How to Make Wreath SUPER Fast: A Dollar Store Hack
Here’s a super fast and easy way to make wreath: no need for floral wreath forms and fancy supplies…
We are going to transform a dollar store laundry basket into 2 wreath makers, which can be used again and again to make wreath from natural or artificial elements!
Today we will make two wreaths – a flower wreath and a kitchen herb wreath, perfect for holidays and gift giving!
UPDATE: thanks to you all for the enthusiasm and wonderful questions!! I have made a checklist of great tips on how to best use this method. See it at the end of the post!
This dollar store hack will enable you to make wreath lightning fast, with just botanical clippings and natural jute twine .
*Some resources in article are affiliate links. Full disclosure here.
Related article: Make a stunning peony wreath for $15! Another Dollar Store DIY!
Step 1: gather materials from the garden to make wreath
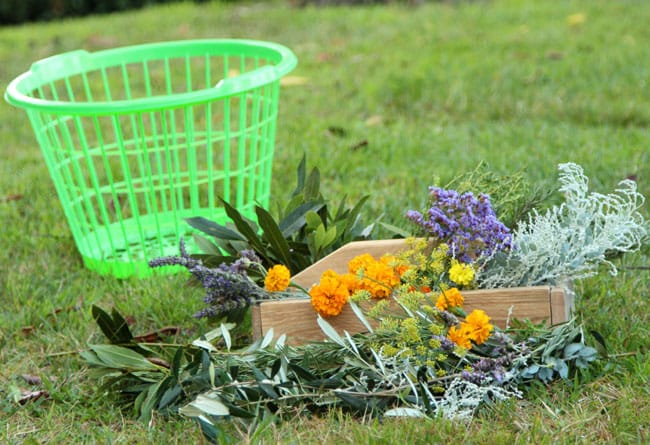
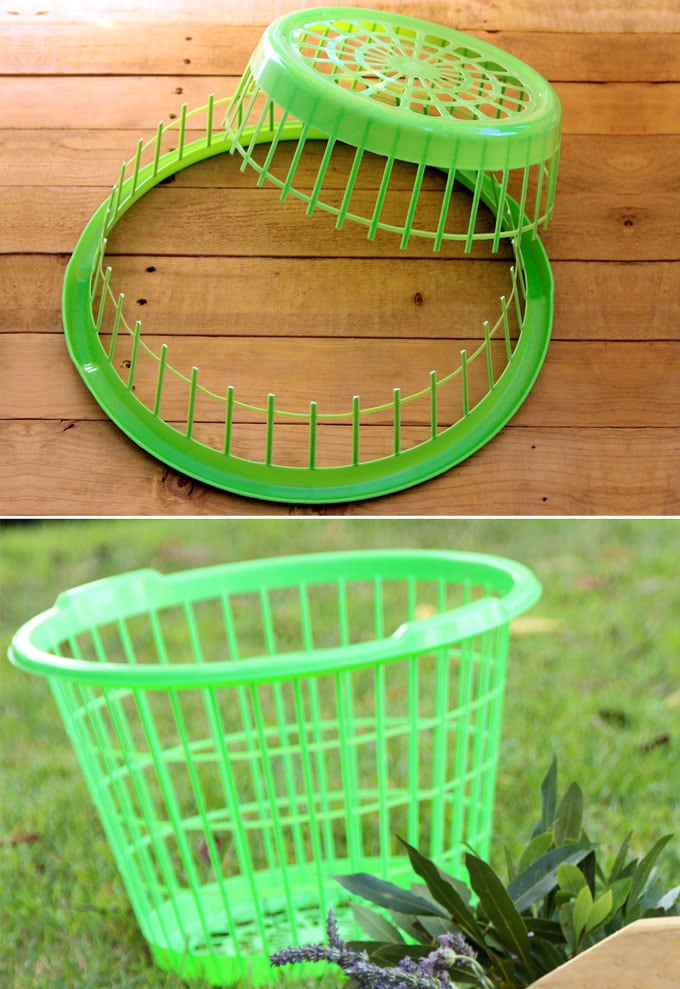
Start with treasures gathered from the garden, and a Dollar Store laundry basket about 15″ in diameter.
Cut the basket like shown above. The top part and bottom part are different in size, which will give us TWO wreath jigs !
Make sure they are each 4″ to 5″ tall, and don’t cut too close to the cross pieces.
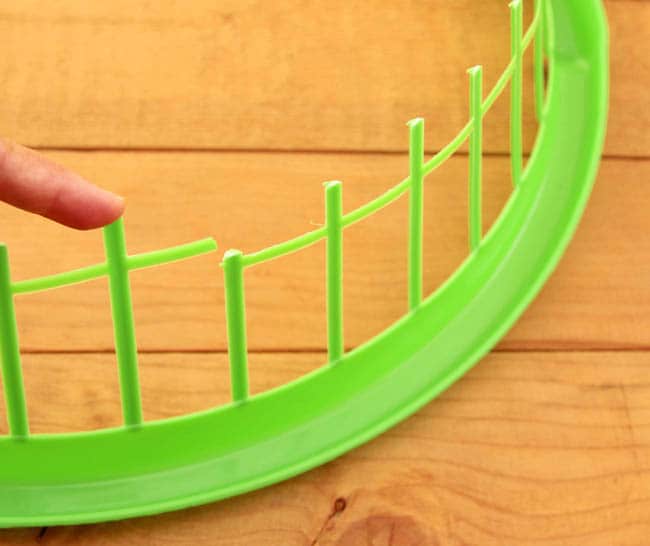
If you do, like I did in my very first cut, you will end up with a crack. What a great start!
Well, I realized it quickly, and taped this area. So place your cuts at least 1/2″ away from the crossing areas!
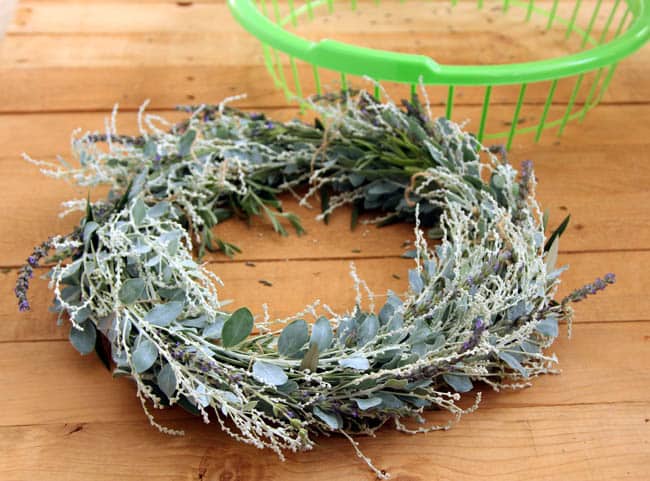
Step 2: Arrange the first few cuttings
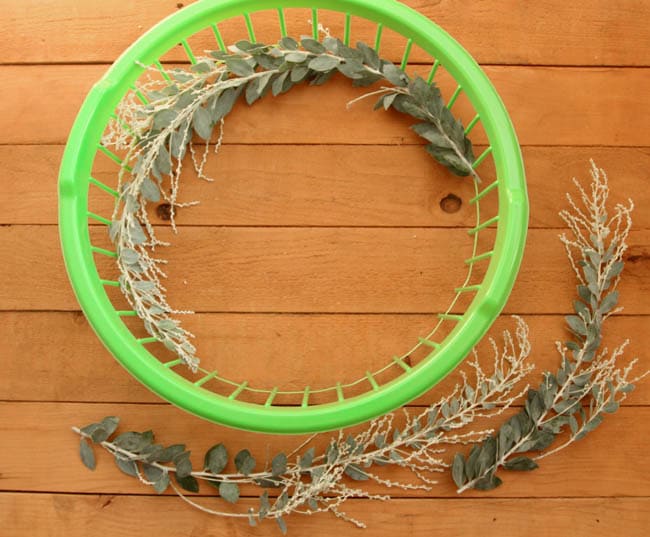
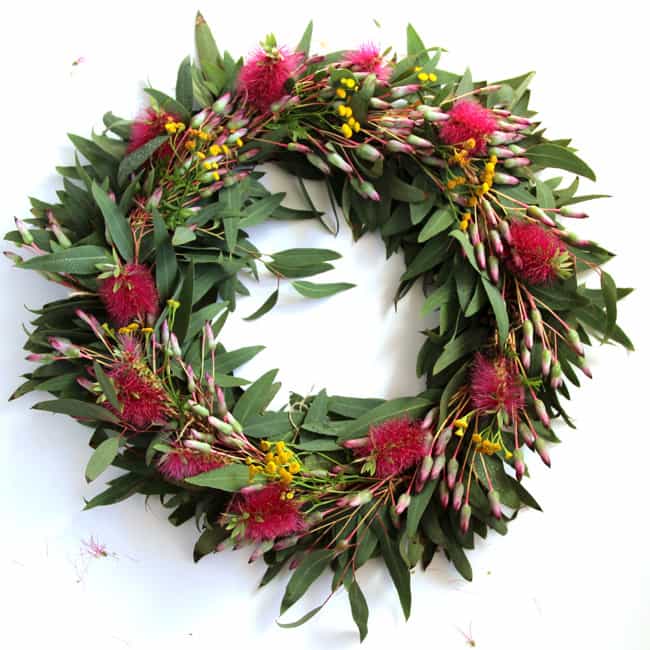
For the flower wreath, start with branches that are sturdy but still pliable for the bottom layer, such as the Acacia and Olive branches here.
Tip: make cutting long enough to go at least 1/3 to 1/2 of the basket, so the wreath is more sturdy later!
Place the cuttings one stem at a time inside the basket ring until you have about 4 layers as a base.
Keep changing the starting points as you go around the circle.
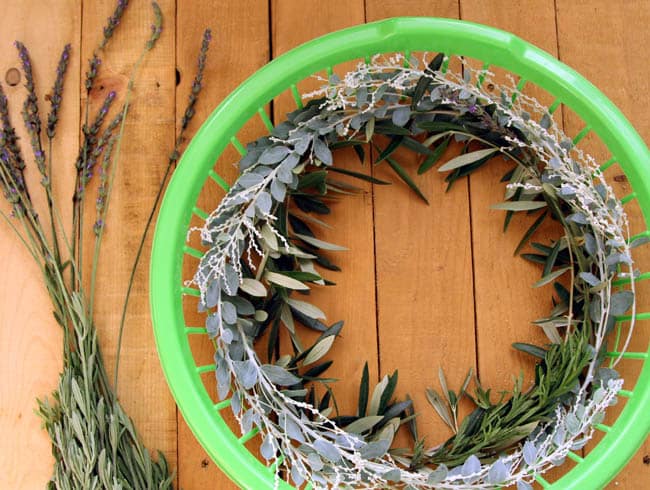
Next layer some softer plant clippings such as lavender for more colors and texture.
Step 3: Tie the cuttings to make wreath
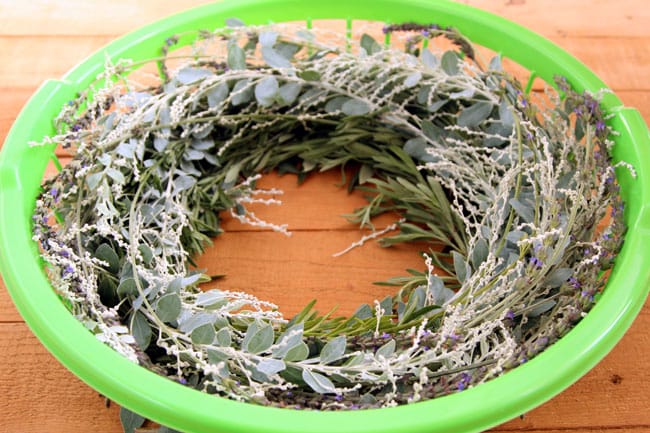
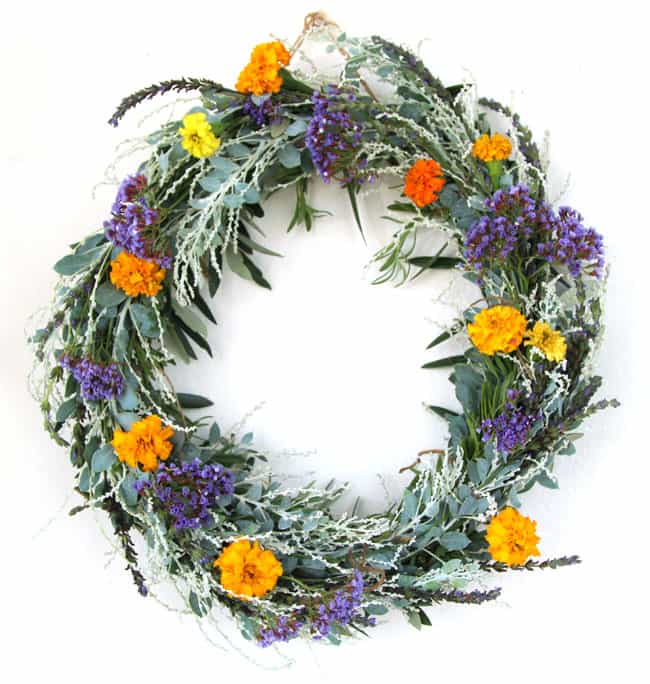
Once the layers are thick enough, we will tie the wreath and add some more flowers as highlights!
Cut 8 to 10 pieces of natural jute twine at 12″ long each. Find 8 to 10 equally spaced points around the circle, tie each piece around all layers of the wreath, leaving some of the tips of the cuttings loose for a natural look.


Tuck in a few bright colored flowers for some attractive finishing touches. I used Marigolds and Limoniums here, both will dry really pretty too!
Final touch, wrap another longer piece of natural jute twine around a point on the wreath, and tie a loop for hanging.

Doesn’t it make you just so happy?
Important tip: Make the wreath really full and tie the knots tight. Because as the cuttings dry, the wreath will shrink a bit.
Part 2: Make kitchen herb wreath. Continue to next page
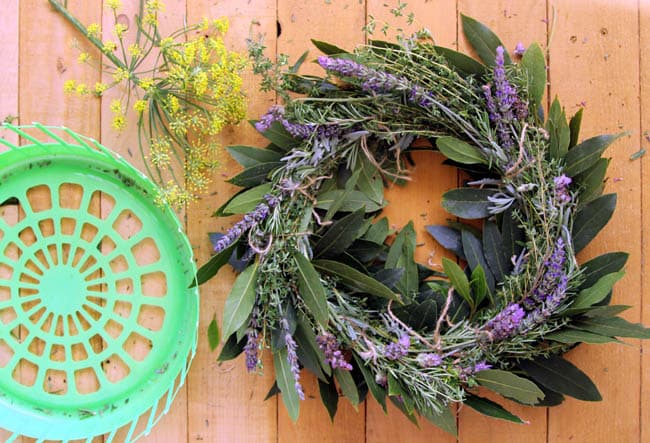
Make wreath that is both pretty and useful: a kitchen herb wreath!
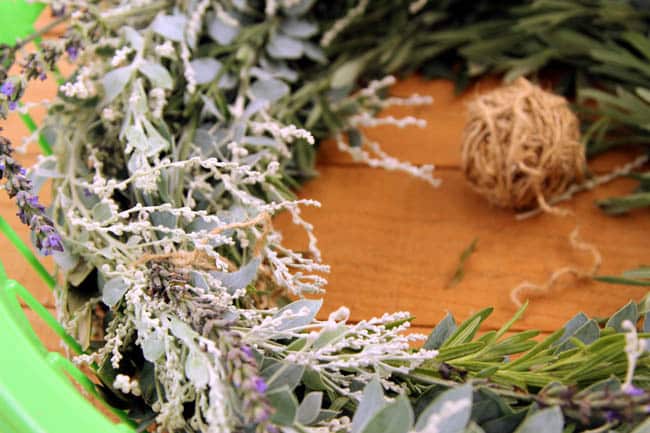
The steps are similar to the flower wreath, except we are using all herbs!
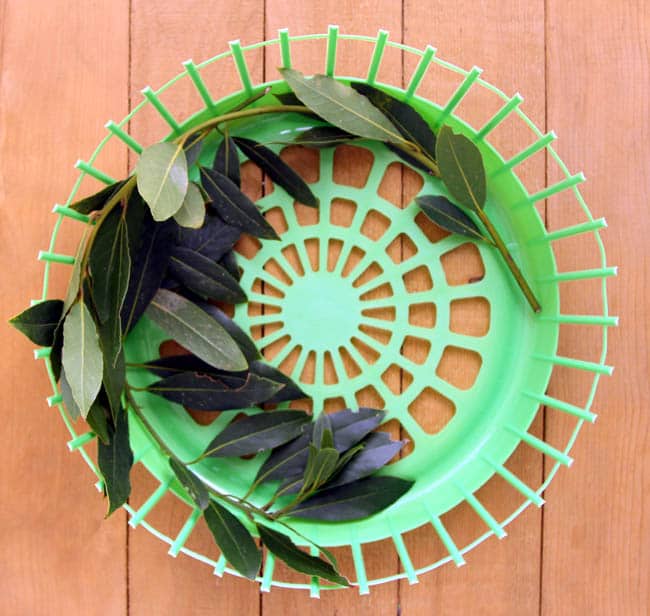
I started with bay, then rosemary.
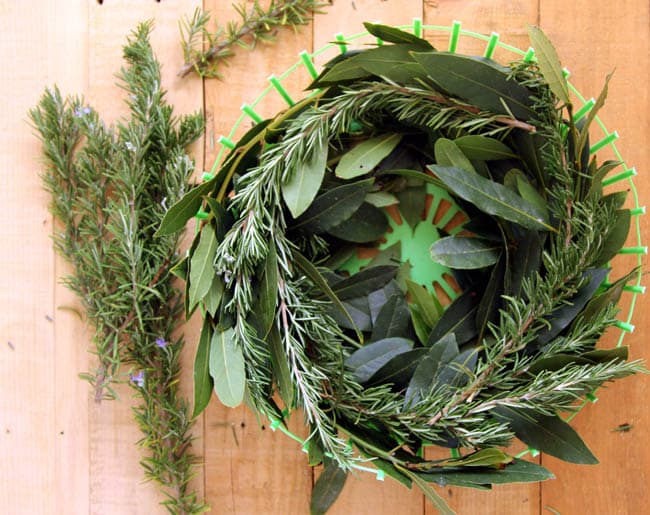
Next, add thyme and lavender.

Tie the knots using natural jute twine , and tuck in some dill blossoms and seed heads as final touches.

Seed heads make everything extra dreamy, don’t they?
Now the checklist of tips on how to make great wreaths with this method:
- use thick layers – 4 to 6 layers at least – of flexible branches, starting at different points. They are the keys to hold the shape nicely
- the dried wreath can be used like grapevine wreath forms for future wreaths!
- experiment with different types of flowers to see which ones dry beautifully
- make sure the cuttings are free of too much water drops, so when we tie the knots, moisture does not get trapped inside
- avoid plants that are know to be harmful, such as Oleanders
- make several hanging points around the circle and rotate the wreath as it is hanging to dry. It will dry into a more natural look.
Shall we keep the wreaths or give them away as gifts?
Luckily, we can do both because they are so easy to make, with our wreath jigs that you can re-use again and agin!
Update: Ever since this post, I have discovered so many awesome wreath materials from nature! Another wreath post coming soon!
…………………………………………………………………………………………………………….
Some more nature fun projects you may love:
Amazing living structures you can make too!

Make botanical ice luminaries!

How to make a fresh Christmas wreath easily!
How to make a fresh Christmas wreath easily!
Happy creating


Hi;I just want to take a moment of your time to tell you I enjoy a peice of the rainbow so much. Just love everthing about it. Thanks for all the ideas,ect.
thank you so much Becky! really appreciate your kind words, and hope you come back and visit from time to time! 🙂
Thanks for sharing this idea. How long does the wreath last once it dried outz especially the flowers? Would you have a pic of any dried out you could share?
Thanks 😊
hi maya! this kind of wreaths can last for a few months or more, depending on the type of herbs and flowers used. if you use flowers like lavender or camomile, they last longer. i don’t have any photos of dried harvest wreaths, but it’s a great idea to add to my project list! 🙂
Great idea! Love it! <3
Just love all of the great items posted. Will try several of them since I already do a lot of crafting.
These are lovely! May I ask, where do you source all of your natural materials? I am interested in offering this as a class where I work but would need a large quantity of the herbs.
hi sarah, mine is mostly from our garden and neighborhood. perhaps ask your students to each bring some cuttings or talk to local landscapers about getting yard trimmings?
i love your wreaths, they are beautiful. I have one problem. I know how to tie them but not on the basket. Do you tie them through the squares of the basket? How may times do you tie them? Thank you for sharing your wreaths with us, can’t wait to see what you come up with next.
hi chris,yes i tie them through the squares of the basket (not on the basket), and there are about 8 ties around the entire wreath circle, but you can add more! =)
Wasn’t going to read directions after so many wreaths from dollar store baskets, glad I did ’cause yours hit it out of the park! Absolutely the prettiest one I’ve seen. Thank you!
thank you barb for your kind words! =)
I have a tree filled with red berries. I’m going to make a wreath tomorrow, using a broken plastic laundry basket. Glad I saved it. I just knew that I would eventually repurpose it! Thanks!
I was going to make a wreath with berries but I have a cat. I looked it up to see if it was poisonous to cats and it was so I had replace the real berries for fake ones. Turned out great
Absolutely amazing. Thank you for your hard work in making these delightful wreaths.
I am just trying my hand at making wreaths. I cut some wild flowers? weeds? plumes? That is the problem. I do not know what they are called. The tall weed that has a light tan , feather looking plume??? I thought I could just hang it upside down and it would dry. Well it did dry and I sprayed them with aqua net hairspray. But it did not keep them from falling apart. I would appreciate any information given on how or where to find information about drying things to use for many projects.
Hi debby! some plants, flowers and seed heads dry without falling apart, some are way more fragile. experiment with everything you can find and there will be keepers! 🙂
I’ve made wreaths from various items, but never thought to use a circular laundry basket as a guide for forming a perfect wreath. What an amazing idea! I’m in the process of using the heart wire frame that was the initial wreath form (used for the wreath to make the heart floral wreath) for my sisters memorial service. I kept the form after removing the flowers (once dried) to reuse and recreate future wreaths. Of course I preserved those beautiful flowers that if I so choose, can be reused in anther wreath to enjoy in her memory.. You just gave me the coolest idea to recreate another wreath. Thank you!
hi janet, thank you! 🙂 you might want to check out the most recent wreath under diy here, it’s an improvement on this one! 🙂
I love this! Any ideas to use the rest of the basket?
Gee, thank you, I don’t know if I’ll attempt since I don’t follow directions well but you are brilliant! !
I love this idea! I have a farm with an olive orchard and at the end of the rows of trees, we have planted Rosemary! (My favorite scent) I have never had my own home before and now that I do, I’ve been wanting a wreath for the door! You have made my day! I think I can do this!! :D. Thank you so much! xoxo
an olive orchard sounds amazing nancy!! =)
Wow, cheaper than Micheals ideal store!
Thanks you so much!!
Great idea! Love it!
You are very creative! Thank you for sharing this great idea!
You did a beautiful and very professional looking job. I love this ?
I know I must have missed a step…if you tie everything together, how do you get the wreath out of the basket?
hi! the basket is only there to hold the shape, the wreath slides out! =)
Writing from Chicago… wanting to make a wreath and saw this. Gorgeous!!!! Thank you for sharing your talent with all of us.
thanks Dina! =)
love it
Your ideas are inspirational. Can’t wait to see MORE!
thank you Mary! =)
WOW!!!
BRILLIANT! I love this idea so much I’m subscribing to your blog…Thanks for a great idea.
thank you Sylvia! =)
What a great and creative idea. I will most certainly have to try this. Thank you for sharing!
omg great great idea i so stealing ops using your idea keep the ideas coming they help my sometime blank brain getting old and loosing focus
In making the larger wreath. ..is the basket lip closest to the wall// or the base? How do you cover over the plastic lip? Not sure from your photos. Love this!!!!!
hi kim! the basket is only to hold the form, not a part of the wreath. when you tie the knots, only tie the cuttings! =)
Are you saying to slip the wreath out of the plastic form after tying the branches with the cord?
yes!
I wasn’t getting it, but now I understand. I didn’t realize I should take the greenery out! Sorry. Thank you for this great idea. You are so smart
I have the same queries – is the thick top rim cut off or just hidden? They are absolutely brilliant and so professional looking
hi audrey, the basket is only to hold the form, NOT a part of the wreath. when you tie the knots, only tie the cuttings! =) slide the wreath out of the basket, which can be used again and again! =)
Absolutely gorgeous and such a great way to make these – I pinned it!
Thank you for this!! Short of using styrofoam (yuck!) I haven’t been able to figure out how to make a decent wreath! You made that a hellova lot easier for me!!
I seriously heart this idea, and you of course! Not only is it simple, but it’s so GORGEOUS as well. You are so talented my dear. 🙂
My thoughts exactly! Always super smart, earth-loving ideas with whimsical magic and flair! Thank you again and again!
thank you so much to you both, LZ and Christy!! much appreciation and big hugs! =)
Very clever. I hate paying for the foam bases. Can this method be used with silk flowers and greens?
hi carol, yes it works for fake florals too! =)
That’s great. Thank you for the reply.
I have never seen this idea of using the basket for making wreaths. What a smart idea! Those foam wreaths can be so expensive. Love this!
Love your ideas! You are a great creative artist!
Love, love, love this idea but wonder how the wreaths keep their shapes after you take them out of the baskets??
Thanks for sharing!
hi lis! the way we layer the cuttings, tie the knots, and the thickness of the wreath will hold everything in place! =)
Ananda you are a genius. If ever I get an EMPTY laundry basket, I am going to try this.
Woman, you never fail to amaze! Another fantastic AND easy project. Loving this!
Beautiful! I love+++++
have a beautiful night with fragrances lavander and other herbs….
Wow what a creative way to make wreaths! I just spent a fortune on one for our front door, maybe next time I’ll try this instead!
wow what a very creative idea! Love the wreaths, beautiful and the price is great too! Thanks for sharing!
Valerie
what a great idea!! I would have never thought of that! Such a cute wreath!
Well, aren’t you clever!! Great idea! 🙂
Oh my gosh GENIUS!!! These wreathes are seriously gorg. I bet they would be a fortune at a craft fair. I love this idea!!
Super cute and so professional looking! You take great photos.
Very clever and looks simple enough. I have been wanting to do wreaths for the fall and holiday
seasons. Now I might be able to!