DIY Bed Frame & Wood Headboard ($1500 Look for $200!)
How to build beautiful easy DIY bed frame & wood headboard, $1500 look for $200! Best tips & free plans for king, queen & full bedframes!
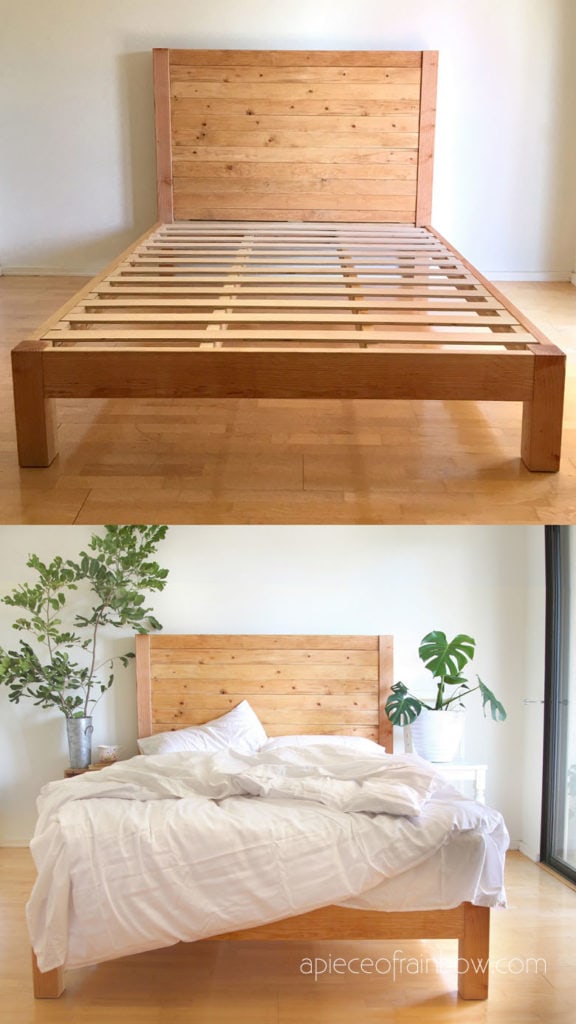
A DIY bed frame sounded so awesome and SO SCARY to me, for a long time. Finally, we did it! This simple DIY wood bed frame is inspired by some of the $1000 – $2000+ beautiful wooden bed frame and platform bed designs from places like West Elm and Pottery Barn which we love.
SO, what does it take? One weekend, $100 ( update: this project was done in 2018, and we got mostly douglas fir. Since then many readers told us they spent $150-$200 in their local store) , and a few simple tools most beginner DIY enthusiasts have!
The detailed DIY bed step by step tutorial will cover:
- how to build a modern bed frame without need for box spring, and is easy to disassemble when moving
- how to adapt the DIY bed frame and headboard free building plan to any size bed ( king bed to twin bed, with or without headboard)
- the best natural finishes for your wood bed frame and headboard. ( Some of the helpful resources are affiliate links. Full disclosure here. )
*Some resources in article are affiliate links. Full disclosure here.
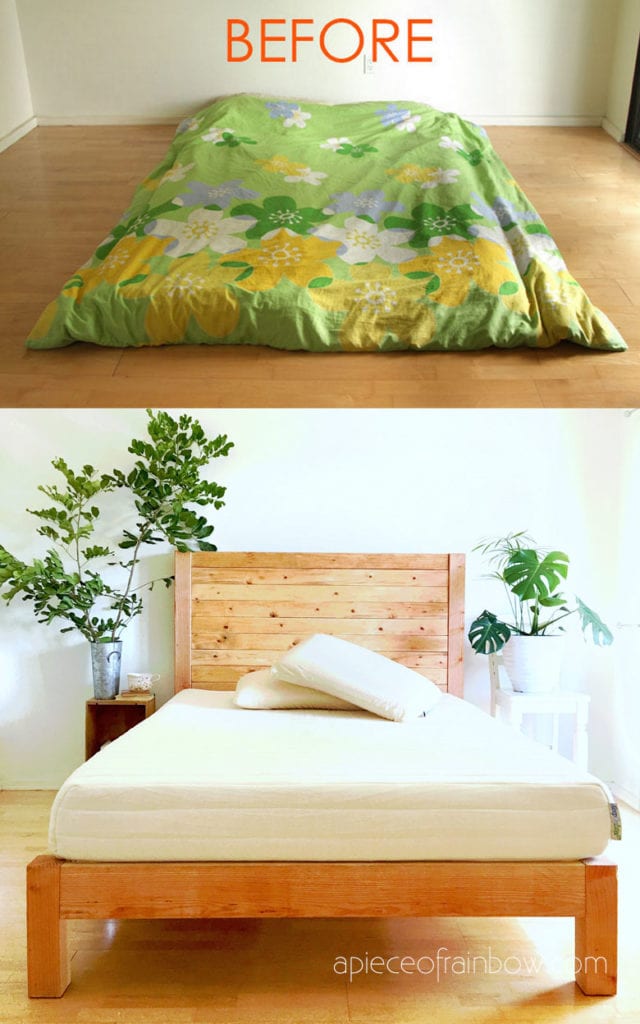
Last summer, inspired by this amazing book: The Life-changing Magic of Tidying Up, we decided to embark on an epic decluttering of everything, the first things we let go of were our huge mattresses and box-springs. Oops! So we just spent an entire year sleeping on the floor.

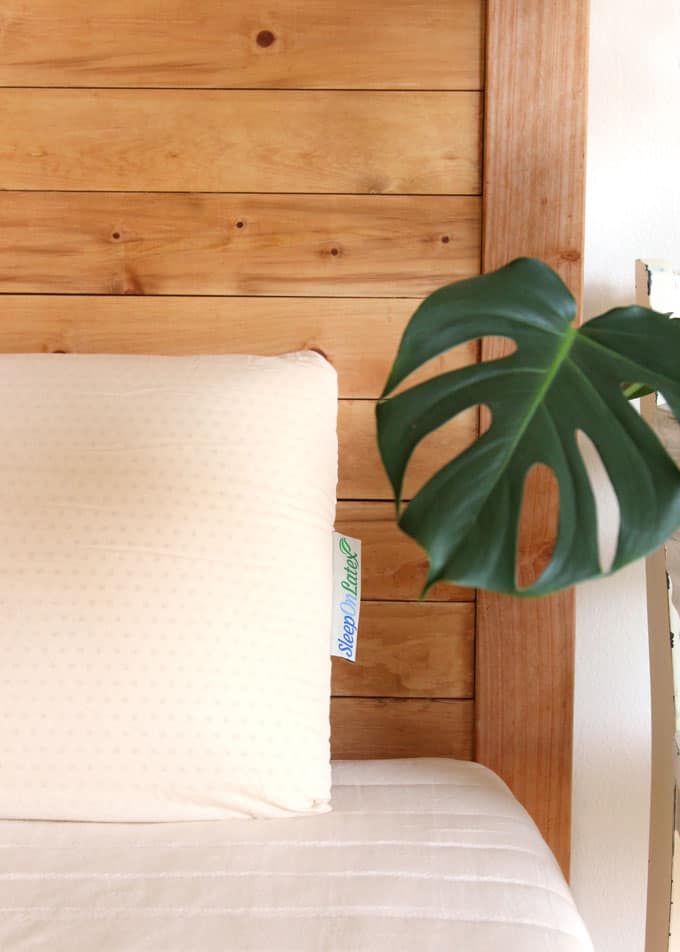
When I shared my DIY bed frame idea with our dream mattress company Sleep On Latex, they generously sent us some amazing gifts to support our DIY project : a heavenly mattress made of 100% natural latex foam, certified organic cotton and organic New Zealand Wool! Plus two luscious latex pillows!
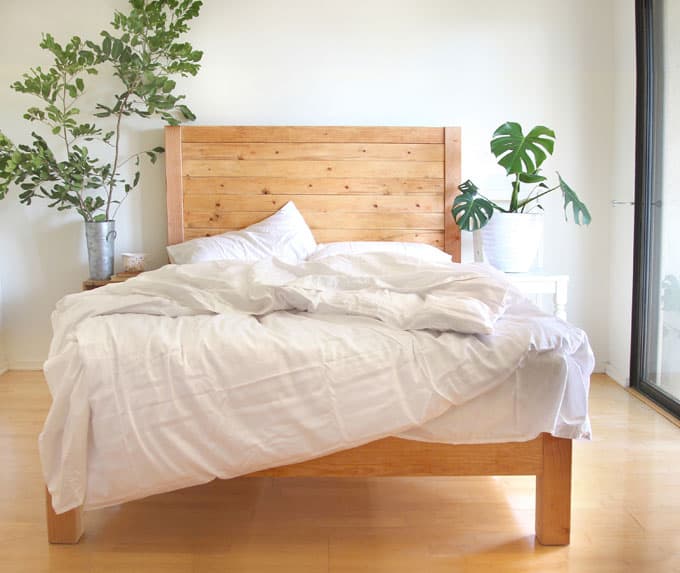
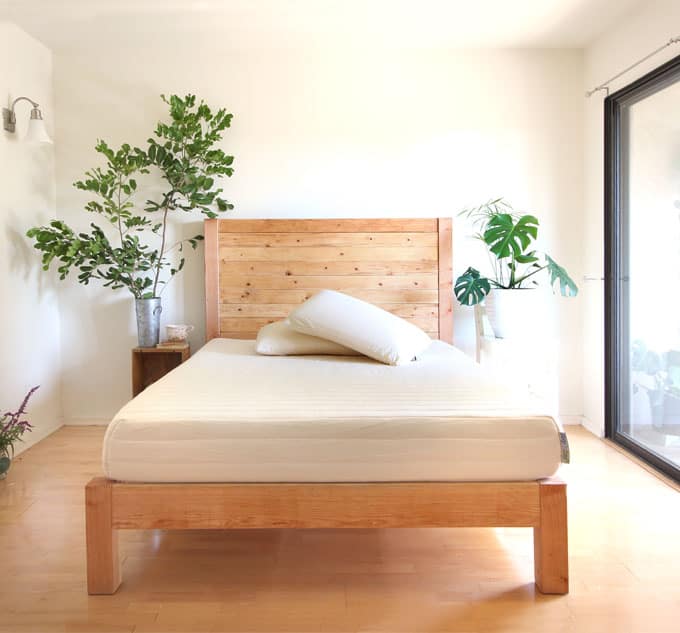
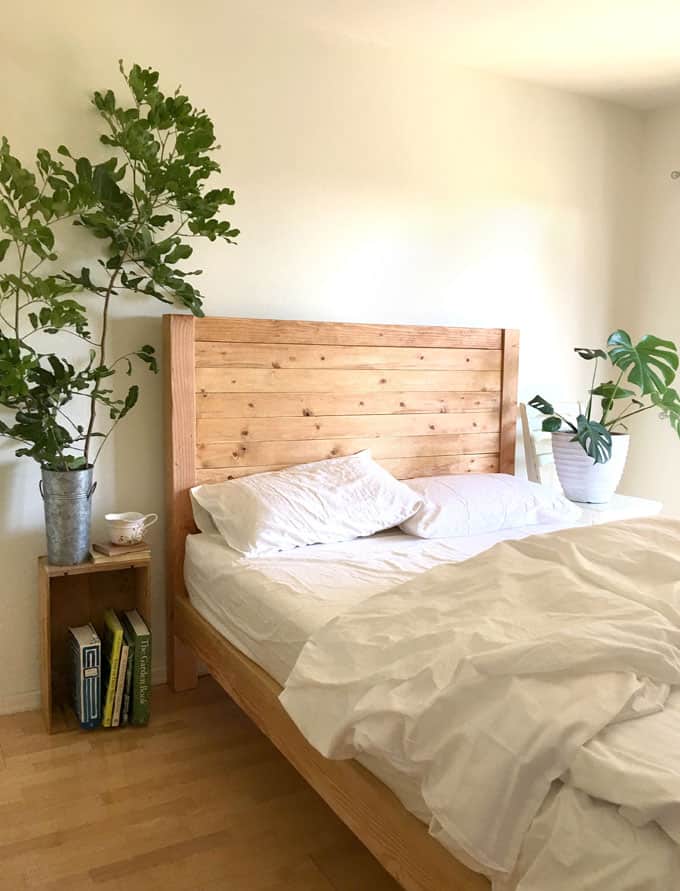
Hubby is always super supportive. This time, he is not only supportive, but beyond excited about how surprisingly easy it was to build this bed and how much he, a born perfectionist, loves our new, sturdy, gorgeous DIY bed! This wooden bed would look beautiful in any home from modern to farmhouse style.
Step 1: Choose the right wood to build a bed frame ( very important!! )
Do NOT use pressure treated lumber, there might be chemicals in them that you don’t want! If you use reclaimed wood, make sure they are clean and safe to use!
To build a wood bed frame that is beautiful and sturdy, we need to choose wood for strength, work-ability and beauty. Select wood with structural integrity, tight grain, small knots , few cup and twist, and no splits.
Knots are very dense, making them hard to drill and cut through. Study the plan to see where the screws are, and select boards with few knots in those areas.
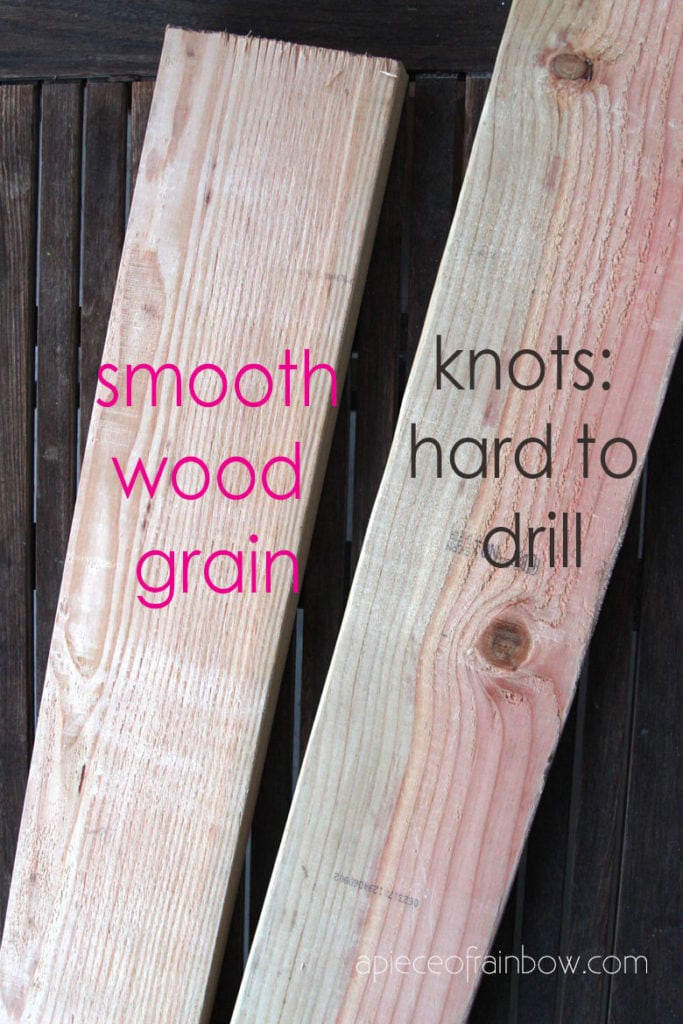
We used Douglas Fir for our DIY wood bed posts and rails. It is a popular structural/construction lumber on the west coast. The wood is very stiff and strong. Southern Yellow Pine / Spruce Fir is also a great choice and popular on the east coast. Other great choices are Poplar, Ash, Oak, Alder, Birch, Cherry, Walnut, and Maple.
If you are using other species of lumber, make sure that the wood is good for structural use. Don’t just base on the name ‘hardwood’ or ‘softwood’. An example about hardwood vs softwood: Doug Fir is a softwood that is super strong, while Basswood, a hardwood, is super soft and will not hold the screws, which means a bed frame that will fall apart!
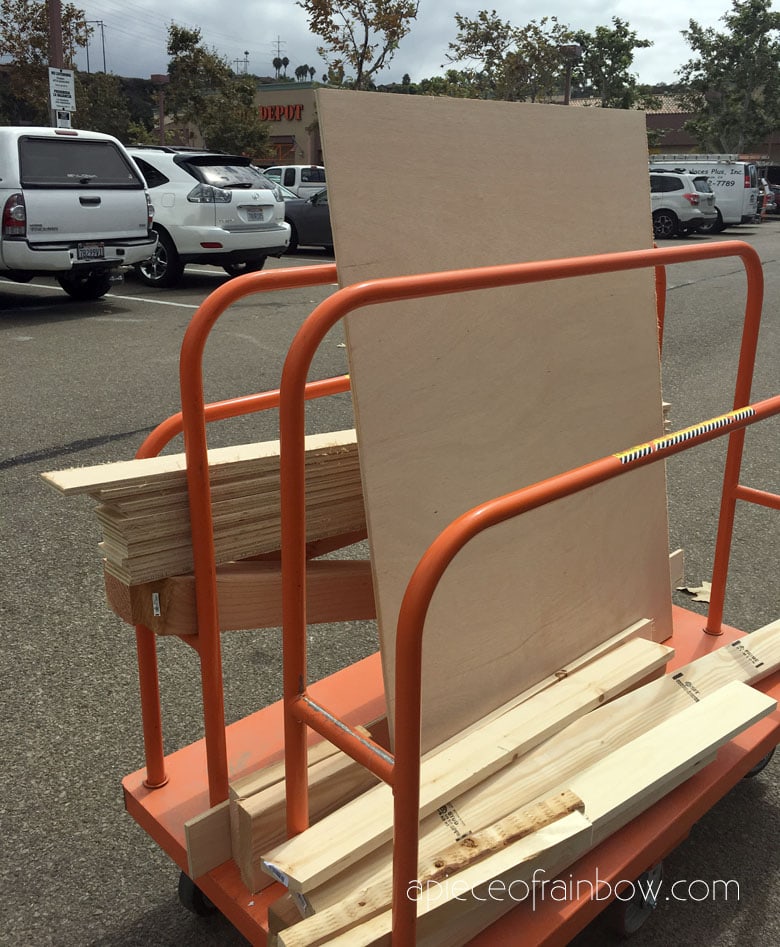
Step 2: gather materials and tools for your bed frame project
When we showed our DIY bed frame plan to a nice Home Depot employee, he got so excited for us, and cut most of the wood for us with great care, which made it so much easier! Take the plans and cut list with you ! 🙂 Some of our resource links are affiliate links, see full disclosure here.
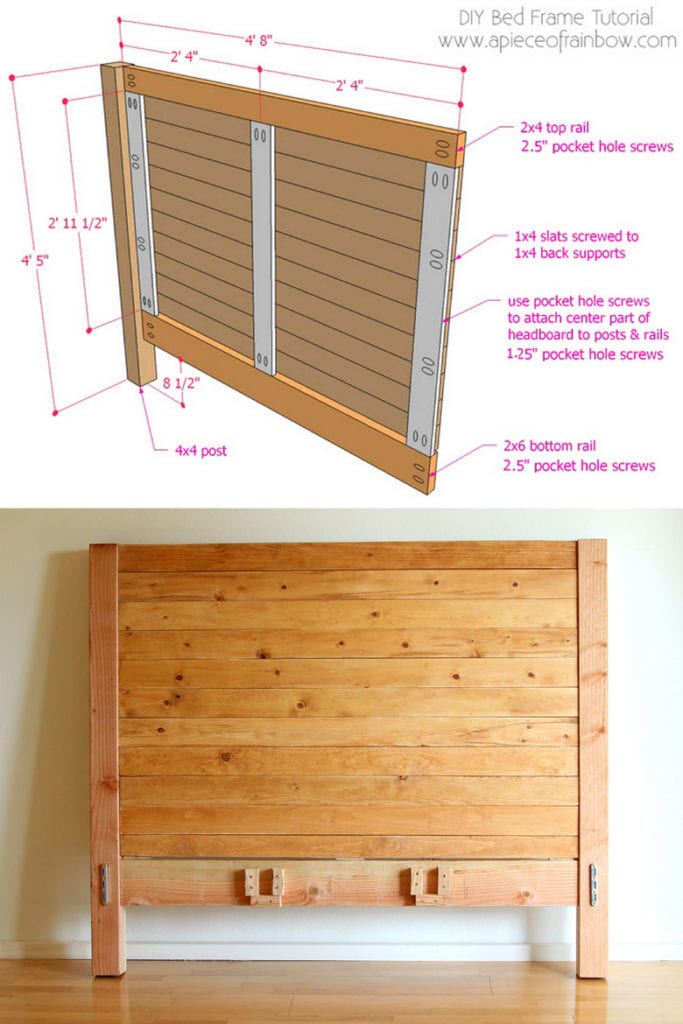
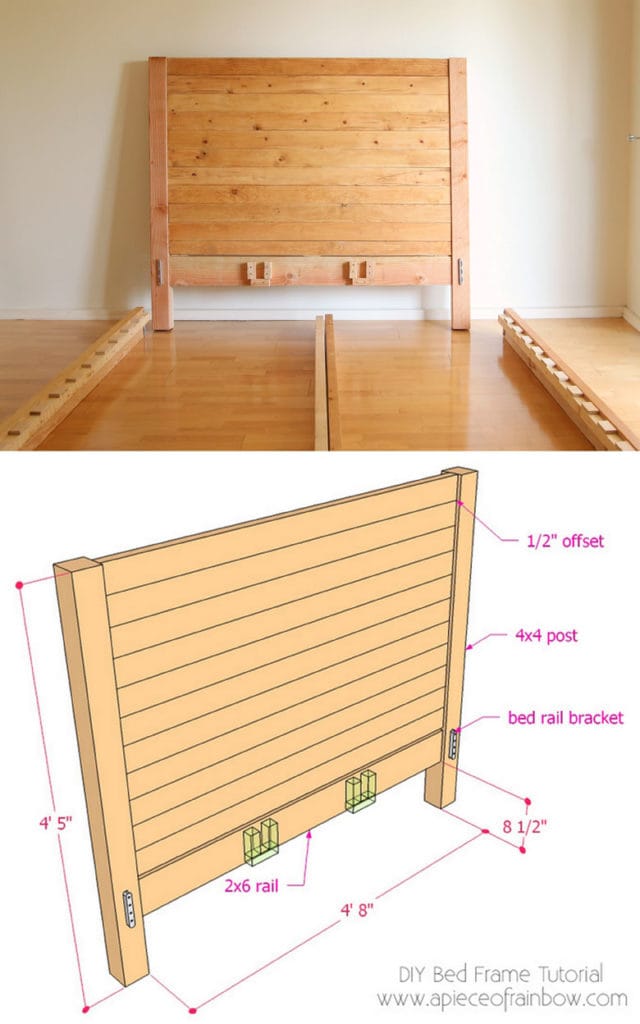
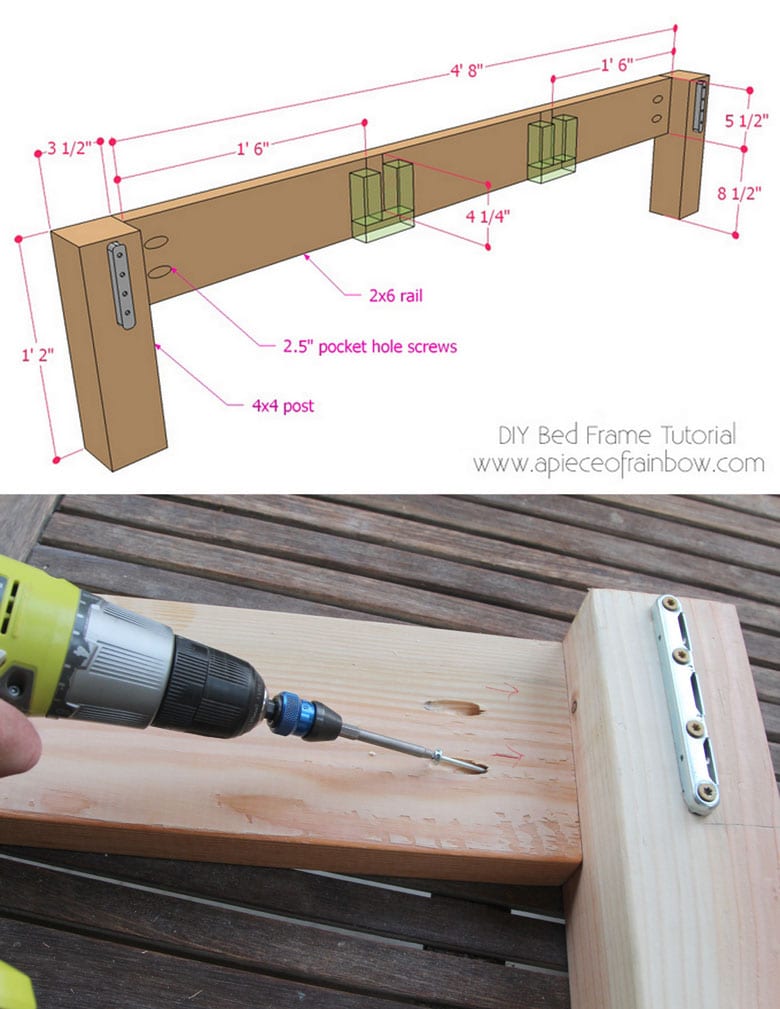
4×4 posts: (2) 4×4 @ 1’2″ L, (2) 4×4 @ 4’6″ L {NOTE: the plans show these two posts on the headboard at 4’5″, but an extra inch gives more flexibility when you layout the headboard} , cut from (1) 4×4 @ 12′
2×6 rails: (2) 2×6 @ 4’8″, (2) 2×6 @ 6’6″, cut from (2) 2×6 @ 12′ ( Some readers asked about using 1×6 or 1×8. They tend to warp, especially at a long length. Look up local lumberyard, they usually carry more varieties than hardware stores! if not, maybe glue 2 pieces of 1x6s instead!
2x4s : (2) 2×4 stringers @ 6’8″, (1) 2×4 @ 4’8 for top of headboard, cut from (1) 2×4 @ 8′, and (1) 2×4 @ 12′
1x4s : (10) 1×4 @ 4’8″, (3) 1×4 @ 2’11.5″, cut from (6) 1×4 @ 10′

Plywood slats and spacers: (14) 3″ wide x 5′ long. We used PureBond 1/2″ thick plywood which is a great quality, formaldehyde-free plywood. The sheet is 4’x8′. Home Depot cut it to 4’x5′ first, then to 3″x5′ slats for us. We cut one of them into smaller spacers later.
Slat supports: (2) 2×2 @ 6’3, cut from (2) 2×2 @ 8′, save the extra to use for stringer supports
Please follow good practices to build safely and smartly. Follow safety guidelines for each tool. Work on a clean level surface, free of clutter or debris. Always use straight boards. Always wear safety goggles and hearing protection. And remember to check for square after each step!
- Kreg Pocket Hole Jig: this one is a good starter Kreg jig, use it with a woodworking clamp, or this bigger set which has a built-in clamp, 1.25″ Pocket Hole screws and 2.5″ Pocket Hole screws
- Bed rail brackets : Our DIY bed frame can be easily assembled or disassembled when moving thanks to these awesome bed rail brackets! They don’t come with instructions, so I have included detailed instructions on how to install these brackets. We used these 2 1/2″ screws ( use with star drill bit) and 1 1/4″ screws to attach the brackets to 4x4s and 2x6s.
- always use deck or structural wood screws that are strong and durable, like these which offer lots of length options. Length of screws should be at least 1/4″ to 1/2″ less than the total thickness of materials you are joining.
- Sand paper : I used 120 grit sand paper for sanding the cut surfaces, and 300 to 400 fine grit sand paper to sand the exposed wood surfaces. Tape measure, combination square, pencils for marking
- drill, circular saw or jig saw, safety goggles, dust mask, hearing protection. Follow safety procedures!!

IMPORTANT: after all the wood is cut, check the pieces together which have the same length: this will ensure our DIY bed frame is square and all the pieces fit nicely. Consistency is more important than numbers!
For example: all the 1x4s on the headboard should be the same length as the two 2x6s on the headboard and foot-board. It is OK if all of them are, let’s say, 1/4″ less than what is written on the plan (this diy platform bed frame is forgiving if you are off by 1/2″ to 1″ ). It is NOT OK if some of them are 1/8″ more, and some are 1/8″ less than the 4’8″ on the plan.

Sand all the cut surfaces and exposed surfaces so the wood is nice and smooth. If you want to paint or stain the wood, now is a good time.
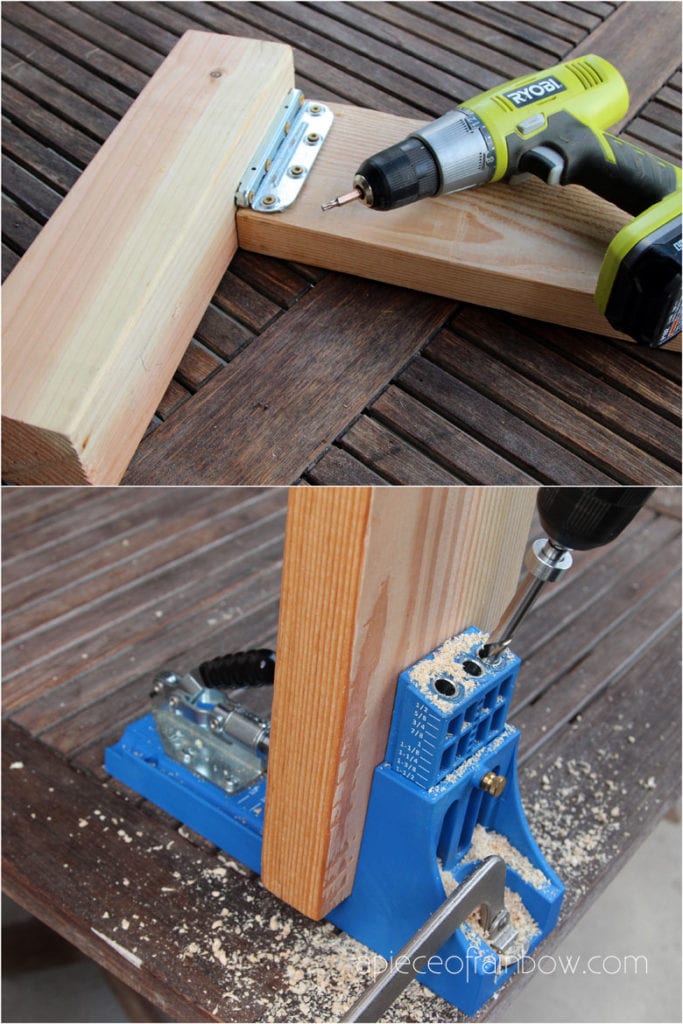
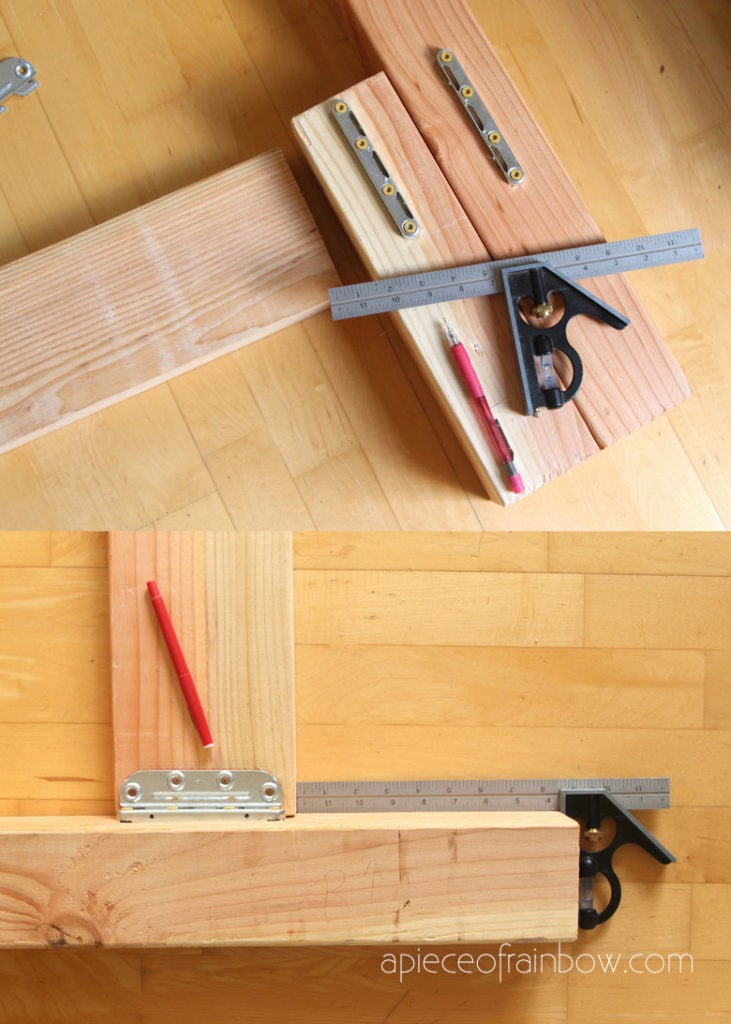
Step 3: How to install bed rail brackets
This important step is not difficult, but it requires patience and accuracy. If you do it right, the rest of the DIY bed frame is super easy! Let’s see how to install bed rail brackets in detail.
These surface mount bed rail brackets come in 4 pairs. The brackets with the slots goes on the 4 bed posts, and the brackets with the “claws” goes on two 2×6 6’6″ long side rails, one on each end.
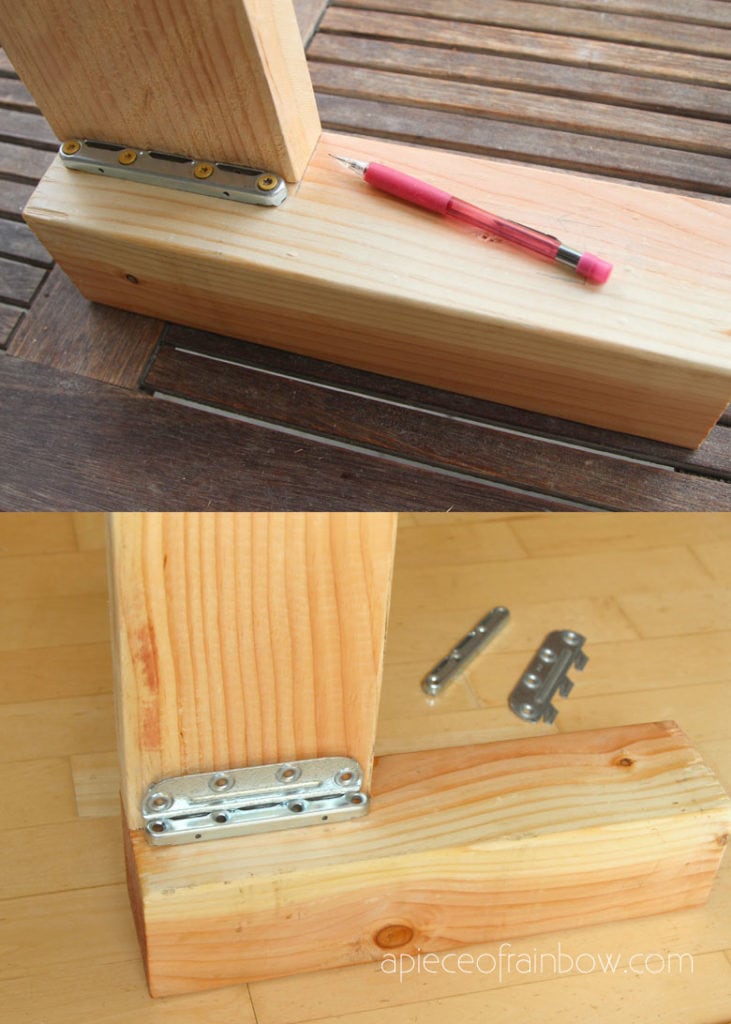
Set a 2×6 rail ( or use a smaller scrap piece of 2×6 ) on a foot-board post, the top of the rail should be flush with the top of the post. The end faces of the rail and post are touching when mounted.
Set the pair of brackets in a locked position onto the post and rail, and mark the outer edges of the brackets and each drill hole carefully.
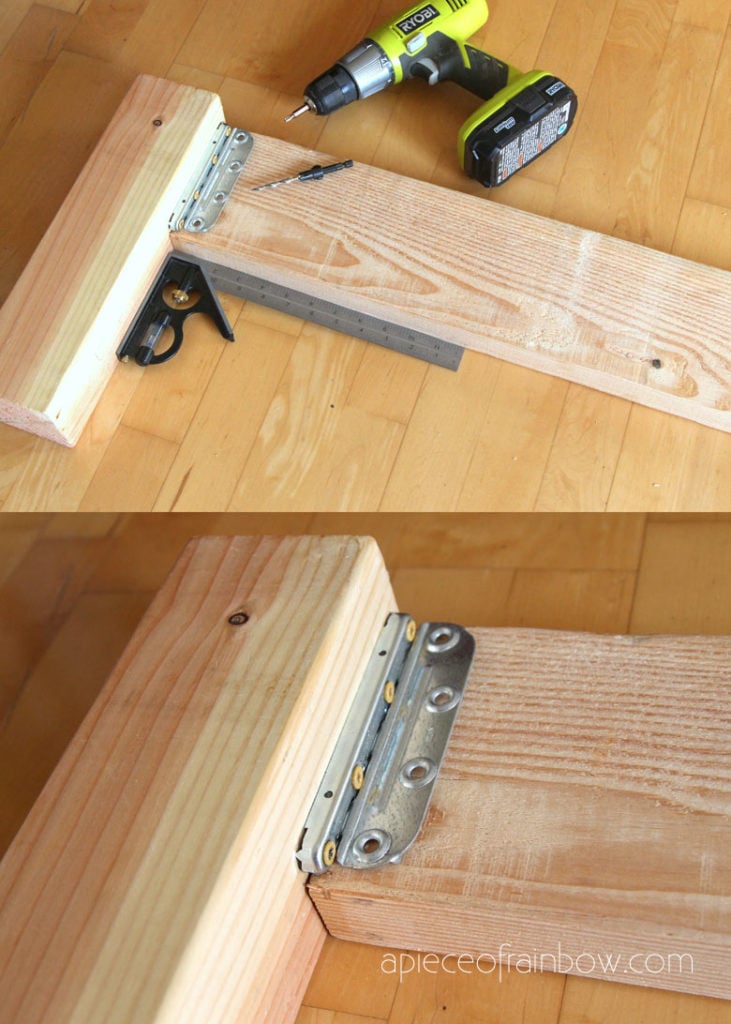
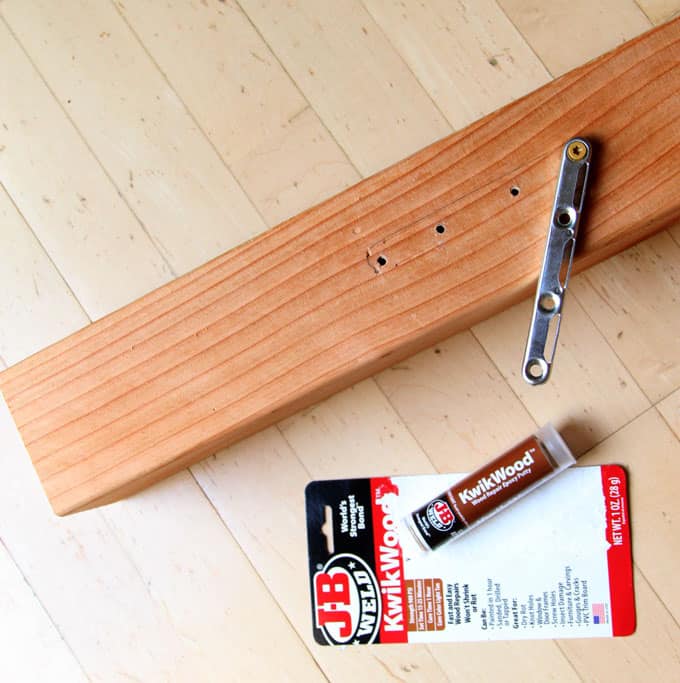
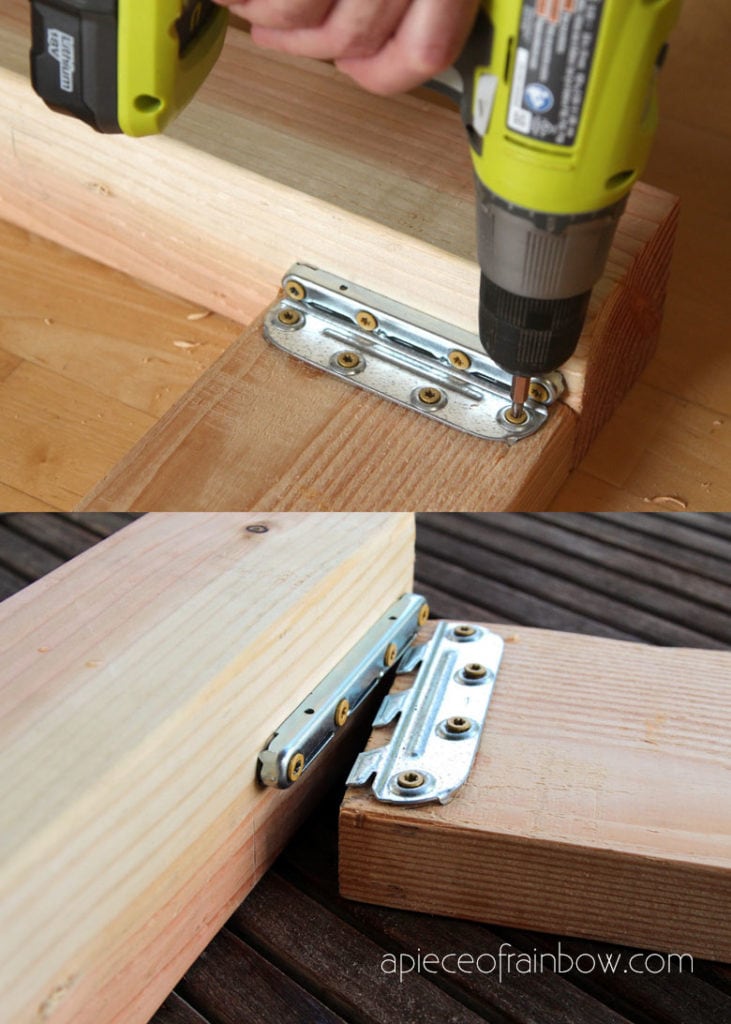
First, pre-drill each marked drill hole, and attach the slot bracket onto the 4×4 post using 2″ to 3″ long screws. If you are off, the rail will not be flush to the post. Remember to keep checking at each step! We used these 2 1/2″ screws ( use with star drill bit) to attach the brackets to the 4x4s.
This happened to us once. We filled the drill holes with JB Weld wood putty and redid it.
Next, attach the “claw” bracket to one end of the rail, check everything is square and flush. We used 1 1/4″ screws to attach the brackets to the 2x6s.
Don’t tighten the screws too much on the “claw” brackets yet. At this stage, we want to easily hook and unhook these brackets. In the final step when we get the brackets hooked together, we will tighten the screws so the bed is rock solid!
Repeat this process until you installed all the brackets. Keep checking to make sure everything is lined up accurately in all dimensions: height, width, and depth.
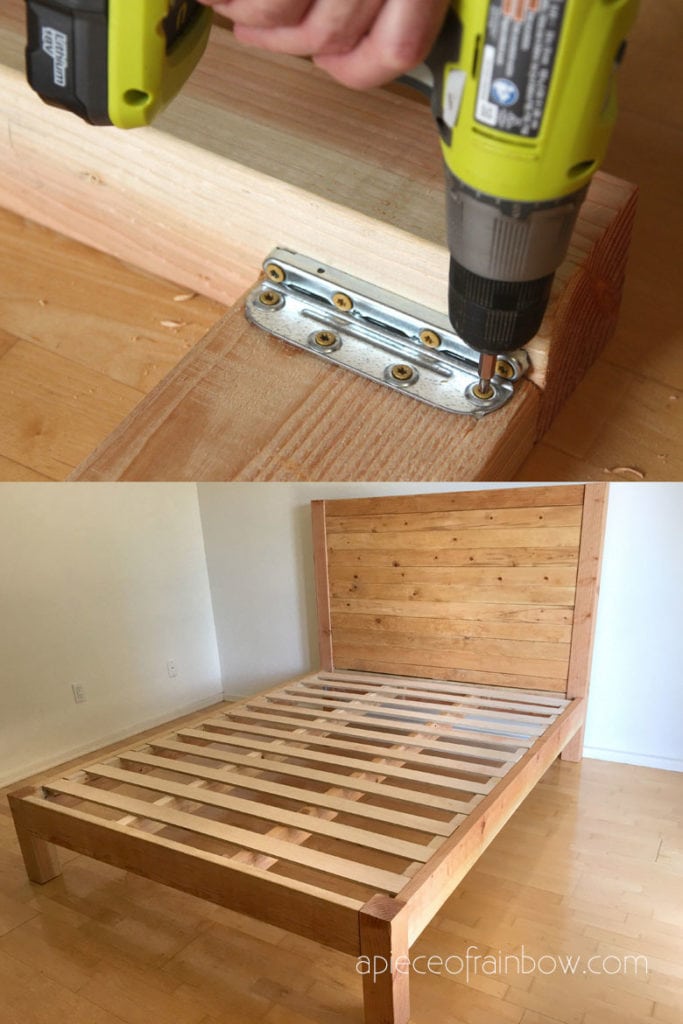
Step 4: build wood bed and headboard
Tip: It is easier to drill all the pocket holes first, then screw the pieces together.
When building the headboard, create the center panel first, then attach it to the posts, and then add 2×4 top piece and 2×6 bottom rail. See diagram below.
The key is to leave a tiny gap (even 1/32″ is enough ) between the 1×4 slats to allow room for wood movement. More about wood movement in the DIY headboard tutorial here
Instead of making this super long tutorial even longer, I have included detailed step-by-step instructions on how to build the center panel, how to check for square, wood movements, plus other helpful tips in this DIY wood headboard tutorial here.
It also includes variations on how to build a wood headboard like this if you already have a bed frame and just want to add a headboard!
For our DIY headboard, I gave the boards a light gold stain to bring the white pine 1x4s closer in color to the Doug Fir posts and rails, using Recipe #7 in this tutorial: Easy Homemade All Natural Wood Stains with 7 Recipes!
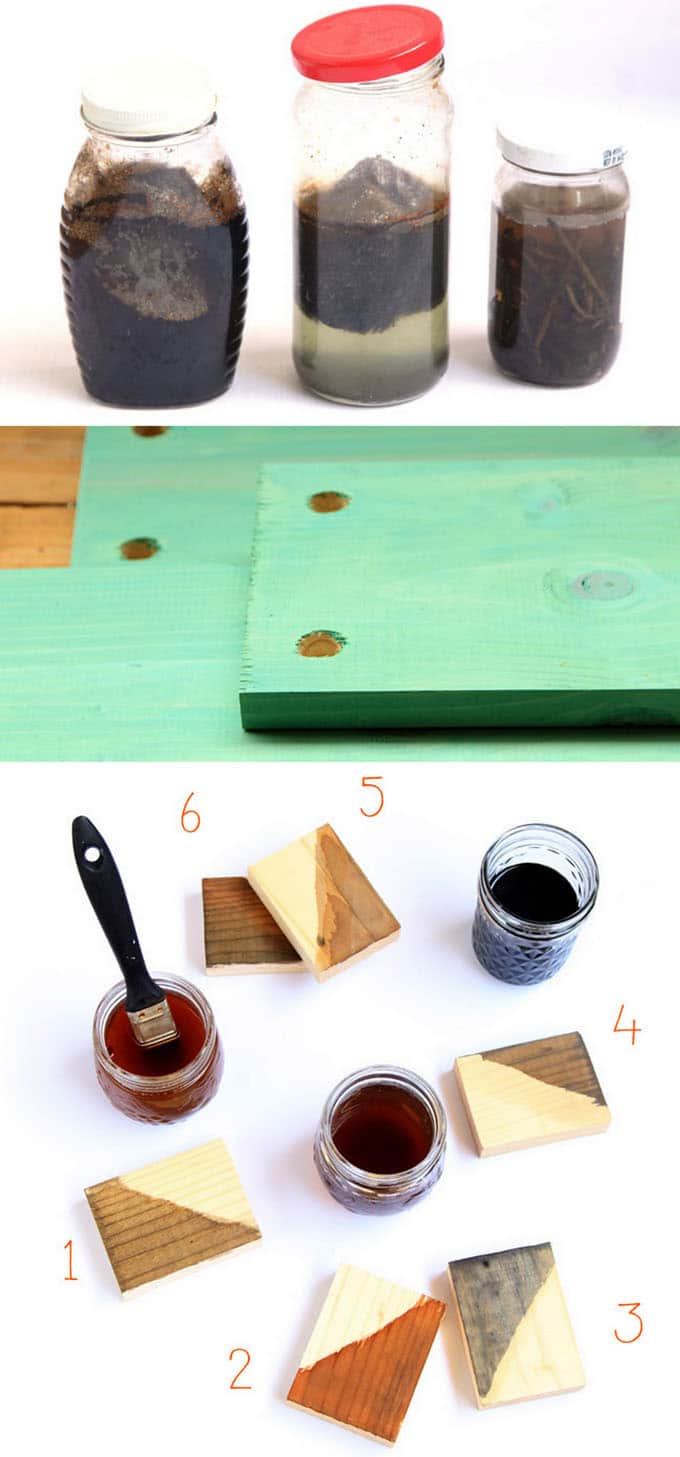
We decided to leave our wood bed frame natural, another good option is a whitewashed wood finish. Here’s a detailed tutorial on how to whitewash wood in 3 simple ways-

To build the footboard, use 2.5″ pocket hole screws to attach the 2×6 to the 4×4 posts, check they are flush at top and on the side that faces out.
Because our goal is to keep this DIY bed frame easy to assemble and disassemble when we move, I design it so the bed slats and supporting 2×4 stringers are held in place by supports and spacers, instead of attached to the bed rails.
The key here is to measure carefully so the bed slats are just 1/4″ below the top of the 2×6 side rails. You can have them flush with the top of the 2×6 side rails, we chose the 1/4″ offset for a cleaner look, and 1/4″ does not affect how the mattress sits on top of the platform bed.
The U-shaped slots for the 2×4 stringers are made from 2x2s, screwed onto the 2×6 rails on the headboard and footboard. The 2x4s just slide sideways into the slots. You can also use 2×4 joist hangers like these. Our reader Dan suggested using BOTH wood glue and strong screws to attach the U channels, because they bear a lot of weight. It’s a great idea!
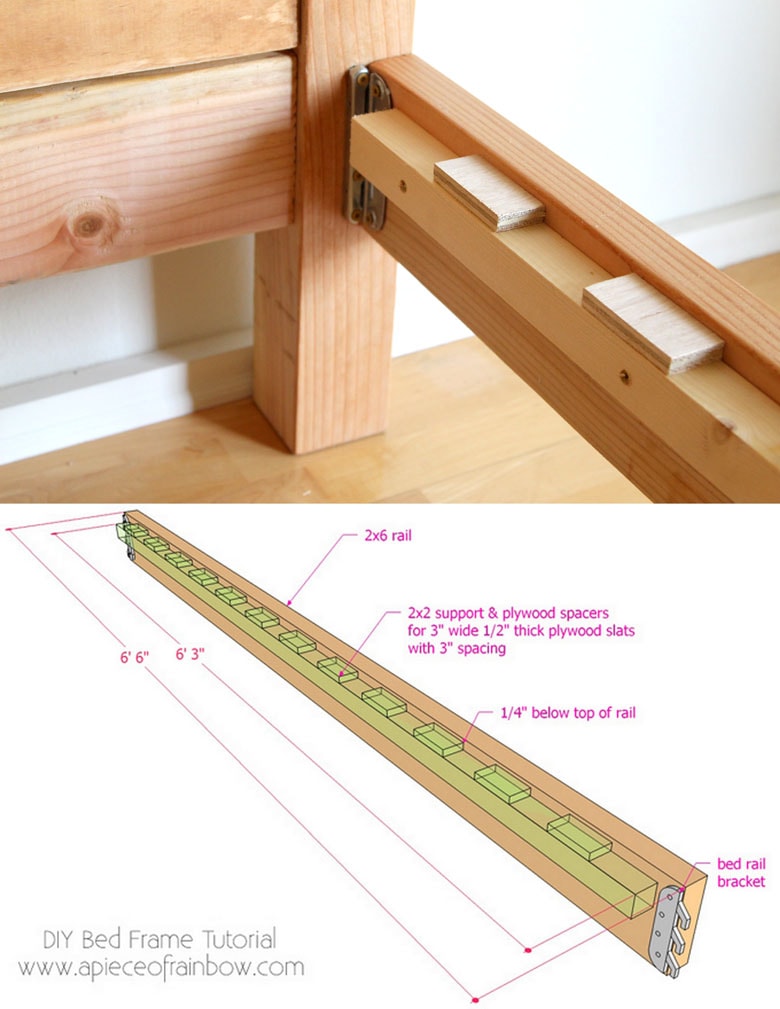
The 3″ wide slats are supported by the 2×4 stringers and 2x2s attached to the side rails with screws. The slats are held in place by 3″ wide spacers cut from one extra slat. The spacers are 3 1/8″ apart for a little wiggle room.
When you glue or screw the spacers onto the 2x2s, line up the two 2×6 side rails, so the spacers are perfectly lined up too. See image above.
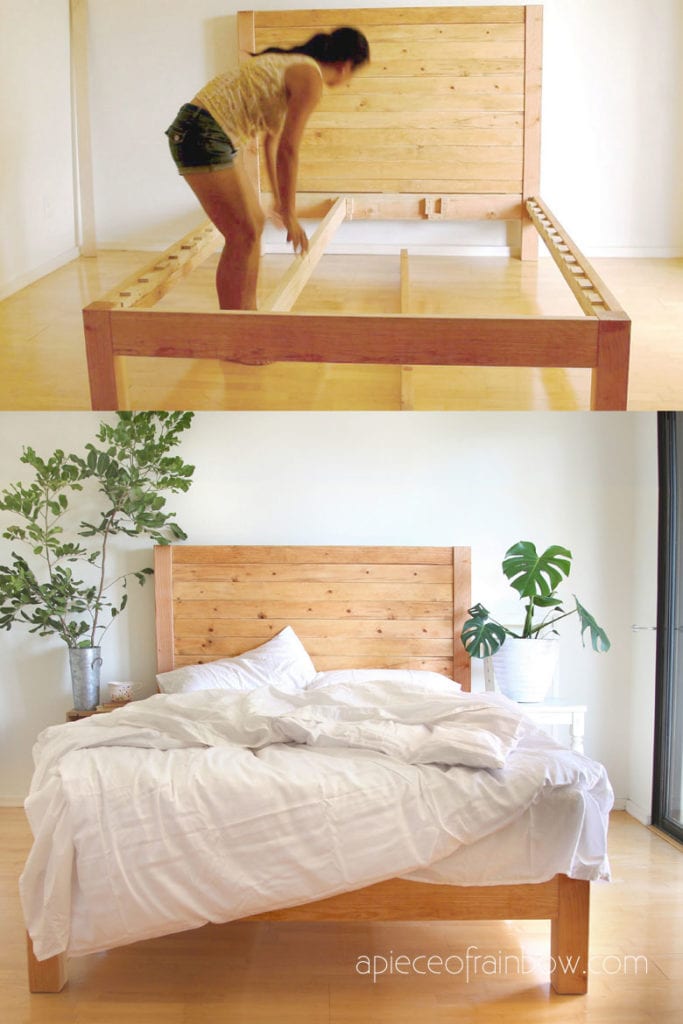
Step 5: assemble the DIY wood bed frame

Time to enjoy the sweet fruit of our labor and assemble our DIY wood bed frame!
First, place the headboard and footboard where you would like the bed to be. Lift the 2×6 side rail and slide the bed rail bracket claws into the slots so they lock in place. Two people can do this pretty easily.
If you have trouble, loosen the screw on the “claw” brackets a little. After the brackets are hooked together, tighten the screws so the bed is sturdy and solid.

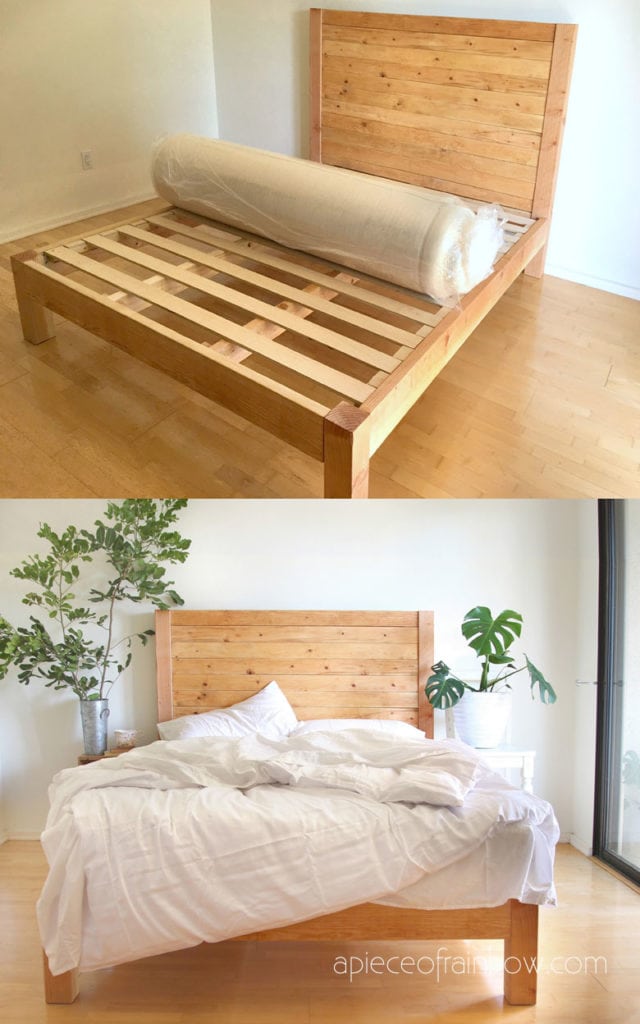
Place the 2×4 stringers sideways into the U-shaped slots on the headboard and footboard. Add the slats. No need for box spring!
Add your favorite mattress and pillows! We LOVE our beautiful mattress made of 100% natural latex foam, organic cotton and wool, and our latex pillows, gifts from Sleep On Latex , a company which has received tons of raving reviews! You can read more about their unique story here.
We can honestly say that when things are made with love and care, they radiate joy into your living spaces. Our bed, mattress and pillows bring smiles to us each day.
Because we are inspired by the amazing book: The Life-changing Magic of Tidying Up, we are adding furniture very slowly and only choosing things that spark joy in us.
We will build night stands or other pieces at some point, but for now, why not get creative with things we already have and love? A wood crate and a white bar stool can hold a few books, a cup of tea, and some lovely plants. Life is perfect.
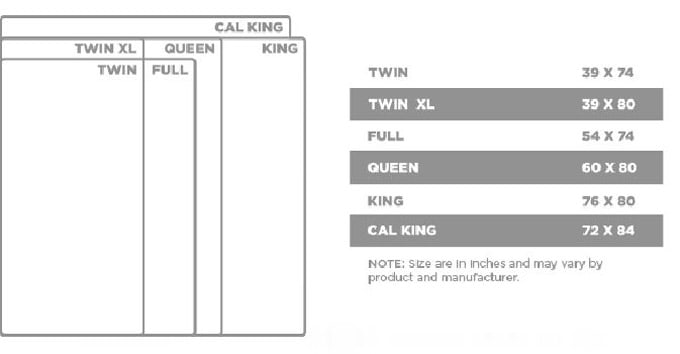
Additional tips: How to adapt this DIY bed frame plan to any size bed, with or without headboard.
This DIY queen bed frame plan can be easily adapted to create other sized beds using the reference chart below.
For example: to build a king size bed frame, just add 16 inches to the length of all the horizontal components: the 1x4s, 2×4 and 2×6 on the headboard, the bed slats, and the 2×6 on the headboard.
To build a twin size bed frame, reduce 21 inches on the length of all the horizontal components: the 1x4s, 2×4 and 2×6 on the headboard, the bed slats, and the 2×6 on the headboard. And reduce 6 inches on the length of the 2×6 side rails and 2×4 stringer ( you only need one stringer because the twin bed is a lot narrower.
To build this DIY bed frame without a headboard, just change the two taller 4×4 posts to the same height as the shorter 4×4 posts, omit everything above, that’s it!
Some of you might be wondering if parts of this wood bed frame can be made from pallets. The answer is yes!
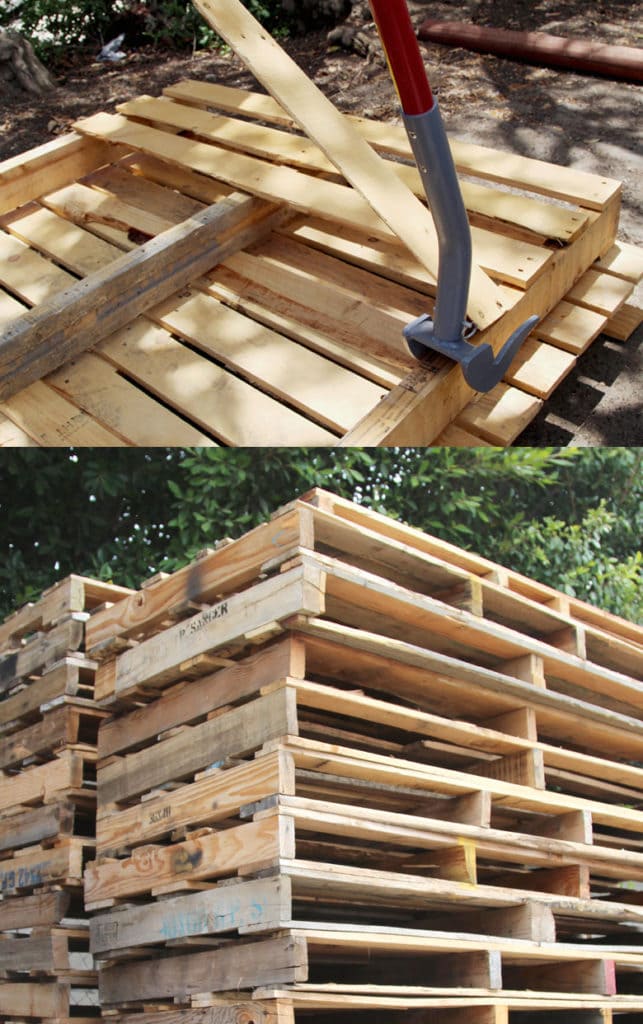
However, not all pallet wood are suitable. Before you start, please check out this detailed guide on where to find and how to work with pallets!
Best natural finishes for your wood bed frame and headboard:
My favorite wood finish is an all natural furniture wax made from bees wax and olive oil. You can get the easy non-toxic wood finish wax recipe here. You can also buy them, these two are both great : a beeswax furniture polish, and a butcher block wood conditioner
I also selected a couple of great DIY bed ideas you can explore – a DIY upholstered bed frame here, an IKEA hack bed frame with storage here, and a pallet bed frame here.
Happy building!


Hello,
I’m in the process of this queen-size build right now, but I’m considering a few modifications. Any thoughts on the following would be welcome:
1. Subbing 2x4s for the 2×2 slat supports for additional strength. Any downsides to this?
2. Using 1x3s for the slats and spacers instead of the plywood. Specifically, what are your thoughts on (a) the comparative strength of 1x3s vs slats from plywood and (b) any complications from additional weight, etc.?
3. Extending the 4×4 posts by 6″ for additional under-bed storage.
Thanks for this great design and instructions!
This looks great! I’m planning out materials for this and seeing 2×2’s are more expensive than 2×4’s. Can I use 2×4’s for the rail/slat supports?
yes you can use 2x4s 🙂
Hello! Looking into making a similar bed frame.
I know most queen bed frames come with center supports with legs that touch the floor beneath the bed. I’m hoping to avoid that (like in your design) so I can make a trundle bed to slide beneath.
Have you noticed any mattress sagging or bowing in the middle of the bed since you don’t have any center supports?
Thanks for your plans! Excited to get building!
hi Peter, no sagging at all, it’s been 3-4 years now 🙂
Hey! Wanted to say a huge thanks for sharing this! I recreated with a couple twists and looks awesome 🙂
I used 1x6s instead of 1x4s for the headboard so shortened the posts by 2” to accommodate. Forgot to replace the 2×4 on top with a 2×6 to keep in consistent but still looks nice. I wish I would have measured the distance for the lower 2×6 from the bottom to match the footboard, instead of making the headboard flush to the top, but not noticeable (just realized when I added the 2×4 joist hangers in and they sat a lot lower on the beam :D)
Used three coats of polyurethane on mine to keep it from scratchin
thank you so much Julia for sharing your variations and ideas! 🙂 enjoy your new DIY bed!
Great plans! Thankful to have found them, just got wood for this project and it was around $260 for mostly pine, and a sheet of birch plywood was about $65
All in all it will make a great frame, thanks the the detailed plans!
thank you Tim! good luck with the build! 🙂
I am very interested in the kreg jig screws used? I have been following every instruction to this point and ripped the wood on my footboard 6×2 using the XL 2&1/2 inch screws. Did you use the kreg jig softwood/plywood screws instead of XL hardwood screws?
hi Jarrett, we just used the standard kreg screws like these- https://amzn.to/3YiCIIc
we never had an issue with the wood splitting. maybe double check the depth when you pre-drill wood with the jig. sometime if the hole is too close to the corner of the wood, or if it’s too deep, the wood can split. 🙂
I’m trying to figure out how you built this for $100? the plywood you listed alone cost $79!!!!! at home depot. I live in washington state doubt the price is much differnt in California. so please enlighten me . I just can’t stand misleading titles and if you are promoting products shouldnt you be more accurate in your claims of what the project will cost? sounds too good to be true? it always is! nice project but NOT $100!!!
hi jennifer! when we built this bed in 2018, the plywood we used were like $30, the 8ft 2x4s and 2x6s were around $3 – $6. maybe wood prices have changed since the pandemic. but it was definitely under $100 when we bought everything that day, and we even had a really nice store associate cutting some big piece for us!
I love this frame and headboard and my granddaughter would like me to build it for her, so I am wondering if you have all the detailed build pieces in the post in a single document that I can download. I am happy to pay for the plans also.
hi Terry, thank you so much! we don’t have any paid plans on this site, but you can save all the images and text to print out. happy building! 🙂
Hello! I’m just trying to understand the headboard and having a little trouble, I see the 10 1×4 slats being used but somehow fitting in 2’11.5” worth of space? Wouldn’t 10 4” boards with breathing room be more than 40” ? I am looking at your plans and I can count 10 boards on your headboard, but I’m trying to make a list to buy wood and a bit confused haha
hi! did you count the top one which is actually a 2×4, and the bottom one which is a 2×6? also there’s a flexible size small gap between the bottom 1×4 and 2×6. 🙂
Made this gorgeous bed for my daughter (full size). I white washed the backboard slats and painted the rest white. She was so happy with the final product and so was I! Beautiful piece of furniture! Instructions were SO easy to follow, even for adjusting the size of the bed.
thank you so much Rebecca! so nice to hear about your happy experience! the whitewashed wood bed sounds beautiful! 🙂
so what were your final dimensions for a full-size bed?
Send me a picture! I’d like to see the finish on the wood
Hi! Can you post the plans for full size conversion🙏🏻 Going to make for my daughter! Thx!
Just Sharing pricing for the hardware and wood for 08/2022
Wood: Menards
Hardware: Amazon
https://i.imgur.com/oLvUEoX.png
King Size Build**
thank you so much Joe for sharing this list! it looks like lumber is much less at our home depot in southern California, even after the pandemic increase. 🙂
I was going to reply the same. That is way too much for 1×4, you can get a 6 pack at Home Depot for $60. Then I noticed the vendor was Amazon… Dude, Joe, do yourself a solid and never get lumber that needs to be delivered. Go to a lumber store so you can inspect each piece for defects, plus its WAY cheaper.
Thank you Joe 😊
I would like to make the frame a bit higher off the ground for a queen size bed. how would you recommend measurements?
hi! just increase the height of each post by an equal amount, that should be it! 🙂
Hi Amanda, thank you for this great design! We are just about done with our king version. The toughest part for me, surprisingly, has been finding the right stain for the Douglas fir and the pine that will look similar and won’t pull to much red/orange! Douglas fir pulls red/orange tones and I’ve read applying a white stain first and then staining with a color that has green undertones will eliminate the red/orange tones – however I haven’t had much luck with that method. I know you decided to go natural with yours, but I’m wondering if you’ve stained other pieces of Douglas fir and if you have any tips on how to get those red/orange tones out and also any recommendations on stains that will be similar in color on Douglas and pine (or if any other commenters might!) Thank you!
hi KC! sorry i have been away for a week! 🙂 i haven’t used stain that much because i always like light colors in wood. i would find a cool brownish (toward gray) color stain so the reddish tones would be muted. i think if you use a darker stain, and use more coats on the pine, you should achieve similar colors. maybe test it on some scrap piece first. 🙂
Hey KC. How much did all the wood to build the King bed end up costing you?
Hey! I know I’m a little late to the game on this one, but I was wondering if you had any suggestions on how to add a canopy on to this design (for a king size bed)?
hi Juliana! the easiest way would be to extend the four 4×4 posts to the height you want, and attach curtain rods, wood dowel, or 2x2s in between the posts towards the top.
Thanks so much for sharing your design! It looks like if I make this without the headboard, I should decrease the length by about 3 inches since the mattress will be sitting atop the 4×4 at the head (and the foot) of the frame. The directions indicate that there is no change to the dimensions if not using the headboard.
hi KT, yes you are correct! although the bed would then be a platform bed, and a couple of extra inches would not be a bad thing either! 🙂
I made the frame in queen size this weekend, and I absolutely love it! I stained with 1:1 (volume) instant coffee and water, one coat, then a coat of wipe-on poly. I did shorten the length to make the frame without the headboard, then I attached my old headboard to the posts. I used the 2×4 joist hangers and made the slats from 1×3 boards (15 total, I think), hot-glued the spacers then nailed each with a finishing nail. Thank you so much for sharing your design!
hi KT! thank you so much for sharing your variations! enjoy the new bed!! 🙂
Hi KT, did you use Douglas fir? I would be so appreciative if you could share a pic with the stain! I made this bed frame last weekend and am having the hardest time finding a stain that won’t pull the red/orange in Douglas fir and will also be similar in color to the pine we used for the headboard. Thanks!
Great job and thank you for sharing this with the world. Would it be possible to share the sketchup file please? I am looking to build a bed, but I want to go for an angled headboard. I think designing it first in sketchup is the right way and even better if I don’t have to start from scratch!
Thanks!
thank you! 🙂 sadly when our previous computer had a bug we lost a lot of original files, including the sketchup file for this! maybe you could just do a very simplified bed frame in SU and just work on the headboard. 🙂
No worries. I actually decided to go with a straight headboard. I did stray from your specs though. I used 2×8 pine for the frame (legs and headboard are still fir). The headboard is shorter. And I used Ikea Skorva midbeam and Luroy slats (which have been great on other Ikea beds) instead of rolling my own – hopefully people here can overlook this sin :D. Here are some pics (hopefully the URL shows up) – https://imgur.com/a/elxGyQ5.
wow your bed looks awesome! thank you so much for sharing! 🙂 happy dreams!!
Thank you for the plans – Bed came out great – we did have an issue about 6 months after we started using it. The bottom piece of “U” channel where the 2×4’s sit broke off partially splitting the footboard 2×6. I would recommend reinforcing that bottom piece of the “U” with a thicker and longer piece of wood and use some wood glue to keep this from happening. I have since fixed it and it still looks great. Thanks.
hi Dan! thank you so much for sharing your experience! i will add a note about gluing the “U” part. it’s a great idea! 🙂
Wow Ananda, you did really great! Years back I hired someone to do the bed frame for me because I don’t know how to do it myself. I’ll definitely bookmark this for my future reference as I am currently planning on doing one. Thanks!
So I built a King version of this over the weekend. The outstanding project is very easy to complete and it looks great in my daughter’s bedroom!
hi Tom! thank you so much for sharing your great experience! it always means a lot to us! 🙂
This turned out so nicely! It almost makes me think I could do it myself.
How do you build this for a full size bed!???
hi! there are tips for plan conversions towards the end of the article. 🙂
Thanks so much for posting! The bed frame looks great, and for a great price.
You said that you used recipe #7 from the tutorial for “staining” the headboard. Recipe #7 from the tutorial appears to be essentially 50% acrylic paint and 50% water. What color acrylic paint did you use for your headboard?
hi Rob! i used a golden brown color i mixed from a brown and a yellow. you can use any brands and mix them, latex paint works too. i just use lots of different brand paints left from various projects! 🙂
Hi Ananda, do you mean acrylic paint, not labeled “for wood”? Any idea which brand or colors? I’m new to this and fear ruining my new project! Thanks for your help!
hi Sarah! acrylic paint is great for unpainted (and some painted) wood surfaces! 🙂 you can use any non-toxic water based paint such as acrylic, latex, chalk paint, etc. i like Sherwin williams latex paint, and acrylic craft paints from DecoArt or Martha Stewart brands you can find at most craft stores! test on some scrap wood to make sure you like it first! 🙂
Hi,
Thanks so much for these instructions. Is there a particular reason you have the 2×4 stringers on edge instead of flat?
Thanks
hi! the 2×4 edge side offers much stronger support than the face side. 🙂
I cannot wait to do it! Thanks for useful sharing!
Hi Ananda – I am very excited to make the bedframe. I went to Home Depot today to scope out materials, and noticed that the plywood labeled “1/2 inch” is really 1/4 inch thick, and the plywood labeled “3/4 inch” is really 1/2 inch thick. Can you tell me which one you used?
Hi Mark! For the slats, 3/8” to 1/2” actual thickness plywood will work great. Happy building! 🙂
This looks like a really sturdy design and even someone like me can follow the instructions! Thanks for adding the download feature as I have saved it and plan on building this bed soon.
Hi Ananda this is really helpful, excited to build this frame! One question for you as I’m thinking about recessing the mattress an additional 1-2 inches so that the frame keeps it a bit more contained. Based on the plans it looks like if I were to drop the slats 1-2 inches the mattress may get stuck on the 4 posts – do you think this would happen and any thoughts on how to adjust the plans so the recess is possible? Thanks!
hi Madeline! the mattress doesn’t shift at all if that’s your main reason for recessing. if you want the look, the easiest way might be to just add a row of 2x2s on top of the 2×6 boards AND the 4×4 posts, kind of like a frame around the mattress. you can use pocket holes to attach the 2x2s to the 2x6s. 🙂
Got it thanks! I think I may try the extra row as I like the look.
Thanks for the tip! One more question- is it possible to use prefabricated slats, like ones from ikea, instead of cutting my own? Thanks again!
hi Madeline! yes you can totally do that, just make sure they are not too short, longer ones can be cut. 🙂
Ananda,
I had the same question. I believe another solution would be to cut out the inside corner of the foot end 4×4’s. The mattress would then sit next to the end 2×6. The cut-out would be close to your metal hangers, but I think it would work. You would then drop your side 2×2 supports and your stringer hangers the same inch or two. Since the front cross piece is on the inside of the 4×4’s, that side would need no cut-out.
hi Mike! so sorry for the very late reply, we lost some comments due to spam bots! yes that could work! i was trying to avoid cutting notched cuts because they take a bit more skill /tools. 🙂
Hi, just a quick thank you. We just finished making this as a king size bed and it looks fantastic. Really appreciate it.
Thank you so much Jarrod for sharing! Enjoy the new bed! 🙂
Hi there!
Great design and thank you for sharing!
Could you confirm these measurements look correct for converting this build into a full size bed frame?
4×4 posts:
1. Cut from (1) 4×4 @ 12′
• (2) 4×4 @ 1’2″ L, (for posts at left and right ends of the bed)
• (2) 4×4 @ 4’6″ L (for posts at right and left side of headboard)
{NOTE: the plans show these two posts on the headboard at 4’5″, but an extra inch gives more flexibility when you layout the headboard}
2×6 rails:
2. Cut from (2) 2×6 @ 12′
• (2) 2×6 @ 4’2″ (for headboard)
• (2) 2×6 @ 6″ (for side rails)
2x4s:
3. cut from (1) 2×4 @ 8’ and
4. cut from (1) 2×4 @ 12′
• (2) 2×4@ 6’2″ (for stringers)
• (1) 2×4 @ 4’2” (for top of headboard)
1x4s:
5. cut from (6) 1×4 @ 10′
• (10) 1×4 @ 4’2″ (headboard)
• (3) 1×4 @ 2’11.5″ (for the back supports)
Plywood slats and spacers:
6. Cut from 1/2 in thick x 4’x8’ Plywood sheet
• (10) ½” thick x 3″ wide @ 4′6” long (slats)
• (18) ½” thick x 2” x 3” (Cut from ½” thick x 3″ wide @ 4′6” long) (Spacers)
Slat and stringer supports:
7. Cut from (2) 2×2 @ 8′
• (2) 2×2 @ 6’3 (slat supports)
• 2×2@ 4 ¼”(stringer supports)
hi Ariel! looks good. happy building! 🙂
Hi Amanda,
Iapologize, I think I made a mistake. Should the slat supports be as follows?:
(2) 2×2 @ 5’9 for a full bed frame (instead of 6’3”) or some other length?
Thank you!
hi Ariel! the 2×2 should be 6’3″ minus 5″, which will be 5’10, 5’9 will work too! they can be 1 or 2 inches shorter but not longer! 🙂
Hello, I’m a little confused by this description “to build a king size bed frame, just add 16 inches to the length of all the horizontal components: the 1x4s, 2×4 and 2×6 on the headboard, the bed slats, and the 2×6 on the headboard.” When you say “all the horizontal components”, does that include the side rails, or just the head and foot boards, 1x4s, and bed slats? If I add 16″ to all the side rails, that would make the side rails on the long side of the bed 7’8″+, which seems excessively long? Thank you for this excellent tutorial! I can’t wait to make it, I just want to make sure I plan my measurements correctly!
hi Adri! it means just the head and foot boards, 1x4s, and bed slats. 🙂 side rails stay the same because king and queen matresses are the same length at 80″ . happy building!
I have a question about the side boards. Is the board that supports the slabs screwed into the side boards straight through?
hi David! they are just a little shorter on each end because of the bed brackets. hope that makes sense! 🙂
HI Amanda,
This bed looks really nice and I am making my list to purchase the materials. I have a question though. How did you do the 1/2″ offset on the center panel of the headboard to the posts? I did not see any instruction on that or did I miss that? Thanks!
hi dave! you can use a couple of the plywood slats (part of the materials list) which is close to 1/2″ to prop the wood slats for the headboard up when building it on a flat surface. hope that makes sense! and have fun building!! 🙂
Thank you and sorry about the misspelling of your name. I do have another question, what screws did you use to attach the 1×4 back supports to the 1×4 slats and also for the bed rail fastners?
Thanks again!
Dave
hi Dave! we used 1 1/4″ typical wood screws for the 1x4s, and these for the brackets (need star bit) – https://amzn.to/2QX2pQc
Thanks so much for the quick replies!
hi Dave! sorry just missed something: you also need the smaller 1.25″ for the brackets & 2x6s https://amzn.to/3voZCxZ , the longer ones are for 4×4 posts. 🙂
Hi, wondering if you could build the headboard in king size, without the stain and ship it I will pay you !!! Please
hi Edgar! thank you 🙂 we are just too busy with the blog to make thing for sale, but if you show this post to a local carpenter ( lumber places can usually refer them) i’m sure you can have it made with nice unique wood and save on shipping! 🙂
I love this bed! Can you tell me what the configuration for a full bed would be? Thanks in advance!
hi Rosalyn! thank you! 🙂 we don’t currently have a drawing for full bed, but in the final section we have instructions on how to convert this bed plan easily to other sizes.
Thanks, Amanda! I did see that, but I didn’t see the specific numbers for the full bed. After looking again I figured you’d subtract six inches on the length of all the horizontal components: the 1x4s, 2×4 and 2×6 on the headboard, the bed slats, and the 2×6 on the headboard. And reduce 6 inches on the length of the 2×6 side rails and 2×4 stringer. Is this correct? Thanks, again!
hi Rosalyn! yes that is correct. only the vertical elements stay the same! 🙂
THANK YOU!!!
Hi Ananda,
Do you have a complete list of materials you used for this project (types of screws, etc.) I’m a total beginner and want to make sure I’m buying the right stuff at Home Depot. Thanks in Advance!
hi! in addition to the the materials list in Step 2, always use deck or structural wood screws that are strong and durable, length of screws should be at least 1/4″ to 1/2″ less than the total thickness of materials you are joining. this is a good choice with lots of length options (amazon affiliate) https://amzn.to/3r2funT 🙂
I took a couple of weeks off at the end of last year to make a queen size version of this bed. The details and information on this tutorial are AMAZING.
In true DIY fashion, we made a few modifications to the plan to suit our taste.
– Added a cap to the top of the headboard
– Cut several angles for aesthetics
– used plywood for the base for the mattress
– Recessed the platform down in to the frame by 2 inches
Thank you for taking the time to make such an awesome tutorial and keeping this available to people like me that would have otherwise never have attempted to make a project like this. We love the results!
thank you so much Jeff for your kind words! 🙂 so happy for you!! be proud and enjoy your new bed! 🙂
I know your comment is months old but I’m not very handy but looking to try to make this bed 🙃.
Jeff when you recessed the slats, how did you avoid hotting the corner posts? What adjustments did you make?
Hi. Great plans. I just finished making a king frame and I love it. I did lower the headboard by not using one 1×4 (so I can fit it down the stairs if I ever move), and lowered the headboard posts accordingly. I did add an extra stringer for more support, and I also put 23” supports inside the frame on each corner with the ends cut at 45 degrees so there is no lateral motion to the frame. I stained all of the wood with Minwax Jacobean stain, and love how it turned out. Thanks for sharing this!
hi Aaron! thank you so much for sharing your experience! 🙂 the 23″ supports sounds great! did you use pocket holes or brackets to attach them to the side boards?
Hi Ananda. Kind of crude but the supports were made from extra 2x2s, and I just drilled them right into the rails with 2 inch screws. Again I don’t plan to move anytime soon so I just went with the easiest option at that point. Thanks!
thank you Aaron for sharing your variations! 🙂
Hi there, I wanted to share my experience with making the frame. We made it for a king bed and elected to make it without a headboard. Unfortunately once we sat on the bed the plywood broke underneath!
So we took it apart and I found a more affordable and sturdy way to construct the bed frame using 2×3’s
For starters I cut the each 2×6 2” shorter, the bed frame without a headboard was too big for the mattress
Screwed one 2×3 horizontally to each side boards, 1/2” above the bottom of the board
Attached 7 2×3’s (cut at 74”) which were secured to the side boards via kreg jig. These lay on top the 2×3 mentioned above. I spaced them 11” apart. This replaced the 2×2 and plywood
Finally used the metal 2×4 joist holders to hold 2×3’s instead of 2×4
hi forrest! thank you for sharing your experience! 🙂 lots of people have made this bed without any plywood breaking, did you have 2 2×4 joists? also would the 7 2x3s make it harder to take apart the bed when moving?
Hey, Ananda! This is exactly what I’m looking for! My family and I just moved into a cabin with a loft space, so we need something that’s off the ground for moisture, but not too far or else we won’t have space for our noggins. I’m gonna do some measuring to see; we might need to shorten the posts a wee bit.
My question is if you notice the middle 2x4s at all when you’re laying on them?
We’re going to try to sleep on just a 3″ latex topper instead of a full mattress. I imagine your latex mattress is probably 6″ at least, so a good bit more. How’s it feel?
hi! we don’t feel the 2x4s at all, should be fine for a 3″ topper with slats over the 2x4s 🙂
Awesome. I think we’re gonna do a DIY topper mattress by combining two 3″ toppers from Sleep On Latex. Should save us a few hundos! and I think 6″ is better than 3″ in this case.
Amazing that y’all got a sponsored mattress. That’s super generous of them and good on you for calling on the resources!
Thanks again!
Josh
Thanks so much for posting this detailed tutorial! I’m so psyched to make this and really appreciate all the tips and tricks.
Do you happen to know whether this plan is sturdy enough to also hold a boxspring? I know yours is mattress-only but wasn’t sure if you had a sense of whether it felt strong enough to hold both!
hi gina, yes it is sturdy enough to also hold a boxspring, however, i would drop the level of slats another 2″ lower so the box spring don’t shift, or make the bed posts higher so you don’t need box spring to add heights if that is the reason 🙂
I really appreciate you sharing all the details and great tips in this fabulous DIY bed tutorial!
Did it! Thanks for the plan! Adapted it to a full size bed and I’m thrilled with how it came out!
yay!! congrats and enjoy the new bed!! 🙂
Inspired me much, It make me think about decor my room.
Nice new room, Thank you much!
Hello!! First, thank you so much for sharing your plans for this bed! We made one for ourselves (with a slightly different twist on the headboard) and we LOVE it!! Goes so well with our decor and looks like it should have cost way more than it did!
I do have a question for you. Over time we are dealing with a LOT of squeaking in the joints. I’m not sure if there is a good tip or trick for eliminating that? It squeaks loudly even when we just sit down on it. We also used Douglas fir. At one point, I did take the slats off and took the side rails off to tighten all the screws to see if that would help. So far, nothing we have done has helped with the squeaking. Do you have any ideas for us to try?
Thank you!!
hi Amanda! is this caused by the headboard not tight against the wall because the baseboard push the bed out a bit? if so, you can add a spacer wood piece behind each headboard post so when you lean it’s less stress on the joints.
you can also try wood shims (available at home depot) to make the joints tighter, which would help! 🙂
Ah! So your bed is pushed up against the wall?? We do not have our headboard touching the wall. I have always had my beds before sitting an inch or two from the wall just so that it doesn’t leave marks on the wall. But you are thinking that maybe using the wall as support could help with the squeaking?? Hadn’t considered that, but may have to try it if I can’t figure out anything else to solve this super squeaky bed issue! Thank you! 😊
hi amanda! yes, squeaking always comes from joints, either they are not meeting tightly, or too much stress on them! you can pad the wood a little with felt pads where they touch the wall also. 🙂
How much space is there between the bottom of the bed and the floor? Could you fit those long plastic containers under it for storage?
it’s 8.5″ to get under the rails, with a few extra inches under the bed. 🙂
Hi! I am all done measuring and cutting, getting ready to drill. Any other thoughts on screw type, aside from length, for attaching the brackets?
hi! choose quality screws with good shear strength when you compare similar size screws! 🙂
This DIY bed is great. I like it. Thanks for sharing!
Is it possible to make taller posts for twin size bed? Any limit on height? I would like to upgrade from 14” posts to 21” to make the bed frame higher.
yes you can do that. just keep in mind when the top of mattress is higher than 30″-32″, it may require some climbing into bed 🙂
Can I use a full plywood sheet instead of slats ? Thoughts on that please. I see mixed comments about using plywood sheet vs plywood slats. Thank you!
hi! full sheet can work. we decided on using slats because we don’t want a full sheet to warp, slats are easier to move, also there’s more air circulation for the mattress! 🙂
The bed looks amazing!
Amanda, thank you for the inspiration and all your work to prepare your plans and sharing them! I made some very slight variations to the measurements to accommodate a queen size mattress and then one big change: The headboard is 6′ tall, and the footboard is 37.5″ tall, to allow for a tall greyhound’s kennel beneath the bed. The only big addition was another 2×6 at the bottom of the headboard, and a supporting 2×4 connecting the stringers and this additional 2×6 to deal with any sway from this added height. Does this add a challenge to my son & Daughter in law getting in and out of bed… well, yes. I also added two side panels with bed-lights that hang on each side of the bed with floating shelves, and used the same beetle kill wood as the headboard. I also took your suggestion of a linseed oil/beeswax finish that turned out very well. If you would like a photo of the end result, I’ll send it to you.
hi garry! thank you so much for sharing your experience! 🙂 yes you can send it to our facebook, instagram, or email ananda(at)apieceofrainbow.com , we are always happy to see our readers DIYs!
Can you please share the picture. I am planning something similar for the Floating shelves for the Full bed I am planning for my son. So the picture will be helpful.
Hello, is it possible to make this platform bed without the headboard? I have a carved room divider that I put up flat against the wall as a headboard behind my current bed.
Thanks!
hi Callie, yes you can totally make this platform bed without the headboard, just make all 4 posts the same height! 🙂
Hi Ananda. My wife saw these plans and wanted me to make this bed for us. I bought all the materials at the beginning of COVID, but have just recently made my cuts and am finishing sanding. However, I’m confused about one thing. Considering you put your stringers to the edges of the 4×4, in your drawings it shows the length as 85” (7’1”). Taking out the 3.5” for the back post, that means the length for a mattress is 81.5”. Does this mean the frame sticks out 1.5”? In the same vein, does that mean the width sticks out 3”? I ask because I don’t want any extra wood frame showing or bumping into with my legs/knees. If I had to err, I’d rather err on the frame being a tad smaller than bigger. I ask because I’d like to confirm before I start assembling everything together. Thanks! Enjoying putting this together, as well as all the great questions from everyone!
hi eric! yes the frame is 1.5″ more on the bottom, left, and right side than the mattress, bt it’s really unnoticeable because of the bedding. I don’t think you want it smaller than the mattress- it would not look as nice with the mattress sticking out! 🙂
Love this bed so much! I was wondering if I could get the download for this? Looking for a fun new project this weekend :).
hi carly! just right click and save the drawings or copy the instructions you need. 🙂 there’s isn’t a pdf as of now!
Love the design and can’t wait to build this bed! On the cut list, it shows the height of the headboard 4 x 4 posts as 4’6″; however, on all of the drawings they are shown as 4’5″. Which is correct?
hi courtney! thank you so much for noticing that! the plans show these two posts on the headboard at 4’5″, but an extra inch gives more flexibility when you layout the headboard. i may have mentioned it somewhere but it’s such a long tutorial, i will also add this note in the cut list. thank you so much and happy building!! 🙂
Great design, both simple and elegant. I’m curious about the inside dimensions between the legs. I’m trying to modify for a full size frame, and also have enough room underneath to slide a twin size mattress between the legs. I figure I need 1/2 inch of clearance on both sides – would need 75″ total distance between the front and back legs. Does that make sense?
hi paul! i think a twin mattress is 75″ long, and you meant 76″ distance right? yes that will work, although you can slide the twin mattress diagonally a bit and since a full frame is much wider, you should have no problem 🙂
Hi, very nice guide by the way. I’m planning to build one for my father who suffers from GERD/hiatal hernia/acid reflux. I’ve got basically no woodworking skills. I want to modify the plan so that it becomes an inclined bed frame with 5 degree elevation (length of bed height should be 7″ I believe). I haven’t been able to find plans anywhere but your bed frame is a good starting point. You can google: “The Torr inclined bed frame” to get a better understanding of what I’m trying to build. There is a Facebook group called: “Inclined Bed Therapy Group”. People would be forever grateful if you could make public plans for a solid inclined bed frame.
hi eric, thank you for the suggestion! it looks like all you need to change is to cut the ends of the two long rail at an angle (maybe 5 degrees?). the lumber store or home depot should be able to cut that very accurately for you if you bring our drawings with photos and info on the inclined bed frame! 🙂
Thanks for this tutorial. Just built the frame for a king sized mattress and laying on it for the third night so far. It’s so sturdy and looks so awesome, The instructions were pretty thorough & I didn’t run into any problems. My wife & I are about to move so I’m grateful this design allows me to break it up into 4 pieces (plus the supports). Makes things so easy. Wish I could post pictures on here but not too sure if that’s possible!
thank you so much Trey for sharing! we really need to figure out a way for everyone to share photos here! 🙂 feel free to tag us on instagram or post photos under our pins for now. and good luck with your move!!
I’ve been looking for bed ideas for about 3 years and never came across yous until now. This is the one I plan to build. My only question is where did you find the brackets for the side pieces to the 4×4 post? I’ve looked and cannot seem to find these, I really like the idea of easy moving capable.
So excited to try this build! Would you be able to help me on the measurements for a full. I have tried the math a couple times but I am fairly sure I am doing it wrong. I took off 6 inches from the measurements but saw your reply above about not removing the 6 inches from the verticals and now I have confused myself more. TIA
hi anysa! The Queen is 5 inches longer than the Full, and 6 inches wider, so i would take 5″ off along the length, and 6″ off along the width. Height should be same! 🙂
I had the best time with this project. I am such a dang rookie when it comes to building things. This bed was a kick in the pants fun time for me. My cost for the wood was $75. The challenge and best part was learning how to use the pocket jig. I chose to use pine for my bed. I just had a new home built and have been using the color espresso as my accent color for furniture. So I bravely stained away at each board and watched the wood transform before my eyes. I was smiling from ear to ear with the results. Thank you for the amazing plans and the joy you brought to my new home. My bed looks so rich and professionally done. The dark espresso color just pops and shines!
so happy for you Wayne and congrats on your new home!!! thank you for sharing! feel free to tag us on instagram if you post it! 🙂
How on earth did you get your materials under $100? I just got quoted for white oak, which isn’t even particularly expensive, and for all the materials I need not including plywood, it’d be $2500 at a lumber yard. And they’re the cheapest around here! Poplar, which is the cheapest, would still be over a grand.
so odd! we just got the wood at homedepot, and other readers from different parts of the country seemed to get their wood no problem too.
I just got poplar at Home Depot total was around 450
Hello! I am not a math person at all and I’m really struggling to make the necessary conversions for a California King. My husband is very tall and has to have that extra length the Cal King offers. Is there any way you would convert the measurements for me for a Cal King bed? I don’t know if I’m over thinking it or what but I’m terrified of spending a lot of money on lumber and making measurement errors that leave us with lumber we can’t use…especially with a baby! I would appreciate your help more than you’d know!
I’m having trouble determining the placement of the 2 U-shaped rests for the 2×4’s. Is their location along the 2×6’s arbitrary? Also what is the 4 1/2” on the diagram referring to as it pertains to how “deep” to set them?
hi sam! yes the placement of the 2 U-shaped rests for the 2×4’s along the 2×6’s does not have to be super exact, just around 20″ from each side rail. the 4 1/4” on the diagram is how “deep” to set them so the horizontal slats for the mattress can be level. 🙂
I’m terrible with math. Can I please have all the measurements for a full size bed?
The bed looks amazing! I am currently adapting your plans to my own project using a $15 headboard that I found at the Restore. I have one concern regarding your use of pocket hole joints. I don’t see any problem with the headboard, but with the bed frame itself, I would worry that the joints to the 4×4 posts would fail if any significant weight were applied. I’m addressing this by using joist hangers (shared by another commenter), but I was wondering how yours have held out over the years?
hi mary! our bed is holding up great like day 1! 🙂 we used bed brackets for crucial joints, although pocket hols can be quite strong too. 🙂
We made this bed in 4 days with 0 fights!! Stained it darker and used joist hangers instead of making our own for the 2 x 4s that hold the slats. Since it was a king size we used 4-2x4s Loved this project!
congratulations sarah!! thank you so much for sharing your DIY bed success! 🙂
Thanks for this great tutorial and bed building plans! It goes so well in the room and looks beautiful!
I love this bed plan! Thank you for posting, Did you use sketchup for the plans with measurements in the tutorial?
yes i did! 🙂
Is there a printable link available for the DIY BED FRAME & WOOD HEADBOARD ($1500 LOOK FOR $100!)
hi, right now we just have all the images in the article you can right click and print 🙂
Hi! I have a small Kreg R3 jig, do you know if this will work, or do I Need the one you advertise in the directions? I’m new to the kreg jig, only used it once so I’m still learning! Thanks in advance 🙂
hi karen! yes the small one will work 🙂
What size screws did you use? Is there a material list that includes the hardware?
hi! the screw sizes are different depending on thickness of wood. for example: to join 2x to 2x, you need 2 1/4″ to 2 1/2″ screws. to join 1x to 2x, you need 1 1/4″ to 2″ screws 🙂
very nice job! i love how it looks. it goes so well in the room, and looks super comfortable. i’m so impressed!
The math for adjust to king size doesn’t add up. You are an inch short.
2 x 6 headboard is 4 foot plus 8 inches = 56 inch plus nominal 4 x 4 posts are actual 3.5 each = 7 inches
56 plus 7 plus 16 added to adjust from queen to king is 79 inches.
I think the headboard and foot board need to be 57 inches to make it work to be actual 80 inches.
57 plus 7 plus 16 = 80
Or am I missing something here?
hi patrick! so a queen mattress is 60″ wide by 80″ long, vs a king mattress is 76″ wide by 80″ long. the queen bed frame is 63″ wide to have 3″ extra, the king bed frame would be 79″ wide to have 3″ extra as well. 🙂 does that help?
Yes. Thank you. I’m going to tackle a king without a headboard shortly. Need to round up the HD pocket hole jig and brackets. Do you think the two – 2×4 stringers in the middle should be adequate for a king bed? Maximum weight load would be around 550 worst case. Add a 3rd or is that overkill? Kind of excited to give this a try. I’m not a work worker so I measure twice, cut once. Love the simplicity of this plan,
hi patrick! it should be plenty strong, but feel free to add a 2×4 for peace of mind! 🙂 definitely measure twice or more! happy building!!
such a great DIY bed and headboard tutorial! look forward to build our own.
Hi there, do you have any idea how to change these plans so that I could use 1×6 or 1×8 boards for side rails instead? I would like to just use wood from the hardware store but they don’t seem to carry 2×6 in select S4S boards. They also just have 5/4×4 boards so would it be possible to use those instead of 2x4s? I want to make sure the frame is still strong enough. Thanks!
hi! 1×6 or 1×8 tend to warp, especially at a long length. look up local lumberyard, they usually carry more varieties than hardware stores! if not, maybe glue 2 pieces of 1x6s instead! 🙂
Hi! We’re excited to follow this plan to build bed frames for our master and guest bedrooms. I lean towards a taller bed. Can this be easily adapted to be a bit taller without jeopardizing sturdiness? Thank you!
hi! yes you can totally have taller posts, make sure to use 2×6 sides! 🙂
Does the supply list include the wood needed for the head board or just the bed frame? Do I need to make sure I look at both the supply lists on this link and the head board link?
this one includes the headboard! happy building! 🙂
Is it possible to use 2 x 4 joist hangers to support the 2 x 4 stringers? These are the ones I had in mind https://www.homedepot.com/p/Simpson-Strong-Tie-LUS-ZMAX-Galvanized-Face-Mount-Joist-Hanger-for-2×4-LUS24Z/100375190
hi jessica, yes you can totally use joist hangers! just make sure they don’t stick outside the footboard or headboard.:)
I love your design! I have a question: Do you think the bed would be structurally weaker if I used 1×6 boards for the rails instead of 2×6 boards? I’d like to use poplar, and there isn’t any 2-by poplar stock at my local home centers. I’d use doug fir, but they only have 2x4s, nothing wider.
I’d have to figure out something for the legs because poplar and doug fir 4x4s probably don’t go well together even with a gel stain, but my main concern is with the strength of the frame if I were to use 1×6 poplar boards.
Thanks!
hi jacky! 1×6 may warp because it is a pretty long piece. i would look up local lumber yard, because they have a much wider selection than general home centers, and i am sure there are lumber stores near you. if not, you can “make your own 2×6” by gluing two 1x6s together and clamp them tight for 24 hours. 🙂
Great idea! Thanks very much for replying! I love the bed.
Hanna Norell, if you want the mattress to sit between and below the bed rails, you will not only have to lower the position of the slats, but you will also have to change the dimensions of the bed by about 2 inches in both directions. The plans given are for the outer dimensions of the bed to match the matress, what you will want is for the inner dimensions of the bed to match the matress size.
I’ve looked through your plans, and I didn’t see anywhere in them that you say what size bed your material list is for. Is this a full sized bed or a queen bed? I’m looking to make a queen size. Would I need to adjust the material list?
hi fred, it’s a queen bed, so you are all set! 🙂
Has anyone had success with using a full sheet of plywood instead of slats?
hi joe, you can use a full sheet. it’s just easier to move when using slats, and also a little better circulation but it may not matter. 🙂
Thank you so much.
Thank you for putting so much thought and care into this tutorial and how to deviate; it’s really helped me vector in what I want to do when I build a bed. Do you find that your mattress slips around on your bed frame, or is it held pretty securely?
hi sara, the mattress doesn’t move at all! happy building! 🙂
I made this bed frame last year. Because I could only find a 4x4x10′ for the legs and headboard supports, I shortened the headboard. Painted it with one coat of red latex so the grain shows through. It’s beautiful and even elegant. Now I have to make another bed frame and wanted to try another design, but after fruitless looking, decided to go back to this design. The directions are very specific and that really makes the whole project so easy! Thank you!
thank you so much sarah for sharing your experience! 🙂 happy building!!
So glad I’ve found such awesome instructions here. This is one of the best tutorials on building a bed!
Beautiful and well talented.
So happy we found your plans for this bed! Just recently finished building ours, switching it up a bit with our headboard. LOVING the results! And feeling accomplished for actually building a piece of furniture! 😊
thank you so much Amanda for sharing your experience! so happy for you! 🙂
Wow! As coolly at you it turned out. Bed simply super! Such beds in shops stand from $1000, but I even couldn’t think that it can be made most and for only $100. I just moved to the new apartment and itself should choose quickly furniture so far there do repair and repair system of heating, after all in Philadelphia is cool now. Whether now I will think it is worth buying in shop or it is better to make most. Thanks for the instruction, I will watch further your new ideas.
I cannot figure out how to get the graphics that you used on the box with the oranges. I signed up for your emails, but I feel like I’m just going in a circle looking for the graphics. Thanks for your help.
hi janet, here you go, enjoy1
https://www.apieceofrainbow.com/creative-fun/
Just finished mine! Such a fun way to spend time, I absolutely loved the finish product. Thanks for putting this together, I would have never thought this was something I could do and have it actually turn out well!
yay!! thank you Aliyah for letting us know! enjoy! 🙂
Hi Ananda, what are you using to connect the short side of the bed frame to the posts? Are you gluing the 60″ 2×6 to the posts?
hi tommy, we used pocket holes to attach the. glue would not be strong enoungh, especially on end grain. 🙂
Hi! What color stain did you use? I noticed you posted a link to the diy stains and you said you used recipe #7, but I am a little bit confused because when I went to the page, recipe #7 was a recipe for staining wood colors like blue?
hi brandy, recipe 7 is good for any color. 🙂 i mixed a golden brown color from a yellow and a brown, hope that helps! 🙂
Hi Ananda,
Love the bedrame and headboard, thank you for sharing your design! Do you remember what colors you mixed and in what ratio to get this color? Thanks!
hi kate, i mixed maybe 50% brown to 50% golden deep yellow, then thinned it with some water. it’s a good idea test on some scraps cut from the headboard! 🙂
Love the project quick question though how did you get the 10 slatst slats for the headboard I have 3 1x4x10′ and 3 1x4x8′ and am only coming up with 9 slats after you take out the 3 2’11” pieces for the back.
hi daniel, thank you so much for pointing that out! i just changed it to (6) 1x4s @ 10′. thank you! 🙂
Wow, this is beautiful. Such a great tutorial too with all the info anyone could need! Thanks so much, hoping to make our frame within the coming weeks!!!
thank you so much kate! happy building! 🙂
so dumb question. when screwing the 1×4’s to the 1×4 supports. did you screw from the back going forward or through the front? also is glue on the 1×4’s a bad idea?
hi nick, glue will form a really strong bond if you clamp each piece tightly for 1 hour, which is possible, but screws are easier. we did it from the back because it looks better that way. happy building! 🙂
That is fantastic way to utilize the pallets! My husband got a lot of them at our recent project.
Will definitely use it and try it out.
Amazing work! Thank you so much for sharing!!
If I wanted to modify this so that the mattress didn’t sit atop the entire thing, but rather fit into the frame (with a few inches of wood surrounding the lower half of the mattress) would that be possible?
I imagined adding an additional board to make the sides taller, or dropping the slats down so the mattress was inside the parameters of the wood would work…though I really don’t have much experience with woodworking and realized the measurements may be a bit too small to fit a queen size mattress into the frame as opposed to having it floating.
What are your thoughts on this? I hope the way I’ve explained it makes sense!
Thank you so much!
hi hanna, yes you can drop the slats lower, and / or use 2×8 instead of 2×6 . the current plan measurements of the 4 sides will allow the mattress to fit inside. but double check your mattress, especially if it has hard rigid sides!
Hi ananda! Was wondering, for making this accommodate a full size bed, would I just reduce all measurements by 6 inches? According to the chart at the end of the article a full size bed is 6 inches shorter on both sides than a queen.
Thanks in advance
hi danny, yes, except for the vertical pieces. also make sure it’s not full XL size, which is 80″ long. good luck! 🙂
If you drop the slats lower for the mattress to fit further down into the frame, will the foot board posts need to notched out to allow this to happen?
hi chris, it depends on the mattress. ours has soft corners, so it would fit either way. 🙂
I was looking for information regarding this and finally got one. Thanks for sharing the information with us. The article was a great help to me.
Hi there! We just finished building this bed this week end! We adapted the plans to build a king-sized bed frame and WE LOVE IT!! We just got a new mattress (leesa sapira) and it was so fun to have a new bed altogether! The bed is very sturdy and well put together. We used Douglas fir and a walnut stain. We loved trying out a pocket hole jig! The instructions were helpful although there were a few things we had to figure out on our own. A few notes for the tutorial:
1. If using Douglas for the highest grit sand paper you want to use is 100/120…otherwise it doesn’t absorb stain as well.
2. We highly recommend using pre stain. It’s a super easy step that doesn’t take long and it helps the wood to evenly absorb the stain as opposed to having it’s softer and harder spots absorb the wood lighter and darker.
3. For the headboard you actually need TEN 1×4’s. The instructions say 9 but the diagrams show 10. It was very frustrating to get everything ready to assemble the headboard only to discover we had to run to the store and buy another and cut, sand, pre stain, stain and clear coat one random board.
4. Depending on how you assemble the bed, the strivers could use an extra inch or two in length. They still work a little shorter but maybe cut them a little longer and sand or cut it down later.
5. Also, instead of using wood, we bought 2×4 joists to attach the stringers. They’re about $0.75 each and was just easier for us.
The project took us about a week in all. We were only really working in the evenings and juggling two small children and extremely hot temperatures. I’m pregnant and still found this to be an enjoyable project to do together with my husband. Everyone is so impressed with our bed and we think it’s pretty great ourselves!!! I wish I could post pictures!
hi Eliese, thank you SO much for sharing your experience! congrats on your new bed!! i have corrected the 1x4s amount, sorry about that! i also added a note for people to check out your comment for more helpful tips! best wishes! =)
Hi Eliese! I just finished making this in king size (using poplar), and used the metal joist brackets too! Indeed, they were only $.78 at Lowe’s. My support slats and spacers were actually .75” boards, instead of .5” plywood, so this allowed me to hang the stringers a tiny bit lower to accommodate the extra height.
I ran into your issue with the headboard, too… I was one board shirt, but could only fit a 1×3 at the bottom, instead of a 1×4. It looks like Ananda used a smaller piece here too.
Ananda, thank you for sharing your plans! This was a blast to make! How can those who have followed your tutorial share photos of the final product?
hi chelsea, thank you so much for sharing!! 🙂 you can tag apieceofrainbow on instagram or upload photos on our facebook page, and i will share them in the post!
Done! Thanks again 🙂
Would you be able to share the materials with wiemeasurements for the king size bed? I would love to start this project up this week. How is your bed holding up? This looks like a simple and beautiful frame.
Thanks so much!
Hi Eliese, would love if you could share a pic of how your bed frame came out with the stain you used! Im having a hard time finding a stain for the Douglas fir that won’t pull the red and orange tones. Thanks!
Is there any concern that the design wouldn’t be strong enough for a king bed? Specifically, would the frame need more center support, such as extra stringers and/or legs?
Thanks!
Mary
hi mary, yes it is strong enough for a king bed! 🙂
Mary i just finished mine and it is a king size made out of cedar.
just to clarify, are the plans for a queen size bed?
yes! 🙂
The stringers should be 6 ft 10 inches instead of the listed 6 ft 8 inches. Instead of 2 inches longer than the side rail, the stringers need to be 4 inches longer because you gain 2 inches in length on each side from the posts.
hi pat, thank you for the observation! in this case, we installed the 2×6 (below the headboard ) flush at front with the posts, so the stringers only gain 2″ at the footboard. hope it makes sense! =)
Awesome build, correct measurement is a must for the final project to be like the drafted design. Really love the simplicity of the design.
HI, I am planning on building a bed frame but I have noticed that a lot of the wood I’ve been looking at have dimensions that are a bit off. The 4 x 4s are really 33/4 x 33/4 and the 2 x 4s are 11/2 x 31/2 etc…
Was this the case for the lumber you used to build your bed? I’m not sure if this is standard.
Thanks for your help and your beautiful oh so inspiring website.
Laura
hi laura, yes that applies to most wood we get, including what we used here, and on the plans! =) so you are good to go!
I love your bed! Thank you for the detailed plans and especially how you installed the brackets. I had trouble with those and switched to these brackets from Rockler – rockler.com/surface-mount-bed-rail-brackets. But will give the ones you used a second try since I still have a set and plan to build a king size bed, My problem with the brackets was with the claw side. Once screwed on they were difficult to insert. I will try loosening the screws and then tightening them after like you suggest doing. Thank you for sharing your awesome talent and creativity.
thank you carol! i learned that trick from other users! it worked great =)
WOW… I just can’t believe my eyes… This is absolutely beautiful… Like you guys made a bed yourself… Great job????????… Would be a good memory for you both
Firstly, I can’t imagine how a half empty air mattress could possibly spark joy! LOL So then did that mean that there was a lack of joy during the time you slept on the floor? I went without during a good part of my life, so not only does everything I have chosen to have in my house or just the freedom of choice in my life, bring me a spark of joy…but I appreciate and a am grateful for all inanimate AND animate things in my life. BUT that being said, I absolutely love your bed and your craftsmanship! Kudos and enjoy!!
hi mary, great question! 🙂 our life was full of joy when we slept on the floor, it was liberating to have very little stuff! however, being joyful does not mean everything will stay just the same – it actually make us want to create and refresh things. this bed gives us a new “blank” canvas to decorate our bedroom for fun in a lot of new ways! stay tuned! 🙂
Great tutorial, looks so beautiful!! We would love to build this for our next bed!
I love, love, LOVE DIY projects… I would love to give this headboard a try, it’s simple and beautiful! I love the wood texturized white wash wall decor as well that I will some day DIY for my house too! THANK YOU!
Last year one of my guy friends invited everyone to a bonfire in his backyard (he just built a firepit) Well, he had a TON of wood palettes and all of a sudden he started carrying them out and breaking them for the fire… I had to go save those things… Noooooooooo, I yelled… give those things to me… then I explained the value of them and he had to go get new firewood to burn. I’m not going to lie, kind of felt like a DIY superhero…lol
Okay, now I’m done with my story… :)!
I will have to think about this as I am considering getting my daughter a new bed in the near future. I am not sure that this is the right size for her room, but this looks great, maybe I can make some modifications.
Wow, I’m so impressed with people who DIY and it looks so incredible! You guys did an amazing job!
Wow, what an undertaking – I’ve never thought of designing my own bed but I guess it makes sense to have something perfect and personal when you spend a third of your life in it! The final result looks stunning – enjoy sleeping on the gorgeous mattress!!
very nice job! i love how it looks. it goes so well in the room, and looks super comfortable. i’m so impressed!
Absolutely nice article!! the bed with the mattress and headboard looks amazing! Very inspiring!!
Amazing work! I’m always impressed with myself when I can even put my IKEA furniture together. It must be so gratifying to sleep comfortably on something you built yourself. Super inspiring!!
Awesome DIY! Looks so beautiful! It must feel amazing and the mattress looks incredible!!
This is awesome! It looks like an expensive store-bought bed, and only $100, also love the super detailed drawings! Good job!
This is super nice! I’m not quite crafty enough to make a bed frame with headboard like this but it turned out awesome!
The new bed looks wonderful!! Great job with the DIY!
This was a great plan. Made a bed for my daughter and it turn out beautifully.
thank you John! so glad you had a great time building the new bed! 🙂
I watched the pocket jig video from YouTube, on there it says to use a clam when you put your screw in, you don’t have clams listed in tools needed nor is there a clam in your photo when you put the screws in to your 4×4 posts? I don’t have much for wood working tools, I bought 2 corner clamps but I can’t use them with the 4×4 attaching to a 2x?
hi! for the 4×4 attaching to a 2x, we just lined them up really good on a flat surface and pushed them tight together when putting in the screws. but it is good to have the corner clamps and these bar clamps for most wood projects! 🙂