How to Paint a Fridge ( Inspired by a $2,999 Retro SMEG )
Are you wondering whether you could ( or should ) paint a fridge? The answer is YES! It is surprisingly easy, hugely impactful, and 100% worth doing!
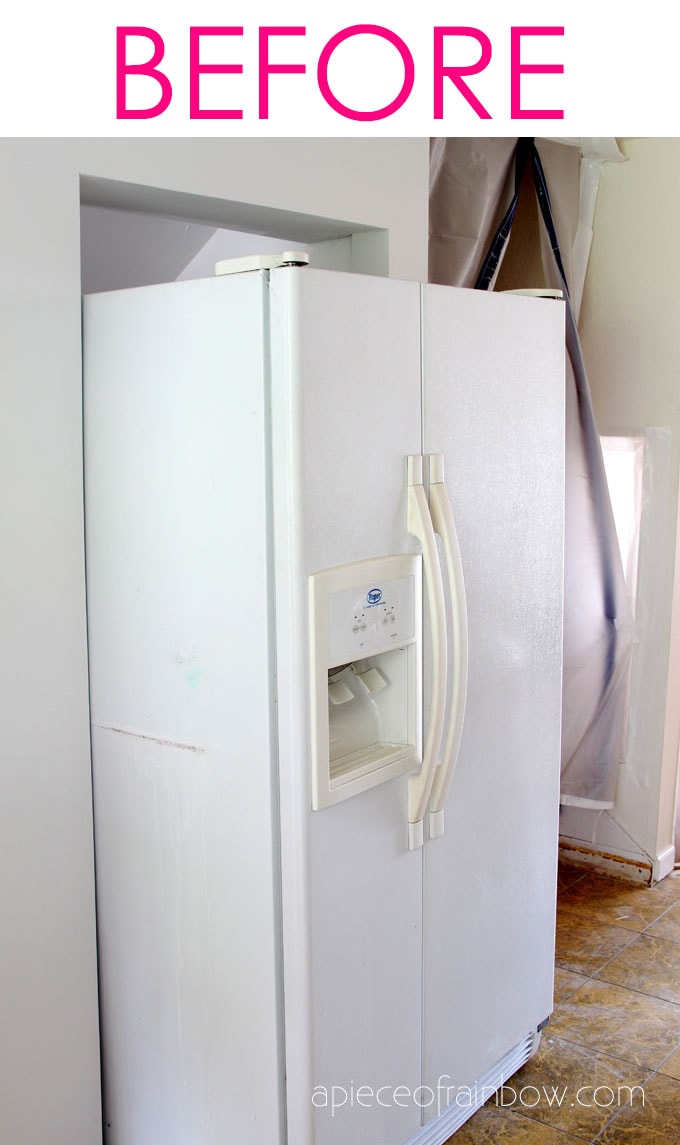
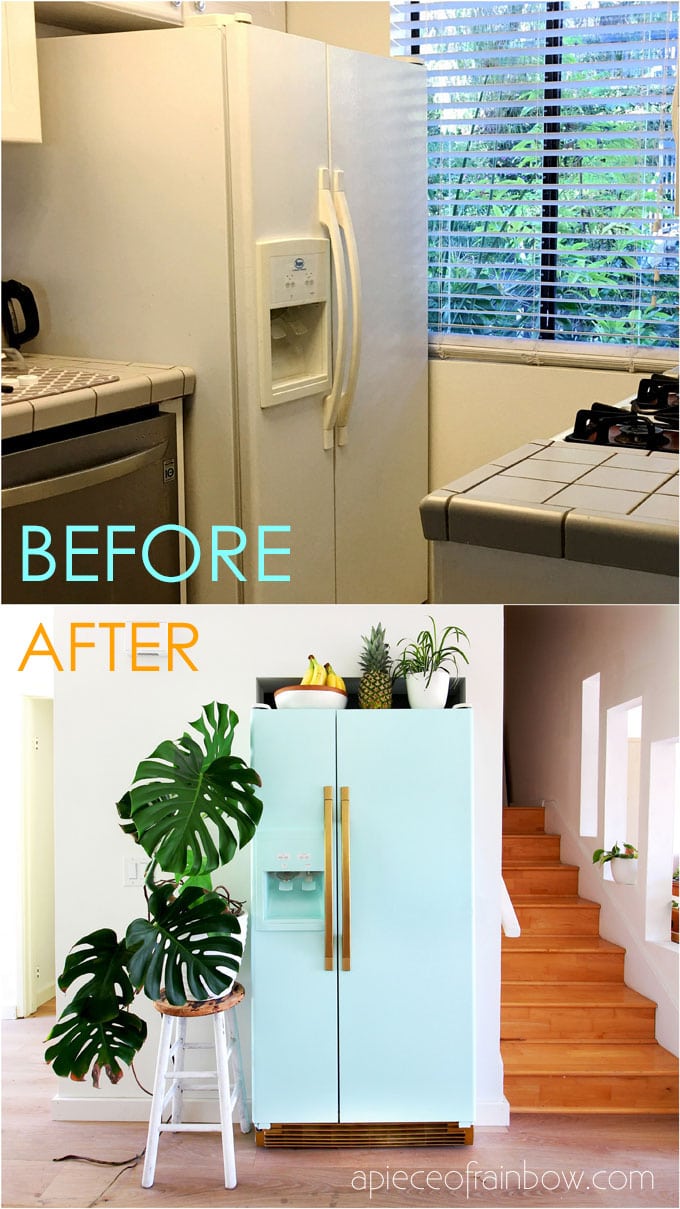
When we bought our house a few months ago, it came with this refrigerator. Talking about potential, like Cinderella-sitting-in-the-ashes kind of potential!
I just knew that painting this fridge was going to be our first big makeover project in our new home! Check out our entire (mostly DIY) IKEA kitchen before and after here!
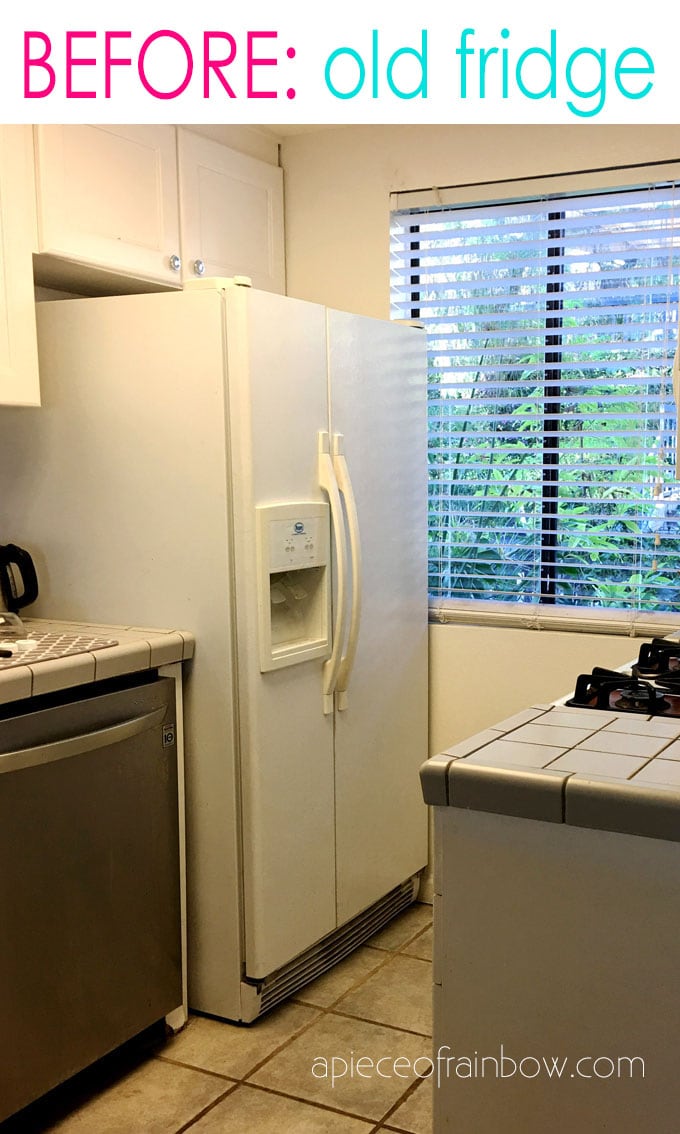
My dream fridge is a $2000+ retro SMEG fridge in the dreamiest shade of pastel mint color. However, I also feel that everything has potential to become more beautiful, and I should at least try to transform this perfectly working bland looking refrigerator. What is there to lose?
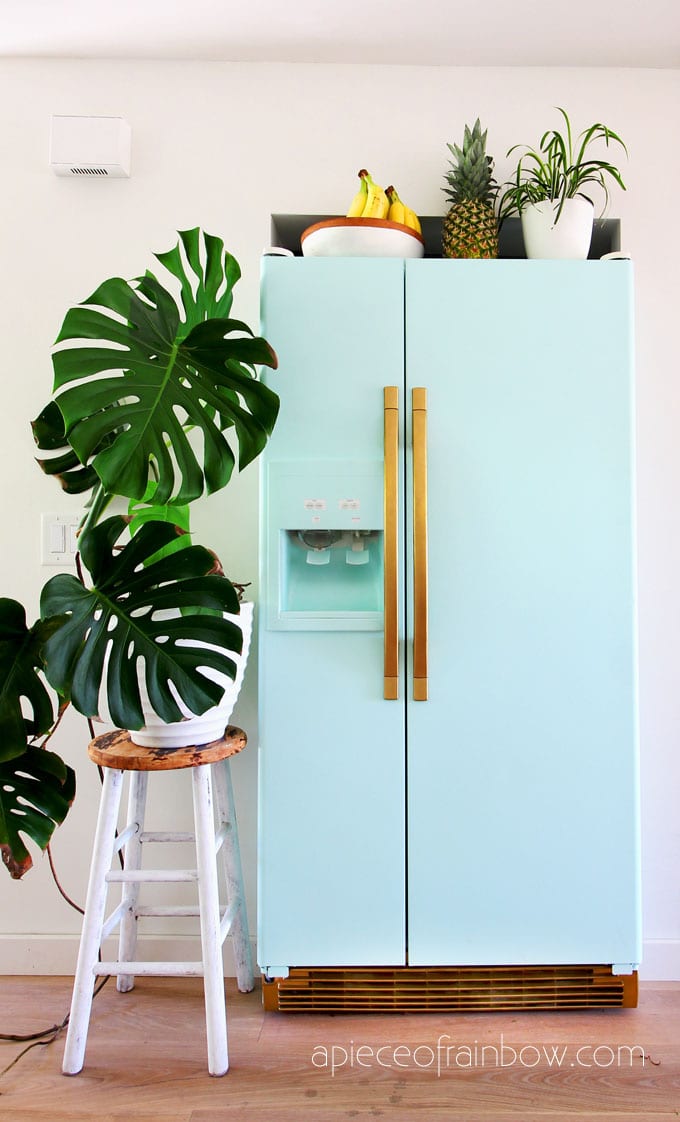
It took $20 and less than a day to paint a fridge. While no one ever noticed any fridges in all the places we have lived in before, everyone that comes to our house now raves about our “new” fridge and asks where we bought it! Can you recognize it?!?
*Some resources in article are affiliate links. Full disclosure here.
In this detailed tutorial with video, I will share with you everything I have learned about painting a fridge so you can get a successful result, and avoid some of the mistakes I made.
Video tutorial on how to paint a fridge ( or skip to written tutorial below)
I want to thank Sherwin Williams for generously providing all the paints and primers for many projects in our new home! We really love their high quality products and can’t wait to show you more projects in the coming weeks!

Materials and tools you will need to paint a fridge:
( Some of the helpful resources are affiliate links. Full disclosure here. )
- sanding sponge with 220 grit or similar grit sand paper : this sanding sponge is becoming my best friend through so many projects! It makes better and even contact with the entire surface of the refrigerator
- 4″ paint roller set: much easier than brushes!
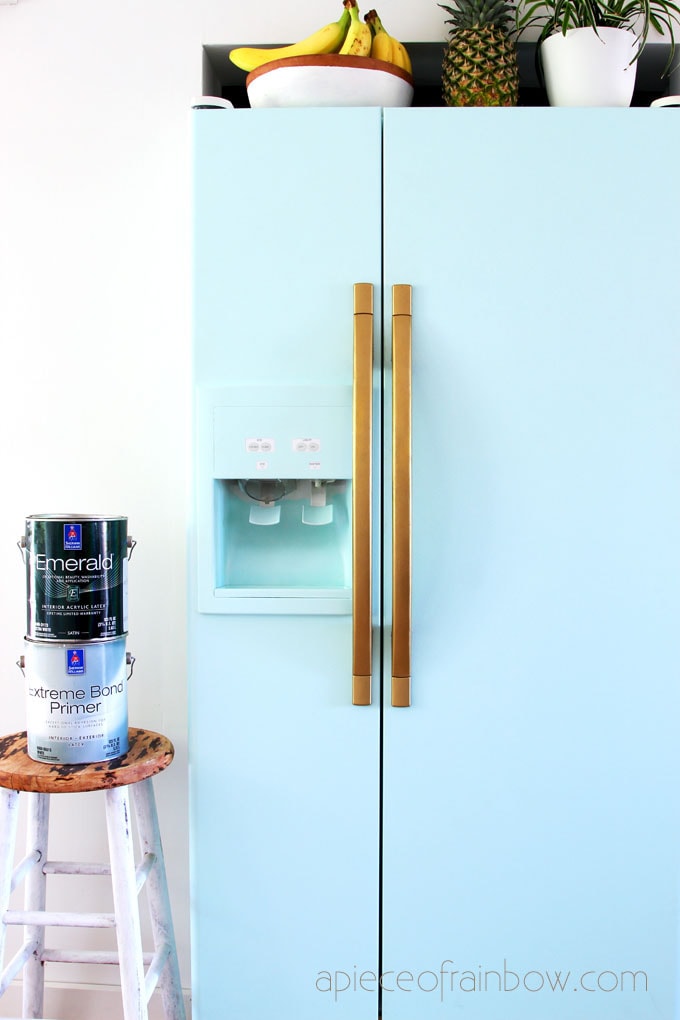
- primer and paint: I used Sherwin Williams Extreme Bond primer and their Emerald Latex paint (more on paint color in Step 3), one quart of each will still give you plenty leftovers for future projects!
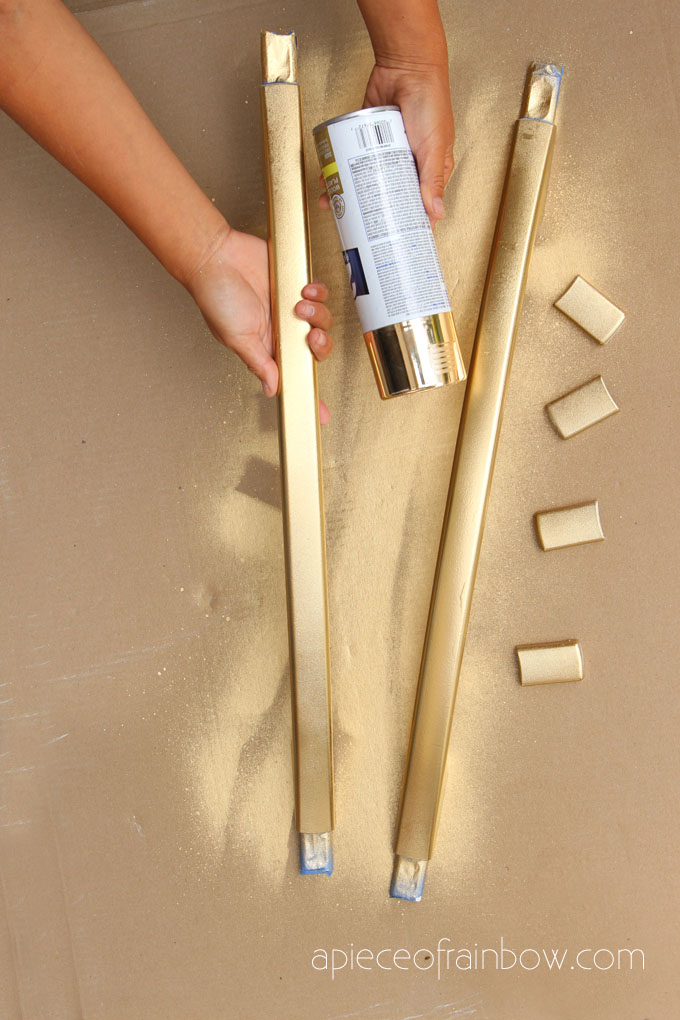
- for the fridge handles at first I used gold spray paint but it wears off somehow. It’s MUCH MORE durable to use gold acrylic paint like this and paint 3 coats with a roller!
- for the bottom vent cover, I used this gold spray paint and this clear sealer spray for extra durability.
Step 1: clean and sand the fridge surface
Surface preparation is SUPER important! A well prepared surface will ensure a durable paint finish.
Remove the handles and vent cover (if any) and thoroughly clean the fridge surface and all the parts with soap and water. Wipe clean and let dry.

I also taped some of the ice and water buttons, and the screw holes for the refrigerator handles. You can use painters tape or scotch tape for the small buttons.
Because we decided to change the location of this big refrigerator and put it in a wall cut-out, I taped half of the sides as they won’t be visible. Always trying to reduce my work load! 🙂

Next, take a sanding sponge with 220 grit or similar grit sand paper and quickly sand all the surfaces that will be painted. The sanding sponge makes better and even contact with the entire surface of the refrigerator.
Sanding is very important because it will create tiny grooves for the primer and paint to grab onto. Wipe off all the dust from the sanding process.
Step 2: prime the fridge before painting
The purpose of a primer is to ensure better adhesion of paint to the surface being painted.
There are many types of primers, such as water based, oil based, and shellac primers. Here’s a more detailed comparison of these 3 types of paint primers. Oil based and shellac primers can be great for tough to adhere surfaces, but water based primers are a lot easier to use and to clean up.
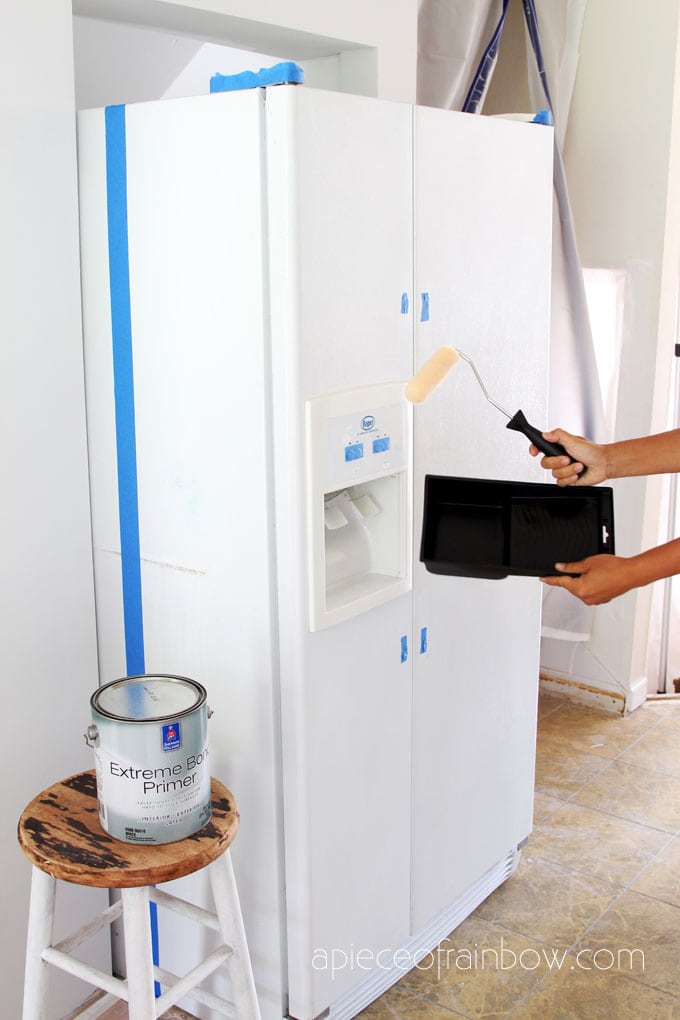
I applied one coats of Sherwin Williams Extreme Bond primer using a 4″ paint roller which works a lot faster and easier than brushes. Remember to sand and prime the sides of the refrigerator doors too!
This primer is great! It drys flat and matte in 1 hour, and our fridge is ready for painting.

Step 3: how to paint a fridge
It took me a while to find the dreamiest mint color paint ( think retro mint SMEG fridge): Sherwin Williams SW 6757 Tame Teal in satin finish. It is such a perfect soft pastel mint color, and looks beautiful in changing lights from morning to evening!
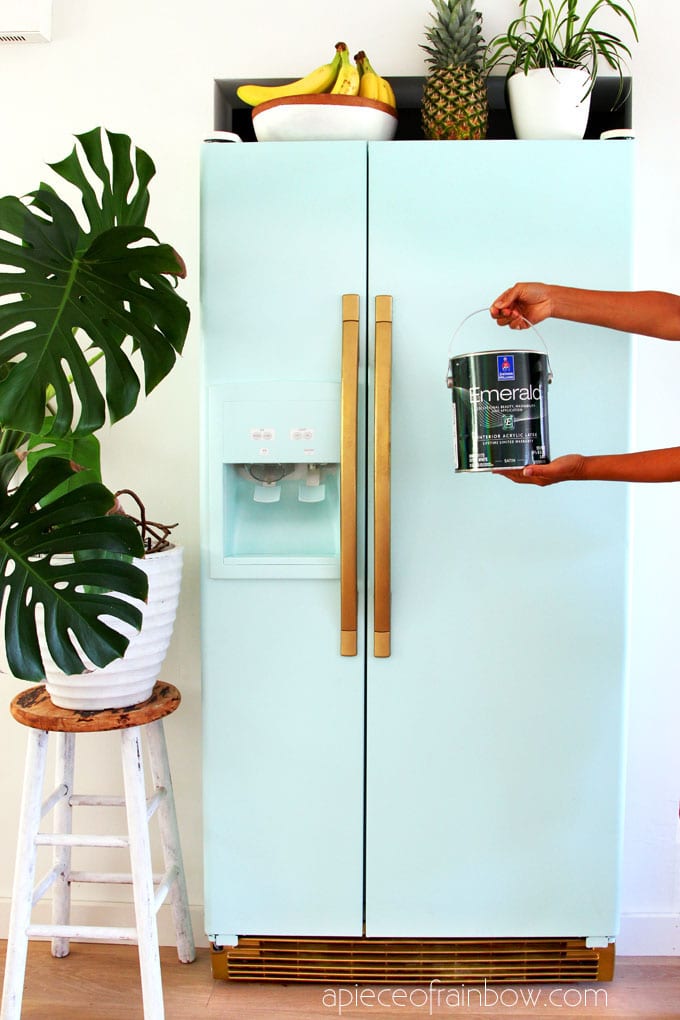
I used Sherwin Williams Emerald Latex paint which is certified by super high health standards, and the paint has such amazing coverage, one quart will still give you plenty leftovers for future projects!
Use a 4″ paint roller and apply 2 coats of paint, allowing the first coat to dry for at least an hour before the second coat. If you are painting your fridge a dark color, you may need more coats.
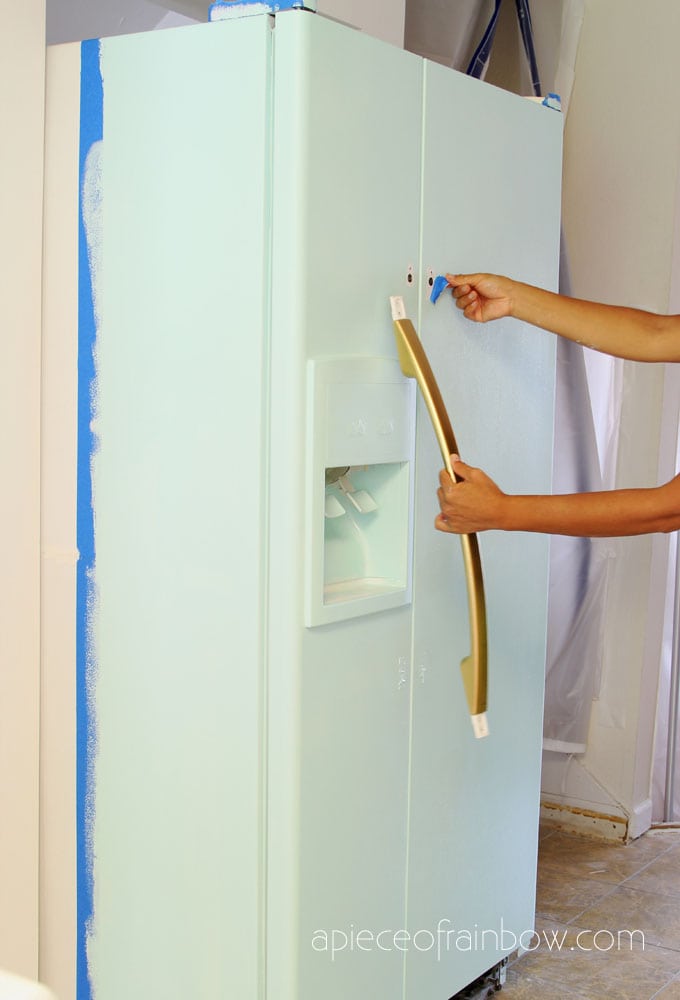
Step 4: paint the handles and vent cover
For the bottom vent cover, I used this gold spray paint and this clear sealer spray for extra durability.
Lessons learned: Initially I used gold spray paint also on the handles, however, I noticed some gold was rubbing off on our hands! Refrigerator handles are the most used parts of the fridge, so they need to be super durable. For the fridge handles It’s MUCH MORE durable to use gold acrylic paint like this and paint 3 coats with a roller!

The handles are much more challenging to paint than the fridge, here are some helpful tips I learned the hard way:
First make sure you are doing it outside in a well ventilated area. Clean the painting area so dust don’t get stuck on the fresh painted surfaces. Spray lightly and quickly to avoid drips and puddles.
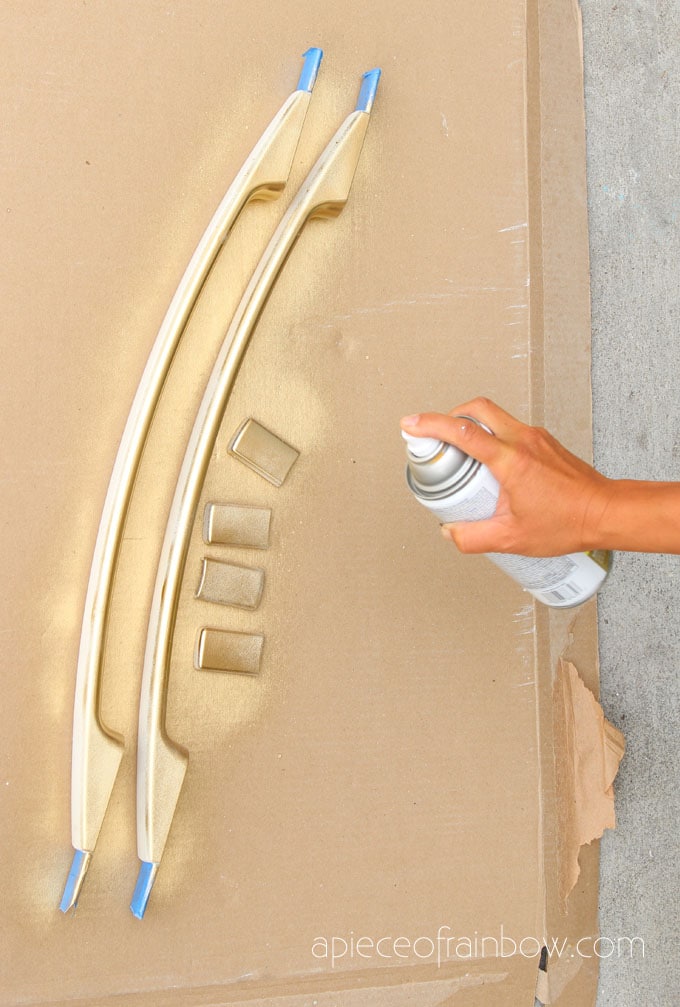
Wait for each coat to dry completely (usually about 30 minutes), then turn the handles to their sides and spray. Try not to touch the handles too much until after the clear coat, because you can easily leave finger prints on the fresh painted surface.
After the gold spray paint dries for about 1 hour, you can spray 1 – 2 coats of this clear sealer spray for extra durability.

Here it is, our “new” fridge! We are crazy in love with it, and so are our friends and family. Even strangers coming to our house would compliment on this fridge and ask where we bought it! 🙂
Additional tips, resources, and FAQs
1. The burning question: how is our painted fridge holding up? Any scratches? Is it easy to keep clean?
It’s been quite a few months now, and I am happy to report that the fridge has held up great through active daily use, and all the commotions and pushing around during our complete kitchen and bath remodel. We clean the surface regularly with a soapy sponge.
It did get one tiny scratch when a sharp metal bar bumped onto it, but it was super easy to touch up. Remember to always save a little leftover paint!
In Step 4 I mentioned why I had to apply a coat of clear sealer for extra durability on the gold spray painted handles. The handles have held up great since then.
2. What kind of paint can you use on a refrigerator?
You can successfully paint a fridge using many kinds of paints, some work better with a primer first. Appliance epoxy (usually comes in white) and liquid stainless steel are the most commonly used. Here‘s a great article on how to paint rusty refrigerator or other appliances with liquid stainless steel.
If you want a unique color, you can use latex paint, which comes in unlimited colors, and is super easy to clean up. When you use water based paints, make sure to use a good primer first for better adhesion.
3. What painter colors can I use to transform an old fridge?
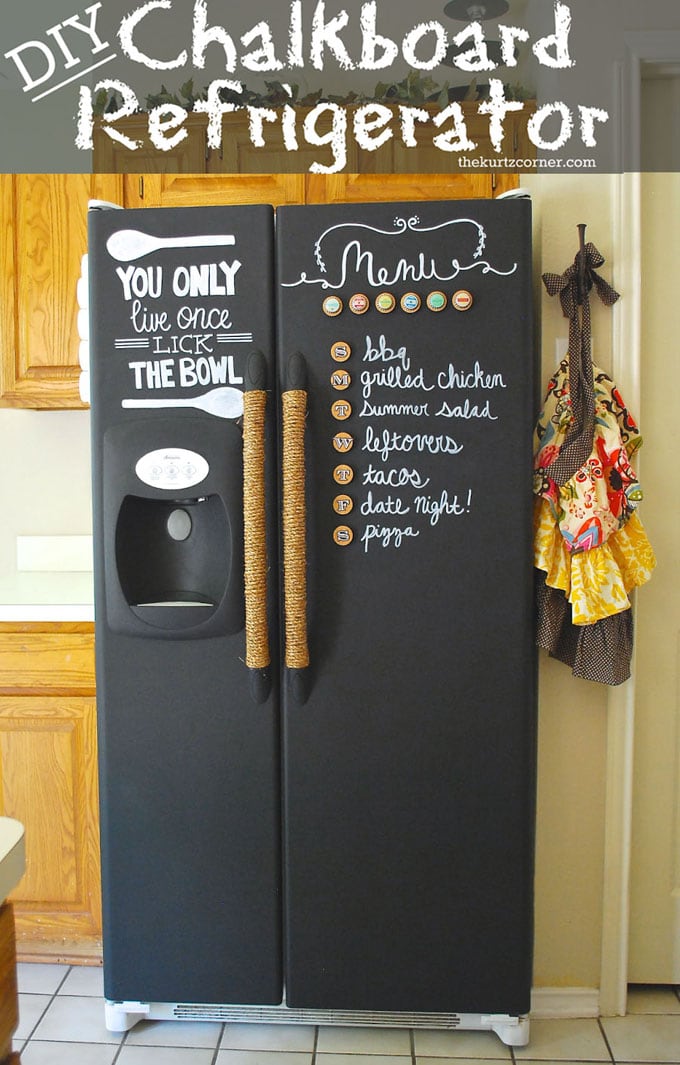
There are many wonderful examples to inspire all of us, like how to paint a fridge with chalkboard paint here, (and write your grocery list or practice chalk art!). Keep in mind that if you are painting your fridge a dark color, you may need to tint the primer (optional), and apply more coats.
You can skip painting all together and use contact paper or peel and stick vinyl to transform your fridge. Here is a video tutorial on DIY peel & stick stainless steel!
4. Would you paint a fridge again?
Absolutely YES!!! I was really inspired by what Marie Kondo wrote in her amazing book The Life-Changing Magic of Tidying Up that we should surround ourselves with things that spark joy.
So often we are surrounded by things that are generic and neglected, like our old fridge. This DIY project has been so rewarding, and we feel sparks of joy every time we walk by our “new” fridge!
Check out our entire (mostly DIY) kitchen before and after here!
You may also love this other makeover ( when we were renters) : we changed a bland looking patio into a boho outdoor paradise, using mostly pallets!

Happy creating! See you next week!


Did you put a sealant on the refrigerator? I know you did it with the handles, and so I assume you did not on the fridge itself, but I wanted to make sure.
I’ve been wanting to do this, and your post has convinced me I should.
Its cool i will try to make my fridge cool
It’s absolutely stunning! It’s so gorgeous that I’m getting ready to order your exact paint and materials, but I have two questions: I didn’t see anywhere that mentioned whether you had your primer tinted. Did you just leave it white? Also, will any high-quality bonding primer work? I already have plenty of Valspar Contractors’ Bonding Primer; do you think that would perform the same?
Thank you for help, and the inspiration and excellent instructions!
hi Robynne! thank you so much! the primer doesn’t need to be tinted. i think most good quality primer will work, and the sanding part is even more important for everything to adhere better. good luck!! 🙂
Wow, that looks great! Just the colours I’m going to do my fridge-freezer.
I did this and it was one of the best things I’ve done off of Pinterest. I have a 6 year old and 2 year old granddaughters and a 2 year old grandson and they prefer this to TV and anything else!!! If you are thinking of this…do it…kids love it and it’s great for reminders to yourself!
hi Tabatha! your grandchildren have fabulous tastes! 🙂 enjoy it!! we are still loving our fridge 2.5 years later!
Lovely! What is the brand of gold spray paint please? The link goes to the wrong item. Thank you 🙂
hi Ellie! it’s Rustoleum. however, we have found that if you use gold acrylic paint like this- https://amzn.to/3kOLF9Z with a roller and paint 3 coats, it’s much more durable! 🙂 i will update the post as well!
How are they holding up now? The acrylic i mean?
the acrylic on the handle is holding up super well after 2 years! much better than spray paint! 🙂
I’m wanting to do something very similar. However, we have a handless fridge with a recessed “handle” in the top of the main door and bottom of freezer door above. It also has a couple of small dents. Any ideas or advice on what to do with it to achieve a similar look?
hi Pearl! you can use Spackle paste to smooth out the dents before painting. Maybe add stripes of gold as accents along the top or bottom of the doors?
Hi – I”m curious what you did with the rubber pieces on the side (the piece between the door and the bulk of the fridge); did you paint those as well or are they still white? I absolutely LOVE your post and fridge! 🙂
thank you Lisa! 🙂 i did paint the rubber part, with a brush. i think it would look nice unpainted / white also!
for real, amazing.
I don’t see this paint for $20 more like $55-75 where did you purchase yours ? Thanks
hi! you can get pint size for a lot less at Sherwin Williams store and it’s way more than enough to paint the fridge! 🙂
Did you paint the water and ice dispenser paddles, too? How did you get into all the nooks and crannies in that area?
hi Dawn! we don’t use our ice dispenser, and i painted it partly, and left some parts white (unpainted). sticky vinyl can also be a good option for these areas 🙂
The surface is so smooth!! The result is so amazing! Thank you so much for the tutorial!
I prefer your painted fridge to a real SMEG fridge. Now you have 2k to spend on food!
thank you Ella! it sure is nice to keep using this fridge that still works really well! 🙂
Hi,
Great DIY! Question: could you have used new goldtone handles instead of painting old ones? I think I’ve seen large cabinet/appliance handles – as long as the screw points match up, this should work without worrying about paint wearing off.
hi Maddy! yes that would be a great way to go! 🙂
How are the painted handles holding up?
holding up great!! 🙂
How pretty! You have a really wonderful blog site with so many great ideas!
I have a huge, black monstrosity of a fridge with a rough surface. Replacing it is not an option in this economy.. I am going to try this technique. I am excited to get started!
We just painted our fridge following your tutorial, and it came out amazing!
Thank you for your creativity and detailed instructions!
Simply stunning! Thank you for sharing your incredible, unique & affordable DIY idea! Your refrigerator truly looks like it cost a fortune, it’s beautiful. In the few years I’ve had online services, this project is probably only the2nd or 3rd DIY that is exactly as described if not better. Once again, many many thanks for sharing this amazing transformation. Much appreciated.
Thanks for sharing such a great tutorial. The fridge looks awesome!!
Love this! However, I’m wondering what you do about the color of your other appliances? So your fridge is mint colored and the rest of your appliances are something else? I know it would be nearly impossible to paint either a stove or a dishwasher.
hi Mona! the mint goes really nice with white and stainless, which are our other appliances! 🙂
Beautiful! Any advice on painting a black fridge? I’m afraid the rubber door seals will really stick out.
hi anna! you could test a very thin strip of vinyl over the rubber and see if it holds up well. i think it’s worth trying, then you can find a piece that is close to your desired fridge color. 🙂
Really appreciate your amazing ideas and tips on painting a fridge. Looking forward to trying it n our fridge!
Wow, I’m always stunned when I read your posts. I’m putting this in my To-Do list. I even tried your Cardboard Shoe Rack and that’s what I’m using currently in my room. I love your posts so much.
thank you so much!! 🙂 happy creating!
Hi! I’m about to paint my fridge (yay!) and I’m anxious about the water and ice dispenser. How has that area held up to moisture? Would you have done anything differently? Amazing project!
hi ginger! we never used the dispenser so it s held up like new. but i think if you do it carefully, it should work. you could also consider some thin vinyl of nice colors to cover certain areas. 🙂
Nice! Thank you for the great tutorial! This is just what we are looking for to update our ugly fridge!!
I really loved how beautiful the fridge turned out! May just have to paint our old fridge!
I love your blog site and this painted fridge looks gorgeous! Thank you for sharing your awesome ideas.
This fridge looks amazing! Love the mint color!!
Are you still happy with how it’s holding up? I am curious as considering making the leap to painting mine!
yes it’s holding up great! just sand it really really well before painting! 🙂
I scoured your article after reading the headline and the part where you thanked ” Sherwin Williams for generously providing all the paints and primers for many projects in our new home!” and I cannot fathom how you were able to do this project “for $20”. Please point out where I missed the finer details of how this would only cost us, the lowly reader and DIYer, only $20 if we are not sponsored by a paint supplier. Thanks!!!!
hi April! to paint a fridge you only need less than a pint of paint or primer, which would be less than $20 total! 🙂
Absolutely love this. Have a very similar fridge and was considering painting it black. Not anymore!
Did you ever considered spraying a clear coat on the front of the fridge? Do you think it would yellow it?
hi barbara, you can certain do that, just use a non-yellowing uv resistant spray. we kept ours satin as the paint finish, glossy clear would be really cool too! 🙂
Can you safely use refrigerator magnets on your painted fridge?
yes you can, the paint does not affect fridge magnets 🙂
Love how this turned out. Was your fridge textured? Wondering if the sanding will work on my textured white fridge and if so, does the sanding make it smooth or is the texture still there? Thanks!
hi david! our frisge has texture too. the sanding creates tiny scratches which dulls the surface, it won’t remove the texture. after painting, the texture becomes less prominent. 🙂
I’ve been wanting a retro SMEG fridge for how many years and today I’m so happy to find your painted fridge!!! Will be doing this over the weekend!
Good job work of painting a fridge retro smeg. Thank you for sharing it. I love it.
It’s a very cool makeover which I would love to do to some of my things at home. Great post!
This is so gorgeous! Ananda! What kind of sheen level did the paint you used have?
hi donna! it’s satin finish. so nice to hear from you and hope you are doing amazing!! xo
did you empty out the refrigerator and unplug it when painting?
no, it was running the whole time 🙂
What an incredibly gorgeous makeover! We repainted an old oven once. It’s amazing what a little paint can do.
I always enjoy reading your post. You are so creative and make things look so easy. Love the “new” fridge. Great job!!
thank you so much stormee for your sweet comment! i did struggle with the gold spray paint ha! 🙂
Ooh! I love the new look of your fridge. So glam! Bookmarking this for my home inspiration!
Gorgeous, inspiring and so inventive!
thank you Jeannette! 🙂
what a great post! This looks incredible!!! I have always wanted to give my old fridge a revamp and I can’t believe how easy it would be!!! Thanks for sharing this great post!
Oh wow, I love this! What an absolutely stunning transformation. I am totally going to do this one day.
I’m super impressed! The fridge looks amazing and it’s better than buying a new one! I would try this for sure
omg this cost only $20 to paint!!! Well done, i am really impressed. Although i don’t consider myself very handy, i would love to try something like that. Worth a shot i think.
This looks amazing! I would have never guessed those are the same refrigerator. Mine is stainless steel, so I like the look of it with the rest of my stainless appliances. But we used to have an old fridge like yours in the garage and now I think of how much better it could have looked!