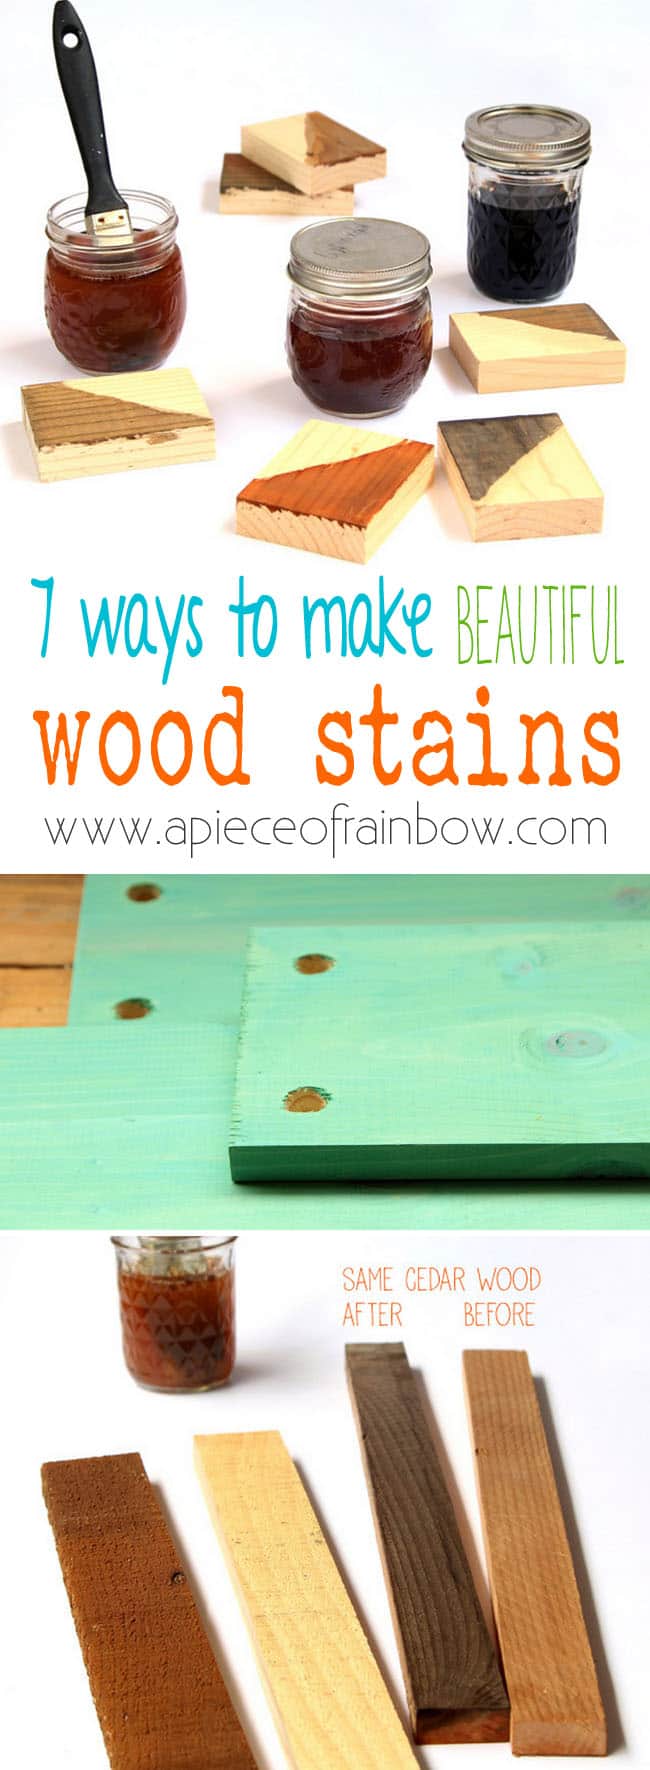
Make Wood Stain in Any Color – 7 Easy Recipes!
Make wood stain? Is it just spilling coffee or tea on a wood table? Actually … no! There’s way more science and art to it! 🙂
Made from all natural household materials, these quick and easy DIY wood stains are super effective, long lasting, and very low cost! And they are better for our planet as well – no solvents and no VOCs !
Since I wrote the original post a couple of years ago, lots of readers have share their experiences and new recipes. This completely updated version will include the following 4 parts:
- Why these wood stains work, and what is the science behind these durable wood stains.
- 7 easy recipes to make your own natural wood stains in any color.
- Pros and cons of DIY wood stains vs store bought wood stains
- Helpful tips and our reader’s FAQs
Difference between wood stain and wood finish
*Some resources in article are affiliate links. Full disclosure here.
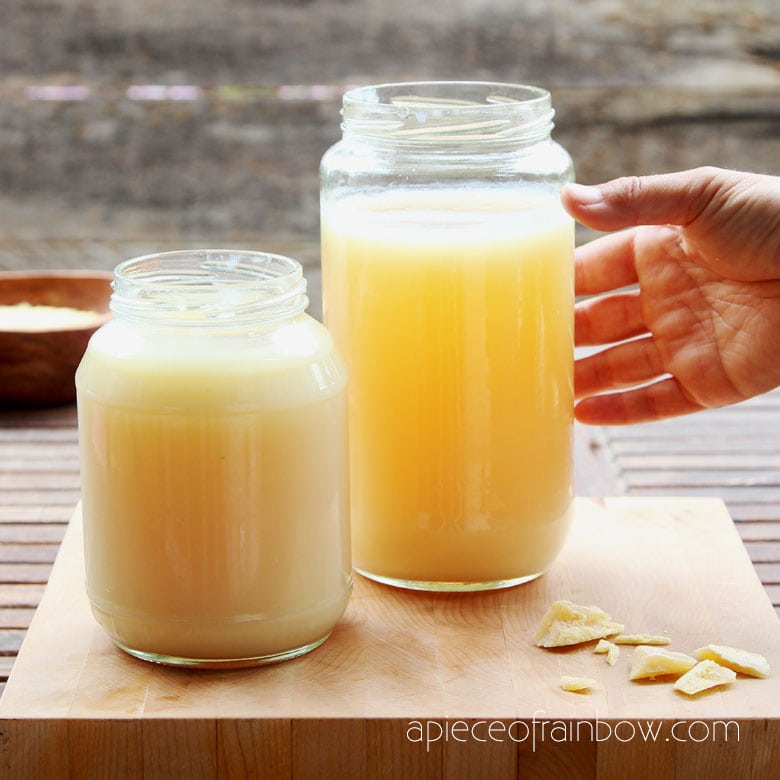
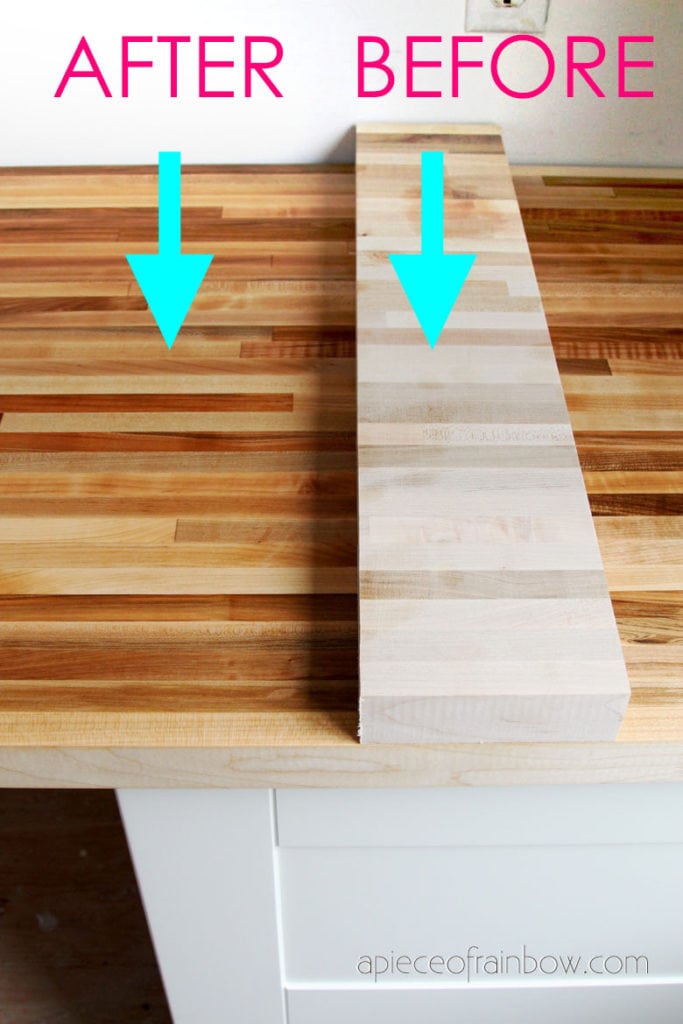
A lot of times we just want the nature wood color to look a little richer and deeper. And wood often takes on deeper colors as they are exposed to natural light. In this case, a simple oil or wax finish will do the job! If you are looking for a natural (and food safe) DIY wood finish that will bring out the richer wood colors, try our DIY butcher block oil recipe here!
Now let’s talk about DIY wood stains! The first 4 basic recipes are various mixtures of vinegar and metal. Why?
The science behind these effective wood stains.
The iron dissolves in the vinegar (acetic acid) and forms a soluble substance (iron acetate). When this solution is applied to wood, the iron acetate reacts with the natural tannins in the wood, producing various shades of brown, grey and black.
As you can see, it is a chemical reaction, which is durable indoors and outdoors, vs when you hear “coffee stain”, “tea stain” or “beet juice stain” on wood, those are in fact natural dyes that would fade away quickly in sunlight.
Four basic DIY wood stain recipes using vinegar and steel wool or rusty nails.
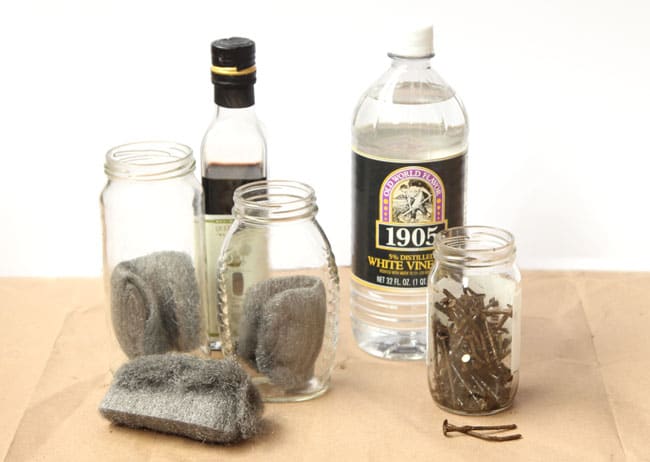
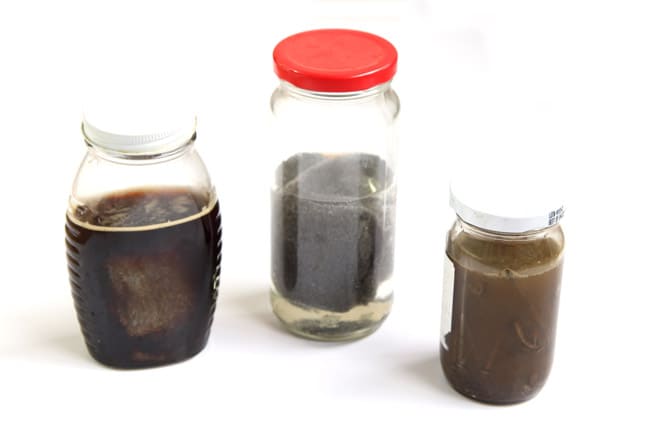
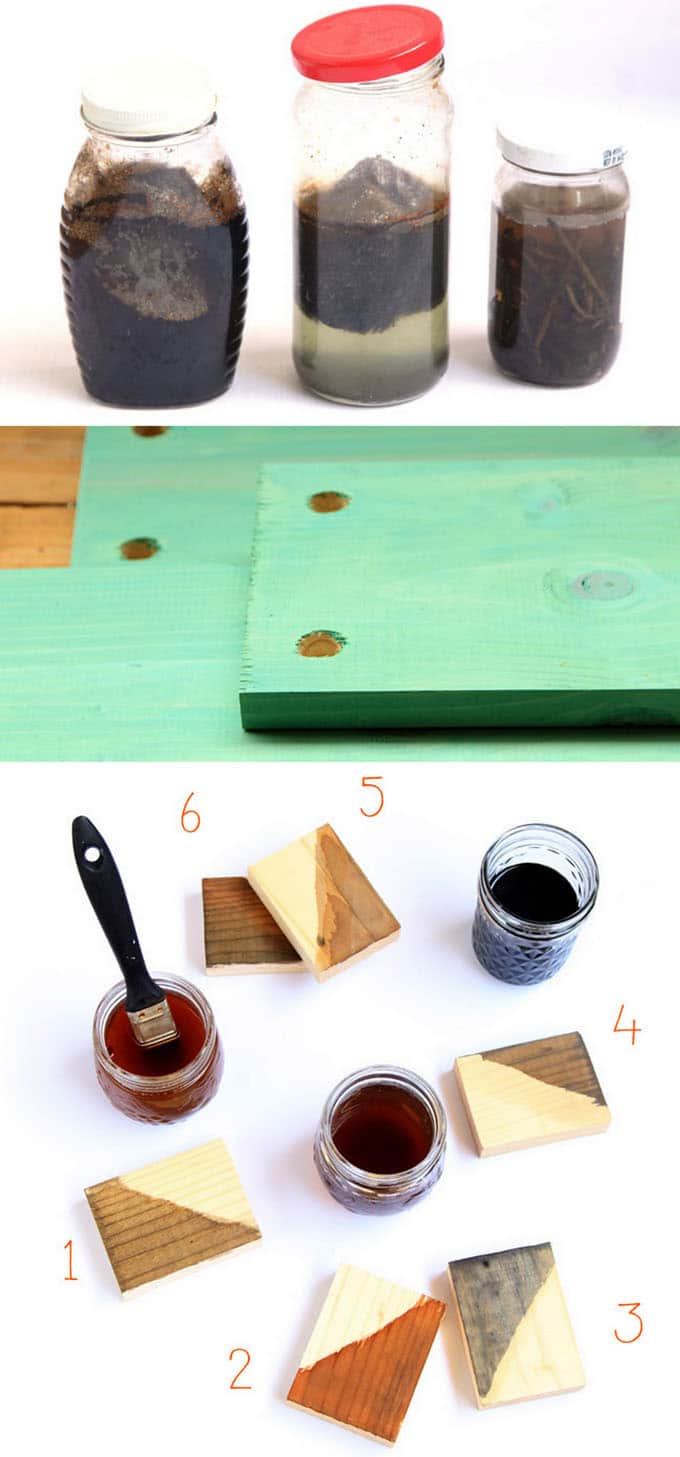
I started with 4 jars to test various types of vinegar and metal: ( Some of the helpful resources are affiliate links. Full disclosure here. )
Recipe 1. 1 1/2 cup of white vinegar and one steel wool pad
Recipe 2. 1 1/2 cup of balsamic vinegar and one steel wool pad
Recipe 3. 1 1/2 cup of apple cider vinegar and one steel wool pad
Recipe 4. 1 1/2 cup of white vinegar and rusty nails
You must be thinking: “Oh balsamic vinegar will be the darkest stain, due to its color! “
Want to bet $1000? =)
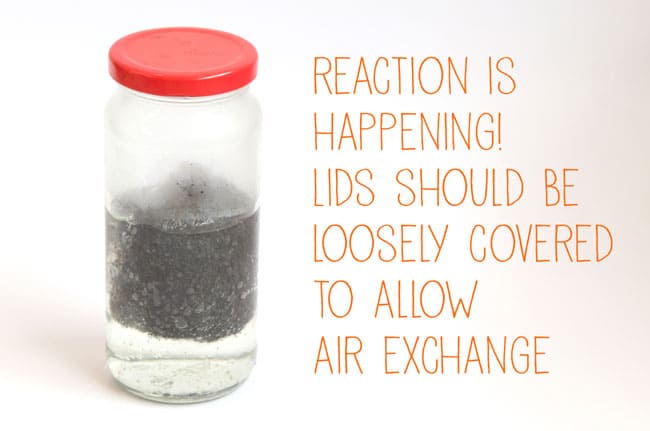
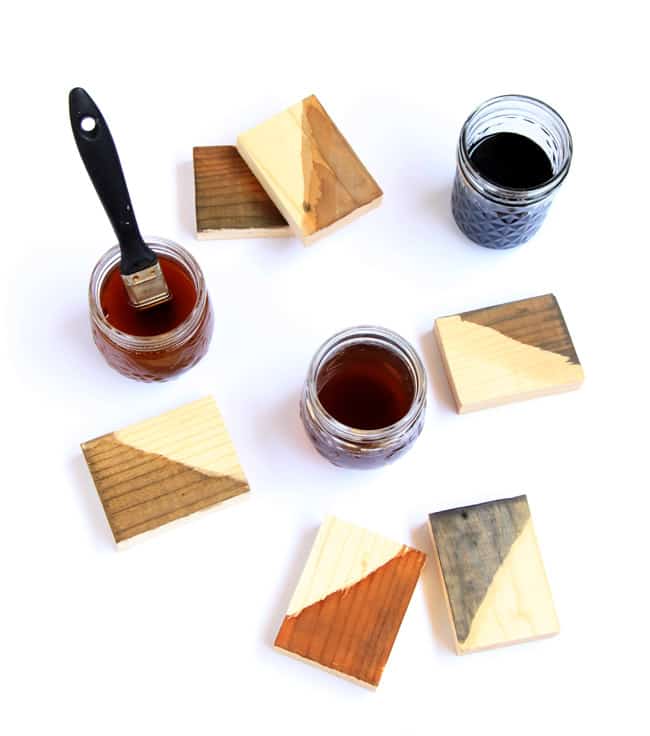
To make the stains, put a super fine steel wool pad (or rusty nails as in the 4th recipe ) in the jar and pour in enough vinegar to cover it, loosely put the lid on the jar to allow for air exchange when the reaction is happening- see photo below. If the pad is not totally submersed, rust will quickly form on the portion exposed to air which is ok.
After about twenty-four hours pour the solution into another jar, or take the pads out of the jars to stop the reaction.
All the steel wool pads have shrunk to about 1/2 the size! Leaving them in the jar longer will produce a darker stain. The variations are endless!

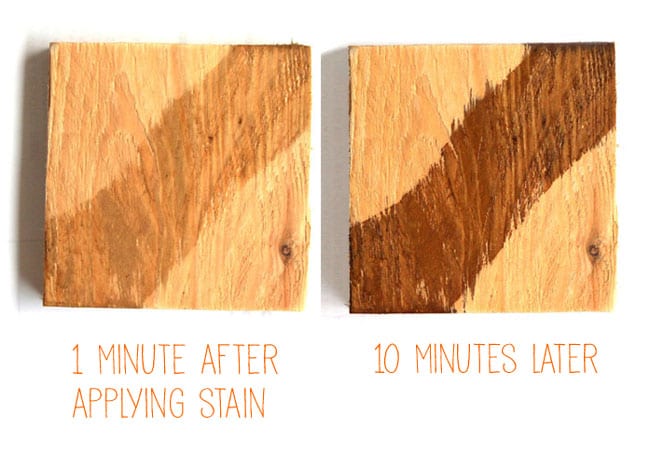
Now watch the magic! When I first brushed some of this wood stain onto a piece of wood, I thought nothing was happening! But a few minutes later, it looks all different, wow!
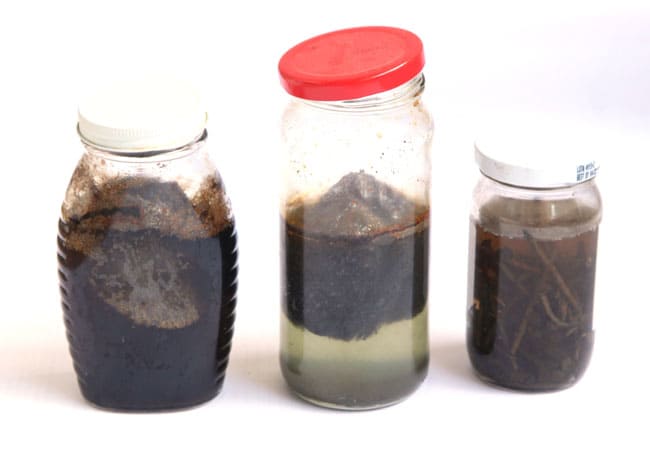
As you can see in the picture below, the stain colors has nothing to do with the vinegar color! Balsamic vinegar and steel wood solution is in the middle, but the white vinegar and steel wood solution on the left has the deepest color. The photo was take 5 minutes after the stain was applied.

Before we look at all the colors in comparison, let’s look at two more variations on these 4 basic wood stains.
Coffee or tea with the basic DIY wood stains
Recipe 5: Brew some tea or coffee at 3-4 times the strength, let cool, apply this mixture to raw wood surfaces. The coffee or tea do not add darker color to the wood stain, they add tannins to the wood which will make the stains much darker. Apply the stain after the wood dries from the tea / coffee first coat.
Dilute the basic DIY wood stains with water
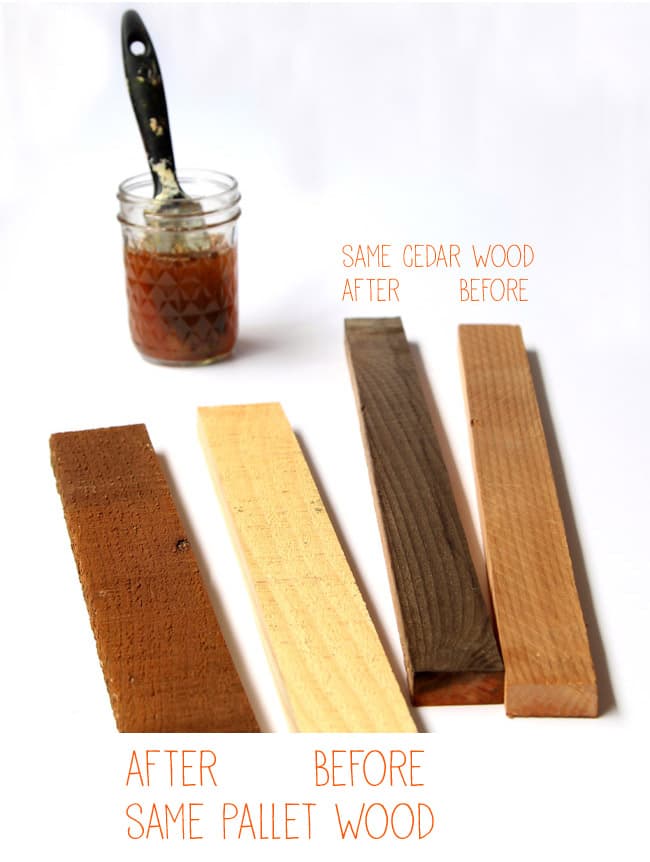
Recipe 6: When we dilute the stains #1 through #4 with water, it produces a lighter color, much like naturally aged wood.
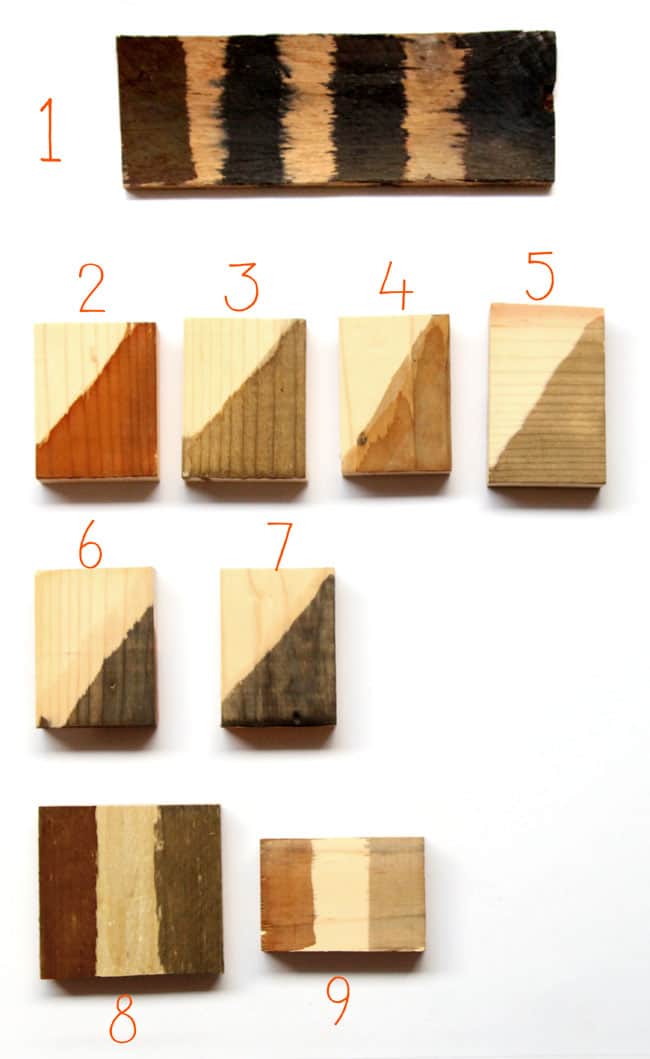
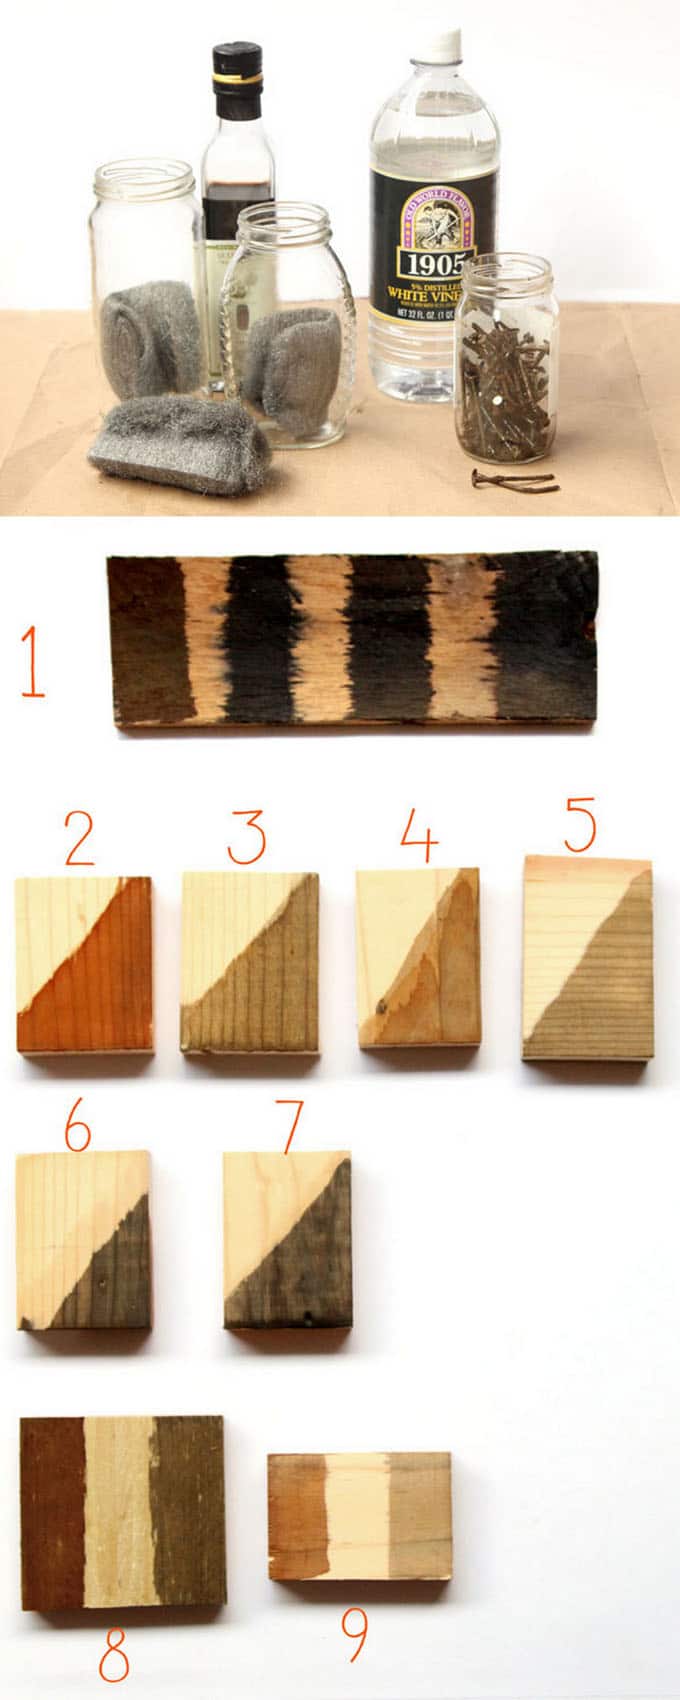
Now let’s check out all the DIY wood stains and variations in the above photo.
1. Stain #1 – #4 applied on pecan or walnut wood. This type of wood has high concentrations of tannins, so all the stains come out quite dark. No need for tea or coffee!
2. white vinegar and steel wool stain on pine: a rich brown color
3. balsamic vinegar and steel wool stain on pine: a warm gray with a gold tone
4. white vinegar and rusty nails stain on pine: a brown color lighter than the one with steel wool, i think it’s because steel wool dissolves faster, so the iron is more concentrated
5. apple cider vinegar and steel wool stain on pine: also a warm gray similar to the balsamic vinegar, more silvery gray
6. & 7. coffee and the vinegar metal stains: all the different vinegar and metal solutions produced a dark, almost black color because of the coffee
8. & 9. 50% white vinegar and steel wool stain with 50% water: both types of wood has the diluted stains on the right, and natural wood in the middle. The rich brown stain became a gray color stain after being diluted with equal amount of water.
So far we have stains in all shades of browns and grays. What about colors?
Make wood stain in any color using diluted acrylic paints! (or other water based ink or paint)
If you love colors, and you also love the grain of the wood, this method gives you the best of both worlds!
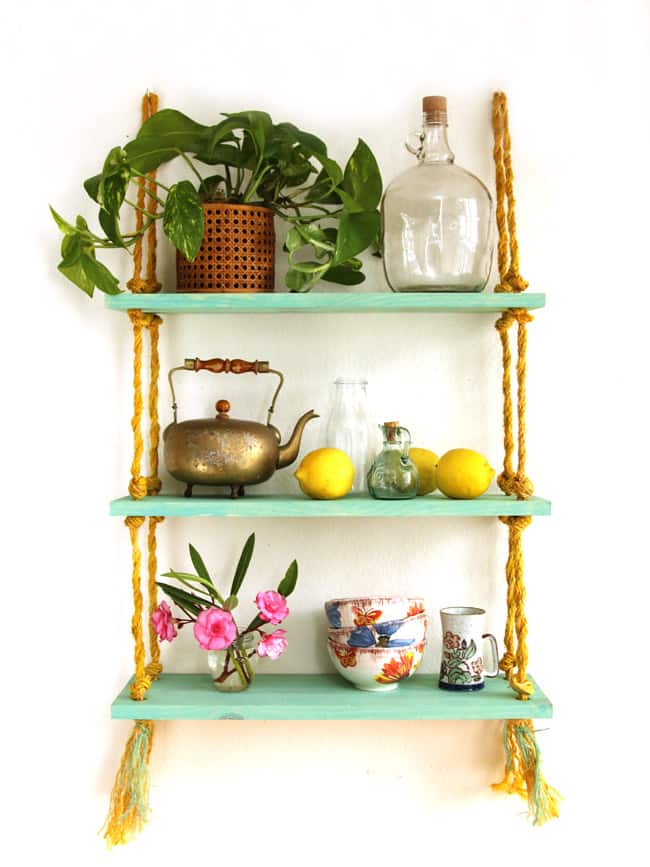
When I made the rope shelf , I had the same question like every time: “To paint, or not to paint?”
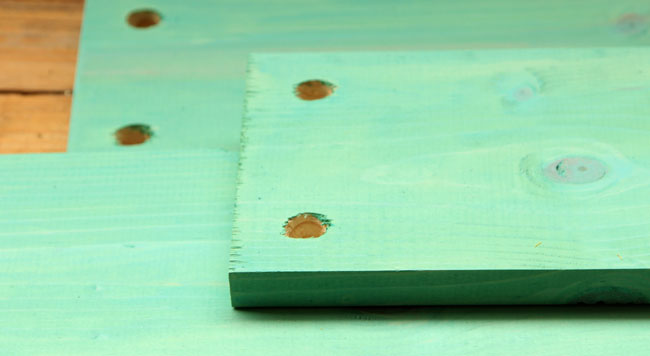
Recipe 7: Dilute the acrylic paint with a ratio of 1 part paint and 1 part water, and apply the “stain” onto the wood with a brush or a rag. The wood will be stained with the paint color, but still has the wood grain showing through!
Different brands of paints will have different consistencies. Choose exterior paints for outdoor projects. And always choose non-toxic paints!
Pros and cons of DIY wood stain vs store bought wood stain.
Pros: made from simple household materials, these quick and easy DIY wood stains are effective, long lasting, and low cost (less than 10% of those in the store)! And they are less harsh on our planet as well – no solvents and no VOCs!
Cons: DIY wood stains can be unpredictable. The wood stain will have different color variations on different wood species, and it can be challenging to match colors when making new batches. So planning and testing is really important!
If your goal is to stain lots of wood and have them all look as uniform as possible, then you need to either make a big batch of home-made stain and use them at once, or choose a store bought stain.
Helpful tips and our reader’s FAQs
- Use scrap pieces to do tests before you tackle a big project. Every type of wood react to the wood stain differently.
- You might go through the same “Nothing happened!” moment. Our reader Mimi left a great comment. Here’s what she said: “I tried rusty nails and steel wool. I waited several days because it didn’t look like anything wsa happening.
today was the big day. I brushed some on a piece of wood, and it was CLEAR! i was so disappointed.
I walked away and got the other jar, and when i got back, the spot was almost black. OOPS, it worked!” - The longer the metal stays in the vinegar, the darker the stain colors become. Remove the metal before using the stain so the color is consistent in the batch.
- Many woodworkers keep their stain solutions for several weeks in room temperature. I do recommend using it up with 1 month because the color is most intense when it’s freshly made.
- You can apply finishing wax or oil to the wood after staining.
- The stains can be sanded off just like commercial stains.
- There is a little bit of fine powdery rust-like residue that should be wiped off after the wood dries. Big thank you to Karen from Somewhat Quirky Design who reminded me to add this!
- These stains, except for Recipe 7, work best on unfinished wood. Wood that has been oiled, painted, or sealed will not react to the stains unless they are sanded to expose the raw wood.
If you try this on a project, feel free to share photos or tips here or on my facebook page! =)
You may also enjoy:
How to transfer images to wood with only wax paper and water, plus a home made furniture wax recipe!

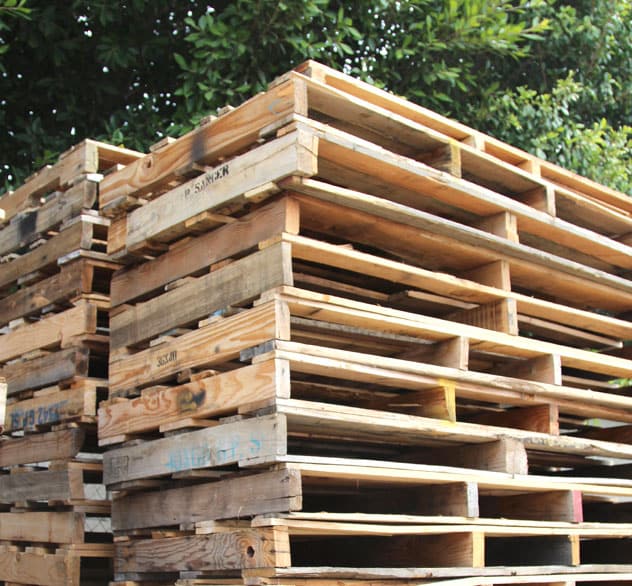
All About Pallets! Where to find them, how to select them and take them apart… loads of tips!!
Happy exploring and have a wonderful week!


Great info on making stains. Have you ever tried this with copper wool or bronze wool pads? My guess is that those metals wood produce different colors vs. using steel wool.
hi Brian, i haven’t tried those. but someone mentioned in comment here that copper penny can create aqua blue stain. 🙂
Dear Ananda, Thanks for sharing this great idea with us. I am so thankful for all that you have done, and I appreciate the effort you put in.
I posted just a few minutes ago about adding a bit of varnish. I didn’t mean to add it to the solution. You need to let the wood dry 24 hours or so after applying the solution, and then apply varnish. Here in Brazil we have what is called verniz maritimo, or maritime varnish. It adds an aged and elegant effect to wood, it is only available in the type which is solvent based, but it is worth the trouble, it really adds a nice finish to your wood, water based varnish is not the same at all. I don’t know what it is called where you are, but I can assure you, that you will love the effects it has on your wood, and I am sure you have an equivalent. So, to sum it up, if you aren’t satisfied with your steel wool in vinegar results after leaving it 24 hours, add a couple of tablespoons of drain clearing alkaline crystals, let it sit for around 30 minutes, and then apply it. Apply several coats. You will love it, at least I did. Let it dry 24 hours, and then apply maritime solvent based varnish. You will not be disappointed with your efforts, believe me. The wood you started out with will have nothing in comparison with what you have in your hands. Share this with others please, it was completely an accident to have discovered this. I was just trying to get a more acidic solution, but the drain clearing crystals were alkaline, not acidic, and made one immense difference to the results which were really mediocre ate first.
hi Quintin! thank you for sharing your awesome discoveries! something similar i had found was that baking soda can darken wood too! i don’t know the science behind it, but will post more when i do some research! 🙂
I made the white vinegar steel wool combo, and it left the wood slightly darker in color. I added drain clearing alcaline cristals, which I thought were acidic, until reading the fine print, to get more color. But that really improved the results. So the second time I tried the vinager steel wool combo, and found it really weak in coloring, I added a couple of heaping tablespoons of alcaline crystals used to clear drains. -The solution got really hot, and smoked a little, but I left it 30 miniutes and then applied it to the wood. The result is really incredible, it gives the wood a really brown carmelly noble finish like really expensive noble wood. Add a bit of varnish, and you have a really beautiful result. So my friends, add a piece of steel wool to vinager, leave it 24 hours, anf then add a couple of heaping tablespoons of alcaline drain clearing crystals, and voila, you will LOVE the results when you spread it on the wood. The wood resembles much more noble and expensive wood types. Add a bit of varnish, and you have a very impressive result, for very little money. Try it, and experiment, you won’t be dissapointed.
It’s a really and easy to make wood stain in any color. Thanks for sharing the great information with us. Its really helpful.
Do you think instead of nails or steel wool I can use non aluminium beer caps?
hi! i think the caps should work 🙂 especially if they rust in the vinegar.
Thank you for your time explaining this in such depth. Great information. Looking forward to trying your recipes in the next couple of weeks. Off to buy some steel wool 😊
happy DIY Lisa! 🙂
Hello,
Wanting to get that white washed reclaimed wood like look as in your first picture. I have a bathroom mirror that is reclaimed wood. However the sides needed to be trimmed off leaving a fresh wood look. Now need to match. What do you recommend? I was thinking of using a grey stain first letting it completely dry and then overcoat with the white washed paint and wipe off. Do you think this will work? Also don’t have Americana outdoor paint as you have used but can purchase Americana acrylic multipurpose. Will this work.
hi Corrie! yes using a grey stain first would work beautifully! and the acrylic will work no problem too! 🙂
Will it work with a new Brillo pad (which of course has soap in it)?
hi glenda! i would soak it in water first and sand it a bit to encourage rusting! 🙂
Hi there! Great article! I’m making wooden chopping board and wanna know if the vinegar and steel wool recipes are food safe?
hi Le-Reece! most cutting board finishes are oil / wax, and we have a recipe here https://www.apieceofrainbow.com/diy-butcher-block-cutting-board-oil-conditioner/ . wood will darken and look richer with this finish as you can see in the tutorial.
however, if you want a much darker color, here’s a food safe stain on amazon that many recommend- https://amzn.to/33zVZcK 🙂
I made the steel wool and ac vinegar mix, about to give it a go!
Because I like to filter out impurities – I make maple syrup so there is a lot of filtering going on – I put the stain through 2 paper coffee filters mounted in a regular kitchen funnel and think I got most of any potential residue out. Will let you know!
I have been doing this for many years. Best advice I can offer that hasn’t been given already is to try using the same known slab of wood for an entire project to ensure the stain is uniform. I had a project where I was short on wood and went back to the big bix store for another piece. The new board stained completely differently in spite of supposedly being the same wood.
Make a lot more than you need, not just for the current project, but for new projects after the end user likes the end result.
hi David, thank you so much for sharing these great tips! 🙂
I have tried the steel wool and vibegar. Awesome. I added peroxide. Worked very well. Tried tea. Cool. Ttried coffee. Cool. All on ontario hardwoods. Really interested
Thanks for the great information! I am experimenting with coffee first coat and then a vinegar & steel wool second coat on pine. How long would you let the coffee sit on the wood before wiping off? Or would just apply thinly so it doesn’t need to be wiped off?
Thank you!
hi! i would just apply thinly so it soaks in pretty quickly and doesn’t need to be wiped off 🙂
The DIY wood stain really worked great for our outdoor wood fence, and saved us a lot of $! Thank you! 🙂
I’m wondering how this holds up to water? I stained using watered down black acrylic paint on a side of a bathroom vanity to get a really nice weathered gray after two coats. If it happens to get a drop of water on it, will it leave a watermark? How is your fence holding up? Should I seal my project? If so, with what? Thanks!
Hi,,
This is an excellent article! The photos and directions are informative, and it looks like the options are endless. So basically the acidic vinegar puts the iron ions into solution, then they’re deposited into the wood grain tannins? Have you tried anything with black olive “berries”? I just picked some yesterday and I’m curious how to prepare them, how to apply the mix and what effect/color they’ll have.
Thanks again!
hi rob! thank you! yes the iron reacts with the tannins to create the stain colors. i have not heard of black olive tree stains, so if you do some experiments, let us know how it goes! 🙂
I have tried the steel wool and vibegar. Awesome. I added peroxide. Worked very well. Tried tea. Cool. Ttried coffee. Cool. All on ontario hardwoods. Really interested
Adorei o nome: A piece of rainbow. É maravilhoso criar e observar as maravilhas que podemos fazer cuidando e amando a natureza.
thank you so much Stella! 🙂
Your recipes for all these wood stain colors is fantastic! Thanks!
very nice post, we are trying to make some wood stains and this is super helpful. thank you very much.
Do you know what happens if you light the steel wool on fire first?
not sure how that would affect the reaction with vinegar. interesting question though 🙂
if you want color in a natural state you might also try Natural Indigo you will find you can gain a nice purple tone to the wood. I highly recommend trying this you will be amazed with the outcome practice with the mixtures and to get the desired effect.
thank you harley for sharing this tip! i LOVE indigo! will have to try it on wood next! 🙂
Very helpful post and discussion – thanks!
How stable are the stain colors? Do the stains change over 3, 6, 12 months and beyond? Darker or lighter or unpredictable?
hi! they are very stable actually. we don’t get much rain here, so if the wood is exposed to lots of rain, i am not sure what would happen. 🙂
Thanks, Ananda. I meant for interior use. Sounds like the stains would be quite stable when used indoors. Thanks!
Oh wow, This is such an amazing post. Really fun and informative post
What a helpful and informative post! This can be really useful!
Have you tried green tea to add tannin to the wood? All of the teas contain tannins in different amounts.
hi michael, i only tried black tea, but green tea would be interesting to test! 🙂
I’m so excited I found this post! I have been looking for a non-toxic natural stain for my wood ceiling and this is it! I will start experimenting on scrap wood next weekend! Thanks!
Thank you so much for this! I love it! I tried the white vinegar and steel wool pad stain on a scrap piece of plywood and loved it!!! I was wondering of you know how much mixture do I need to make to dye a 48” x 30” piece of plywood on both sides. Thanks again and greeting from Chile!
hi camila, greetings! most stains cover 200-300 sq. ft. per gallon, so you would need about 1/2 liter, depending on how porous the wood is. i would make a bit more just in case! 🙂
Hi Ananda, thanks for the great tips1 I have a jar of white vinegar with steel wood AND rusty nails brewing just now. I was wondering: do you think that an oak leaf/bark tea could work well as a tannin-rich base? (I have plenty here!!) Thanks!
hi eleonora, yes i think so. 🙂 i would do a few side by side tests and see which colors you like better!
This is brilliant stuff. I am so happy to have found it. Thanks.
I am home shackled ater surviving brain cancerand started doing wood carving a year ago to keep my creative side going. Turns out I’m actually good at it. I learned to make my own food safe finish and now, thanks to you, am making my own stains. These have taken mywork from good toWAY COOL… I actually have people asking me to teach them stuff. I’m back to “You can do it your way” teaching again. Thankyou.
hi paul, thank you SO much for sharing your experience! i wish you lots of joy and adventures on your creative journey!!
Are all of these food safe?
hi! i would be much more cautious when it comes to making sure things are food safe. these stains do not give off VOC, but to eat on them is another question. i would use food safe wood species and only apply food safe natural wax as finishes.
I love this… the smell of vinegar is not that bad compared to commercial stain. Not to mention I’m the type of person who would rather bake bread myself than buy it!
Just remember to
1) wait 20 minutes for the color to appear
2) test an inconspicuous spot or scrap piece first.
I like the white vinegar and steel wool combination but the color came out lighter than I expected. Will try the tea as a base coat or let the steel wool sit in the vinegar longer.
thank you vickie for sharing your experience! i too think it is fun to make things from scratch! =)
Hi ananda!
Thanks so much for this very detailed tutorial – I’ve been referring to it consistently in the last few weeks as a reference for one of my furniture DIY projects!
I am struggling a bit – I have an unfinished pine piece that I stained in strong tea (two coats), then stained with an apple cider vinegar + steel wool mixture. The stain brushed on a beautiful grey, but after a week, has settled into an orange tone! Is the orange tone the rust dust you had mentioned in your article? Do you have any tips on neutralizing the orange tones? There is a lot of it!
Best,
Annie
hi annie! i would try these tests- 1. skip the tea stain step, because some pine has tannis in the wood
2. dilute the stain with equal amount of water, or more, that would turn it towards grey.
if you like the results, you can sand the pieces you already stained, or use baking soda and water to neutralize the pieces you applied tea stain. 🙂
Ananda, best info I’ve seen. I’m starting with very weathered old wood that is very dark gray. To use these stains, should I do something to the wood first so stain will soak in Good?
hi mollybea! most of the time people use wood stains to create the weathered wood look you already have. what is your goal for staining? i would test a piece as is and lightly sanded before staining to see which color you like better 🙂
I’ve tried this, producing some lovely colours, including a light red from soaking red onion skins. Problem is, none of the produced any stain on a new pine test board. Even after repeated applications. Should I have sanded the board first? What else could I do to make it stain the wood?.
hi susan, if the wood has a sealer or oil finish on the surface, sanding will help. however some types of wood may not have enough tannis to react with the iron acetate , in that case i would use recipe #7
Fantastic idea – i was really wondering how to stain without chemicals!
Vinegar is a chemical. Everything is a chemical, in fact. That’s what “chemical” means.
hi kat! i think i should change the phrases to “no harmful chemical” instead. thank you for the feedback! 🙂
You mentioned color matching being an issue and making large batches helping there. When painting large areas with 1 gallon cans (if I can’t get 5 gallon pails) I always mix the next gallon with 1/4 of the previous gallon to make sure the colors are as close as possible. Basically a large batch is just several smaller batches. Measure 3 or 4 or 5 small batches carefully and leave them all for as close to the same amount of time as possible. Get a larger container and when they are ready strain them all into one and mix them. You can also mix several left over stains into one and see how it turns out.
thank you so much for sharing your great tips! =)
Absolutely stellar info and photos to document the results. You spoil me so! I can’t want to sand down some boards and get some pallets. Color me a happy camper! THANK YOU!!
This sounds great! Has anyone used it on a wood countertop? I have a natural wood countertop which I apply mineral oil to a couple of times a year. It’s looking a little drab and I would like to bring out the natural beauty of the wood.
hi carol, to refresh your wood counter top, i would use a good quality food grade wax and oil finish for butcher blocks, like this one on amazon( affiliate)! 🙂 – http://amzn.to/2tSpCp3
Basically, the wood stain consists of a colorant suspended solvent. The suspension agent can be either water, alcohol, but it is an actual finishing agent. We usually stain our wood fence because it helps to prevent rotting, limits UV damage, enhances the wood grain and also increases the life span. But most of don’t know how to prepare it. Though it is available in the market, still if someone is interested in making it at home, then he may follow the above- mentioned procedure which will definitely guide him in making the wood stain. Thank you so much for sharing the info.
Oh, wow! So surprising how the stain develops on the wood after leaving for 10 minutes! My wife did a DIY stain project before and was so pissed she threw in the bin! Will let her know to wait for a couple of minutes next time.
Hi,
I’m just wondering if you have ever used this over a wood filler, (Specifically Minwax) and had any trouble with it accepting this stain.
hi erica,
any type of wood stain or finishing would create a layer that would reduce or eliminate the chemical reaction between the wood and these stains, except for recipe 7, which is diluted paint. =)
Would this be safe to use on a raised vegetable garden? I am just wondering about the steel wool and if it could leach into the soil and end up in your vegetables.
yes it is safe! vinegar, iron rust or steel wool are all harmless to soil =)
just a little history….these stains (ferric acetate) have been used for centuries , on wood ,leather,steel,and cloth…I have a tip about dyeing cloth …saturate cloth with stain let sit but do not let it dry..then rinse it out…I tried it on fustion ( a cotton/linen mix) and got a beautiful golden/tan…these stains will not fade easily in sunlight.
Another variation is to use copper (but not pennies…too much zinc)wire cut-offs are good ,but to get best results the solution takes9-12 months to make a light blue stain…this solution was used to keep weevils,rats and mice from chewing on the wood or fabric and copper does have an antibacterial aspect also…have fun ,I have used these stains for years and am a furniture maker
thank you so much Mark for sharing! 🙂
I have a question rather a comment. Since I like the steel wool stain best, would I have to remove the soap from the steel wool before placing it in the jar with the vinegar?
Hi! I would rinse or soak it in water first:)
I’m hoping you can help be troubleshoot what happened: I brewed some strong black tea and painted it on what I *think* is pine or birch plywood. Once it had dried, I painted it with the vinegar solution (the white vinegar with steel wool pad that had been sitting for 24+ hours). Every time I have tried it the stain has come out a light gray. I’ve tried it with and without the tea, I’ve used coffee instead of tea and every time it is gray. It’s a pretty color, but not at all the color I was going for. I was going for what you have pictured as the result of your #2. Also, the steel pad doesn’t seem to have dissolved like yours did. Any suggestions? Thanks!
hi kourtney, i think plywood might have additives such as adhesive between the thin layers that prevents a real reaction. one simple test is to try it on a piece of scrap wood or even white paper, the stain should give a deep brown color. =)
Hi just wondering if i stain a bench seat, using vinegar and rusty nails, will it come off onto my clothing? Thanks.
hi sam, no it will not, the stain will be embedded.
just wipe off the bench a day after the stain dries because there might be a very fine dust on the surface.
I followed these instructions exactly, except the part about taking the steel wool pads out. I stuck the jars somewhere out of sight intending to take the pads out after 24 hours and proceeded to completely forget about them. It’s been over a month and I’m uncertain about what to do, should I dump the vinegar down the drain and throw the jars away?
Hi! You can use this stain, it will likely be pretty dark! 🙂
Hey,
This stain idea is great! I’ve been wanting to stain a bench that my nephew made for me ito compliment my laundry room decor. Now I know just what to do to get gray. Thanks for the info!
Does the smell go away?
yes, no more vinegar/metal smell after a couple of months
I made a stain with way too much vinegar, but on the first piece of test wood ( pine ) it instantly got more saturated, and 30-60 minutes later it looked much darker and aged than to begin with.
However, when I brushed some more on the same piece of wood, just the other side, it didn’t do anything at all. Did I make a really inconsistent batch, or is my wood just assembled from different sorts?
Really loving the look of the stain that did turn out, though, so thank you for this article!
hi fred! i think it could be because the stain was very diluted. also i find some wood don’t react to stains, they will need a coat of strong tea first. =)
I came across this post from Pinterest. So glad that I found it! I have used some unusual stains in the past. The one that I can think of right now is one that we used to make a corner table. I didn’t have any store stain that I wanted to use and I wanted to get this table in like YESTERDAY! I just happened to have a couple of boxes of old hair dye that I was getting ready to toss out. (It was so old that the plastic bottle was cracking!) I used it and I have to say it came out wonderful! I would have much rather not have used something that had had all those chemicals in it but I did use what I had a it didn’t go to the landfill.
I will be giving this a try though as my daughters have a couple of projects that need to be finished. Thanks for all of the pictures!
thank you for sharing this interesting idea Stahli! =)
i tried rusty nails and steel wool. I waited several days because it didn’t look like anything wsa happening.
today was the big day. I brushed some on a piece of wood, and it was CLEAR! i was so disappointed.
I walked away and got the other jar, and when i got back, the spot was almost black. OOPS, it worked!
i then brushed several other boards, and they all came out different.
I’m very happy with the results, thanks.
Tomorrow, I’m going to dilute some white acrylic paint to white wash some boards. What we’re doing is finishing the walls of a garage with pallet wood; also a good source of more rusty nails!!
thanks!
your pallet wall sounds amazing mimi! i may quote you in this post because lots of people go through the “nothing is happening” moment! =)
Hi, i used the vinigar and steel method however there are streak marks of how i applied it on the floor, colours is also a bit darker then what i wanted. What can i do or apply do lighter the colour to a lighter colour and get rid of the streak marks. Could i do it plain vinigar or even water? Urget reply would be much appreciated.
if you can gently sand the surface, that would be the best way. if not, try wash it with 1 part baking soda diluted in 5-10 parts water. always remember to test in future, because different types of wood react differently to the stains! =)
TAHANK YOU VERY VERY MUCH!! You save me!!
It’s a nice technique. Appreciate a natural way of making wood stains and that’s also without chemicals, really good.
can I use metal scrubber (one for cleaning dishes) instead of metal wool?
i have seen people using those with success, but i always wondered if they are much more rust resistant than steel wool, which means they would take longer. give it a try! =)
HI ltfi. I’ve used both ultra fine steel wool and the thicker steel pads used for cleaning pots. I find I get different shades with the different metal sources. (I use unfiltered cider vinegar as my base) I personally prefer the colors I’ve been getting with the pot scrubber pads. hth
marvelous post!
I enjoyed it a lot. I will try some combinations… thank you from Portugal
Seakestrel
thank you luis! =)
I have my steel wool in a jar with vinegar but it isn’t working ?
oh! what kind of wood? try a drop on a piece of white paper, the stain should color the paper in 5 minutes. if so, then it’s the wood!
Love the shades that have come up on the wood , it is really awesome. most important it is non toxic. Thanks Ananda for the tip.
Will look forward for much stuff.
LOVE! Does this tend to dry pretty quickly?
yes they dry very quickly =)
quiero teñir una mesita de café, después de teñir, se le puede dar algún tipo de barniz, para proteger y que no queden manchas de café o cualquier liquido que pueda caer.
yes i would use some kind of natural non-toxic varnish or sealer to protect the table! =)
Does the stain color in the jar darken once you take the pass out? I have had the steel pads in the vinegar for almost 48 hours because I feel like it’s not darkening up…
it won’t darken much in white vinegar, but it will stain effectively! =)
Awesome!! Thanks for sharing. I will be starting this tomorrow. I have several pallets with some diy ideas. Dreaded paying 12.00 for a little bit of stain especially when I need different colors for my project. I’m super excited to try this method. Definitely safer for our environment.. I have all the items needed..
you will love homemade wood stain Shelly! =)
This is a wonderful thing you’ve shown! Thank you so much !
About the diluted paint/stain – I did something on the spur of the moment once and it tuerned out amazing . I had a couple teaspoons of reddish-brown paint left in the bottom of the can after painting outside of my house and I had a really ugly stone wishing well in the yard , made of faded whitish grey stones and I added water1/2 way up the almost empty paint can and sloshed it around and then painted it onto the ugly wishing well thinking it might not last but would be better for awhile .
Surprise .. it stained the stones a beautiful reddish sandstone color that’s still nice 2 yrs. later !
thank you so much for sharing !! =)
Thank you so much for sharing! I did a pre-stain with coffee and food coloring and then a final coat of steel wool dissolved in about 2 1/2 cups of white vinegar and 3 tablespoons of balsamic and ended up with a BEAUTIFUL rich espresso color!
thank you lydia for sharing!! =)
I didn’t know it could be so simple. I have a question though – will woodstain made this way provide any protection for the wood or is it just for colouring?
hi neil, it’s for coloring. oils and sealers would be used for extra protection.
How exactly is rust residue “non-toxic”?
hi kerry, many of the products used to coat wood around the home have traditionally contained volatile organic solvents and other toxic chemicals. these home-made stains are water based, and the colors come from tannins in the wood reacting with metals like iron dissolved in vinegar, it’s not rust sitting on top. hope that helps! =)
how would you make a gray or red stain
i would use method #7- diluted paint. 🙂
I have used these stain to great effect. I have also used a mixture of white vinegar and hydrogen peroxide and copper to make beautiful carribean blue stain. I had the best luck when I heated up the liquids to near boiling in the microwave then added copper wire and let it sit for about an hour. Do not use pennies, they are not made from copoer anymore.
thank you so much Roy! i was soaking copper pennies in vinegar and nothing happened! will try your tips for sure!! =)
What were the proportions you used to make the hydrogen peroxide, vinegar and copper stain?
I’m no chemist but I understand that Hydrogen Peroxide can be volatile when in a concentrated form (ie less diluted) so you might want to be careful when heating it. Anyone else know more? David
Wow thank you for such a great post! I’m looking into staining my outdoor fence, is this type of wood stain suitable for outdoor? Will it fade from harsh sunlight or rain?
Thanks 🙂
hi crystal, yes it is suitable for outdoor and have been used in history! =)
It’s just a WOW technique. Appreciate. A natural way of making wood stains and that’s also a non-toxic, really fantastic. Considering the way it is made, the results expected will definitely be a hit. Given recipes are good. Enjoy.
Thank you for answering so many of my questions about these methods! 🙂 I still can’t get it to “brew” in a jar, I have to make it in an open bowl. So far, this is the only way that seems to be working!?!
hi tess! that’s odd… but if an open bowl works, you can always pour the liquid into a jar to store it, right? just make sure to take out the metal to stop reaction! xx
Great idea, thanks for sharing, I will be putting this to test =)
What a great tutorial for different kinds of natural stains! I love how you showed so many comparison photos!! I’m pinning this so I don’t forget!
http://mydiyol.blogspot.de
Hello Ananda,
this is a great post!
Thank you for sharing!
many greetings
Uwe
P.S.: I have a new blog!
please visit
hey uwe! your new blog looks great! =) tried to comment but it gave me the problem massage again!
Amazing post dear!
http://www.bloglovin.com/blogs/printed-sea-3880191
Anada,
You are brilliant! Thanks so much for sharing your creativity!
Happy day friend!
karianne
thank you dear karianne! xoxo
I have used the steel wool w/ white vinegar before. It worked but there was a lot of residue (probably rust) on the wood that had to be wiped off after it dried. Once I got all that off I just proceeded as if I was using regular stain. I like these methods particularly for signs etc that are going to have a distressed layer of paint over them.
thank you so much karen for sharing your great tips! i did notice the residue too, need to add that in the article! =)
And the residue only appears AFTER applying it? What if you passed it through a filter of sorts beforehand?
the residue is super fine, a filter may help a little, there will likely still be some =)
Wow, what an impressive post. I always admire someone who conducts research for such projects. Thank you for all the great information. Cheers, Ardith
thank you ardith for appreciating the geeky side of me! =)
Ooh wow! Thanks for the tips!
Such a great idea! I love that there are no chemicals involved, and that I have all of this stuff in my garage!
isn’t it odd that we make simple things toxic when it becomes commercial? 😉
What a lovely Person to share such great stuff. I am off to the garage straight away – totally inspired thank-you!
Vinegar is a chemical. A weak acid, in fact. Just because something is “natural” does not mean it is chemical-free.
All things are chemical. I think what people mean by “chem free” is stuff you shouldn’t eat or get on your skin.
All things are “natural”. Each harsh chemical is derived from natural products.
One day at work a body-builder was eating pills during lunch. Guys mentioned steeroids. The man said that these pills contained a concentrated extract from a natural product. Someone else said “so does WD-40”.
I just keep getting gray on the pine boards I have (select grade) – both with and without the tea pre-stain.
I’ve tried the balsamic and the white vinegar, aged around 24hrs.
Diluting them just made a lighter gray, not dark brown like it seems to say in your post.
Any tips?
hi kyle, maybe try putting a board in the sun for a week before staining? sunlight can turn pine wood towards golden brown. 🙂
Wow! What a creative and cool idea! I had no clue you could do this. Love it 🙂
thank you reichel! =)
What awesome ideas! I had no idea!
Wow! Such a cool post. This is so interesting!
http://www.MariaProvenzano.com