Simple DIY Pergola ( Grape Arbor ): Free Building Plan
A DIY arbor ( also know as a pergola or trellis ) is one of the most enchanting structures you can create in an outdoor space!
A beautiful pergola not only defines an inviting outdoor room in your garden and creates shade over a patio, deck or backyard seating area, but also offers the perfect structure to grow flowering or fruiting vines such as wisterias, roses, jasmine or grapes.
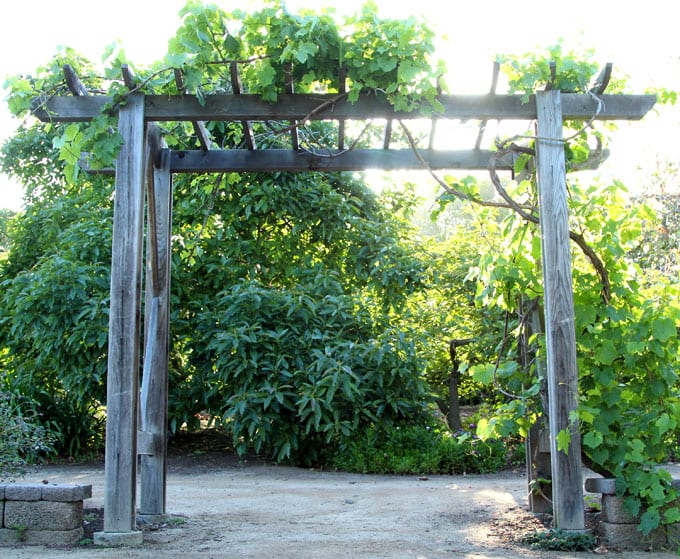
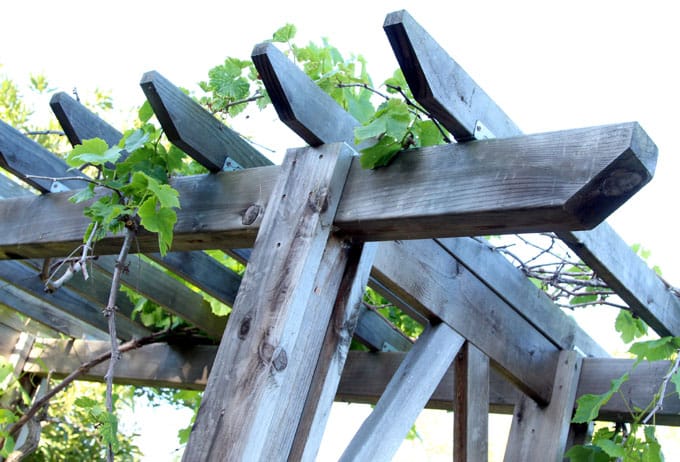
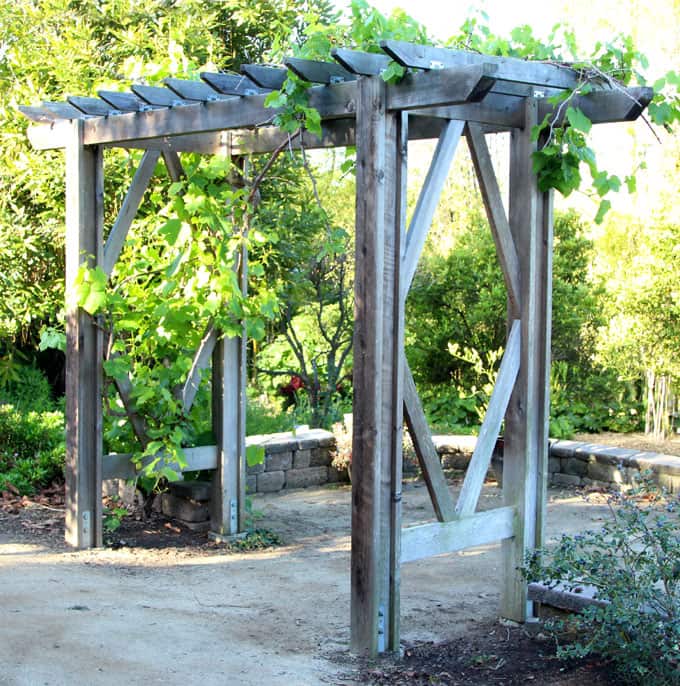
This grape arbor is located in a public garden near our home. I really like how attractive and DIY-friendly it is.
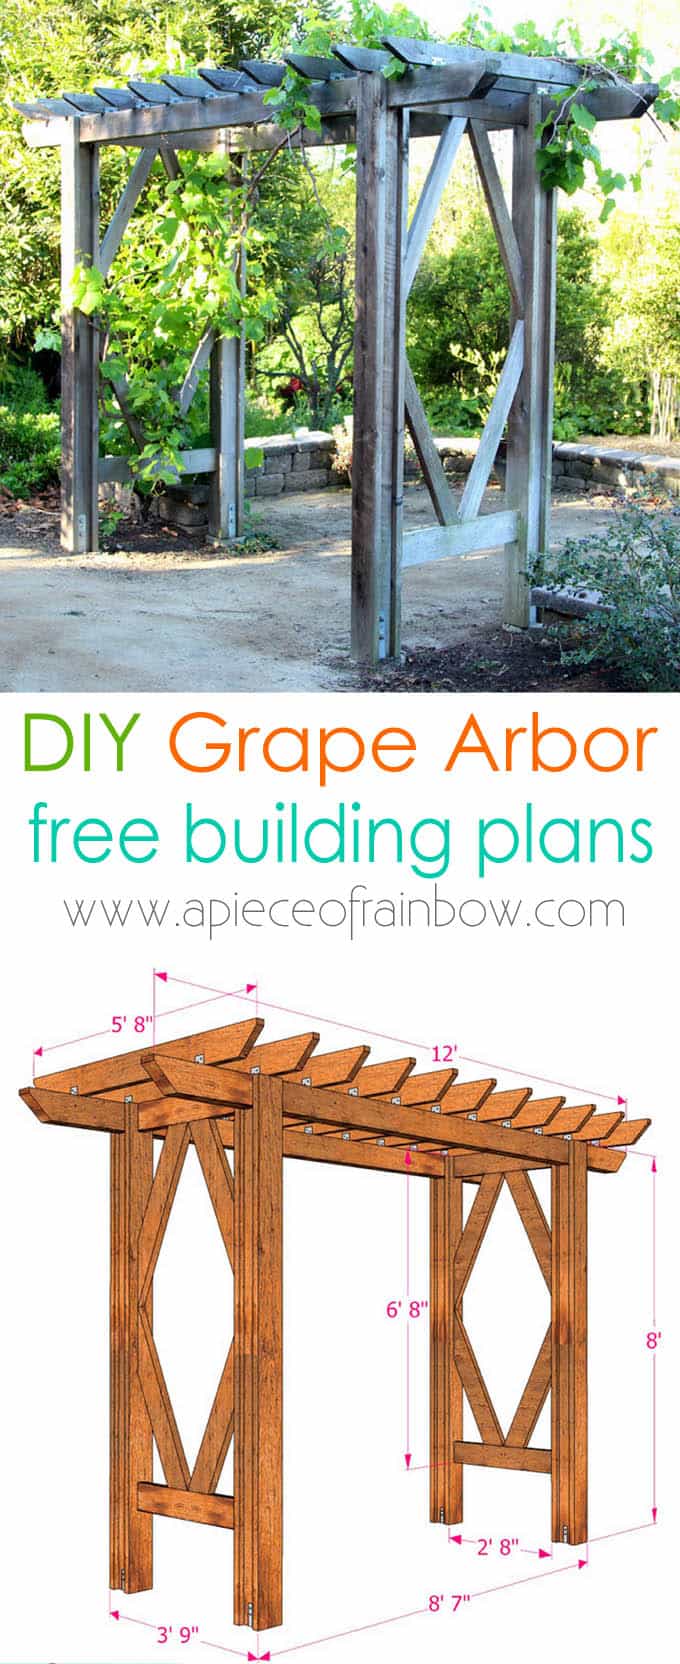
I decided to draw up a plan for you all who are looking for simple and great looking DIY pergola plans. Use as a guide if you decide to build a similar arbor / pergola for your backyard oasis!
DISCLAIMER: THIS ARTICLE and PERGOLA PLAN is for visual design ideas and building resource only. Please follow local building codes and professional safety guidelines when building anything structural!
*Some resources in article are affiliate links. Full disclosure here.
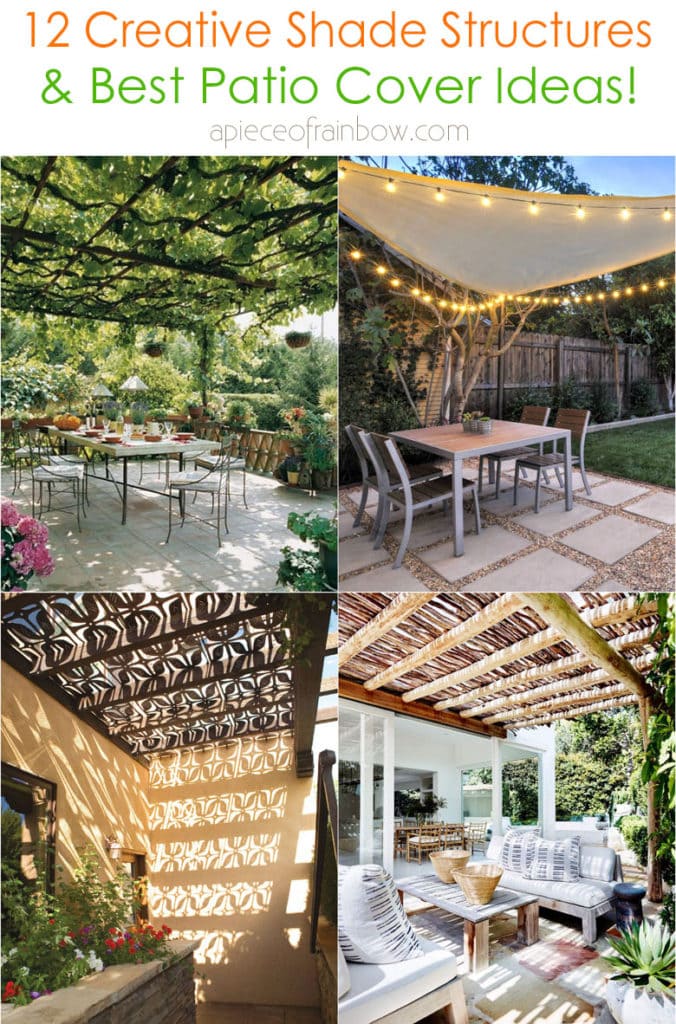
You may also love: 12 creative shade structures and patio cover ideas, including lots of wood pergolas, fabric or other covers you can add to pergolas, and DIY pergola kits!
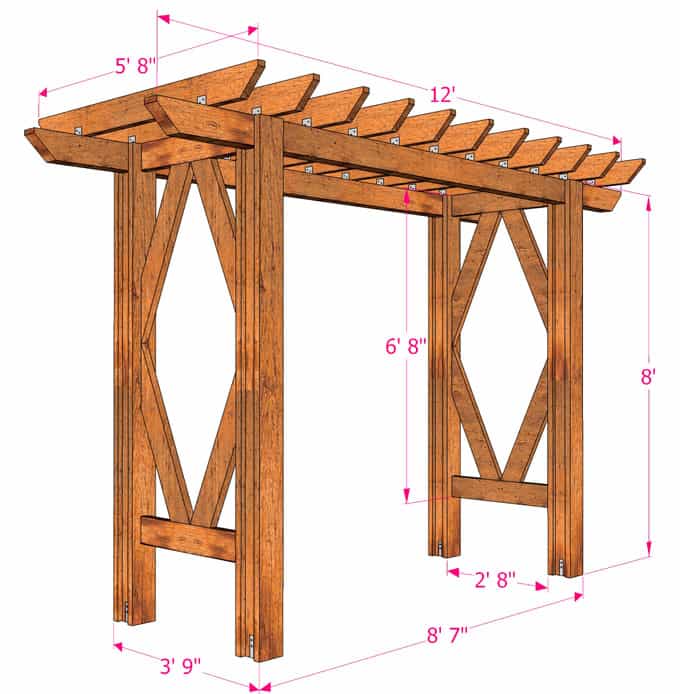
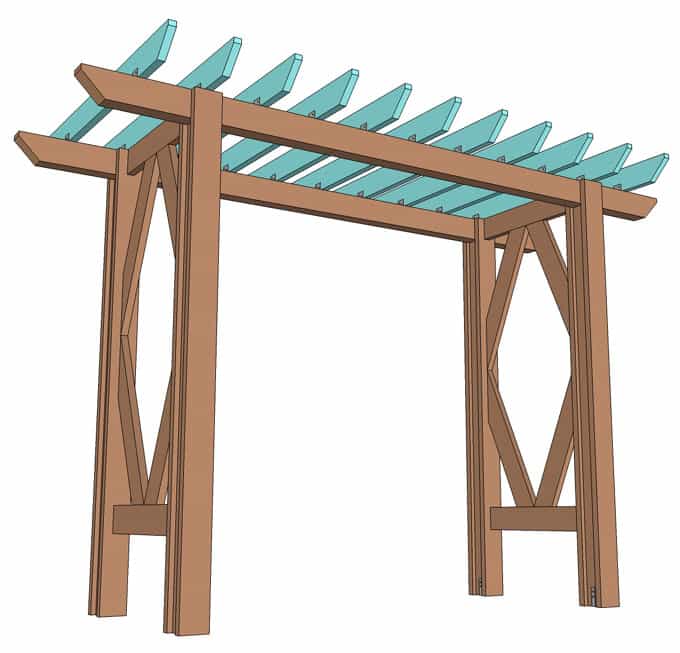
The drawing below shows the dimensions of the arbor and all the above ground components.
Here’s a list of lumber you will need for the DIY pergola / grape arbor:
IMPORTANT: an outdoor pergola project requires wood that is good for structural building, and rot resistant, such as redwood, cedar, teak, and SOME species of pine. Check with your local lumber expert!
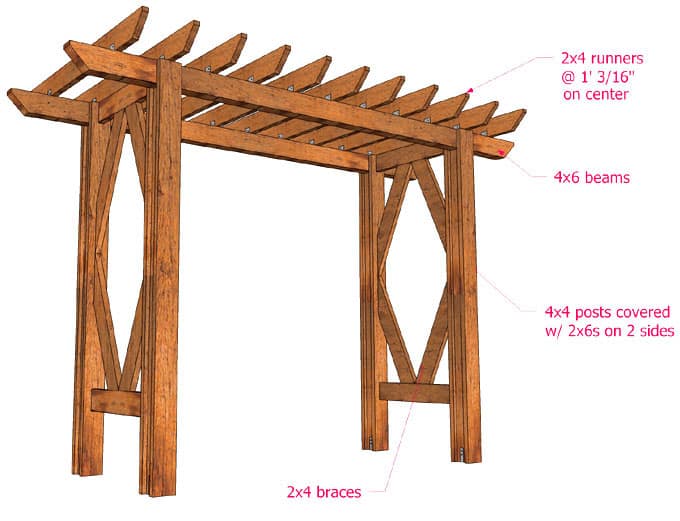
- posts: (4) 4×4 @ 7′ 6.5″ .
- trim: (8) 2×6 @ 8′ .
- beams: (2) 4×6 @ 12′ , option: 45 degree decorative bevel or corbel cut at ends
- braces: 2x4s size varies, see Step 4.
- runners: (11) 2×4 @ 5’8″ or 6′ , option: 45 degree decorative bevel or corbel cut at ends
- brackets for joinery, see each step for more details
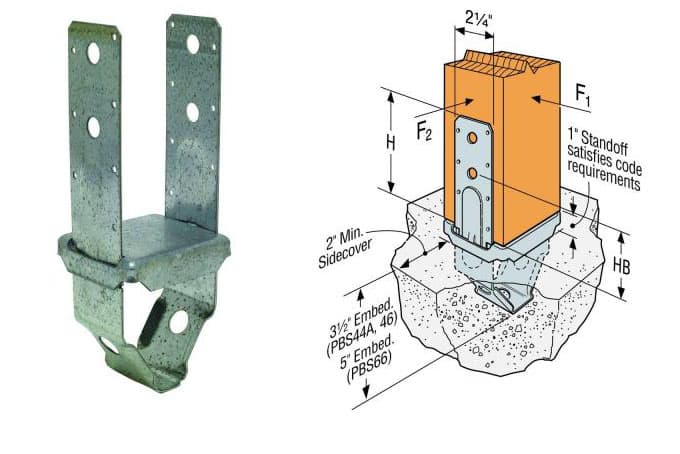
The DIY arbor starts with footings – very important.
Due to climate and soil type, there are different requirements for footings. Consult a professional local contractor when creating footings for arbors and pergolas.
Before digging any holes for the post footings, it is really important to call your local utility and cable companies (such as Blue Stake ) and have them mark the location of any underground services. Smart, safe digging is a must.
This elegant grape arbor uses Simpson post base PBS44A post anchors to connect the posts to concrete footings. See more in resources section at the end.
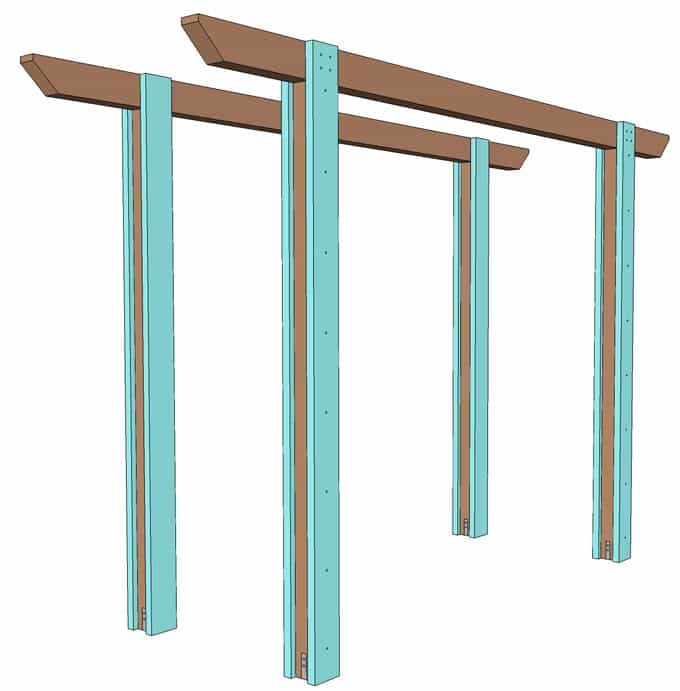
Step 1 ( after the footings are set ): install 4×4 posts for the DIY pergola.
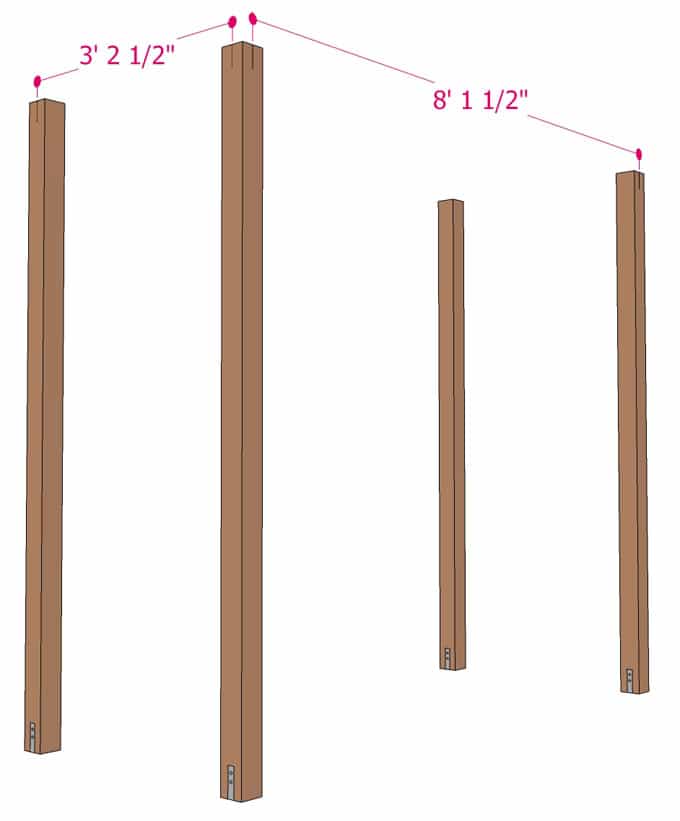
The drawing shows the center to center of these posts.Before securing all the posts, hold each post plumb in place, or brace the posts so they stay plumb, use a 2×4 and a level to make sure the top of all the posts are at the same height. Trim posts if necessary.
Use wood screws to attach each post to the base. Simpson Strong Tie, the manufacturer of these awesome post bases and other connectors, has put together an Installer’s Pocket Guide which you can download here for more details.

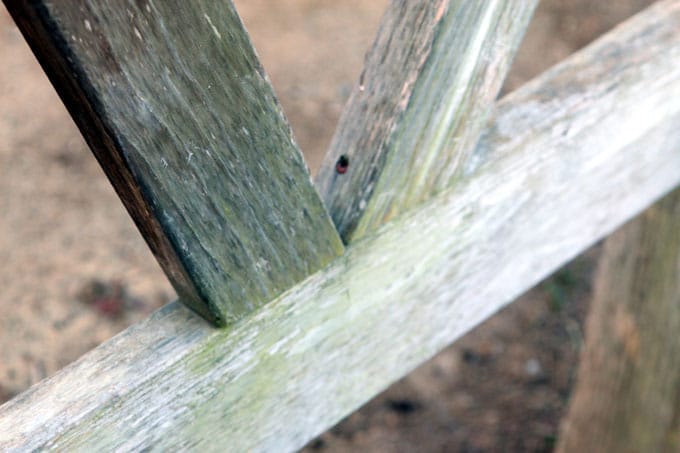
Step 2: Add 4×6 cross beams to pergola
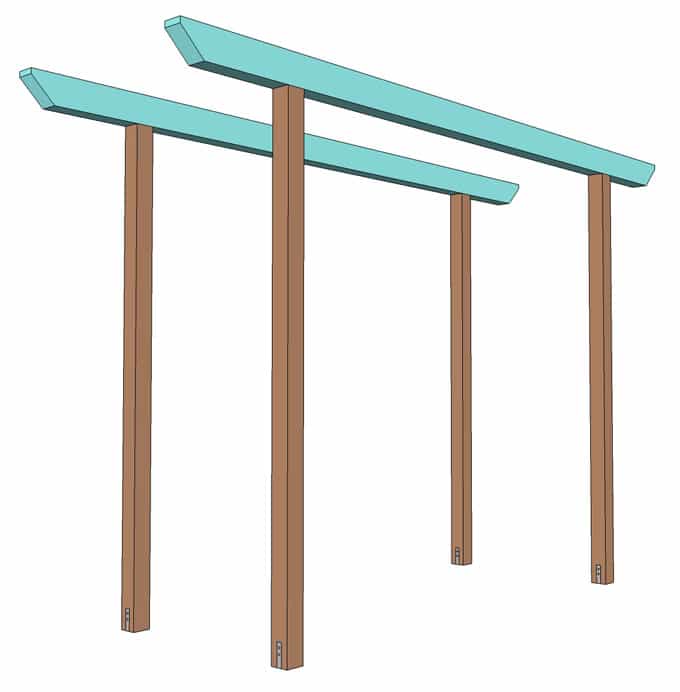
Rest the first 4×6 cross beam on center over a pair of 4×4 posts. The overhangs should be of equal length. Secure the crossbeams to the posts with pocket hole screws or Simpson mending plates. These will be covered by the 2×6 trim pieces as shown in next step.
Step 3: Add 2×6 trim pieces to grape arbor
These 2×6 trim pieces serve two functions: they add more details and richness to the pergola design, and they help strengthen the post-beam connection.
Each trim piece is attached to the beam with 4 screws, and to the post with 8 screws spaced vertically at 12″ on center.

Step 4: Add 2×4 braces
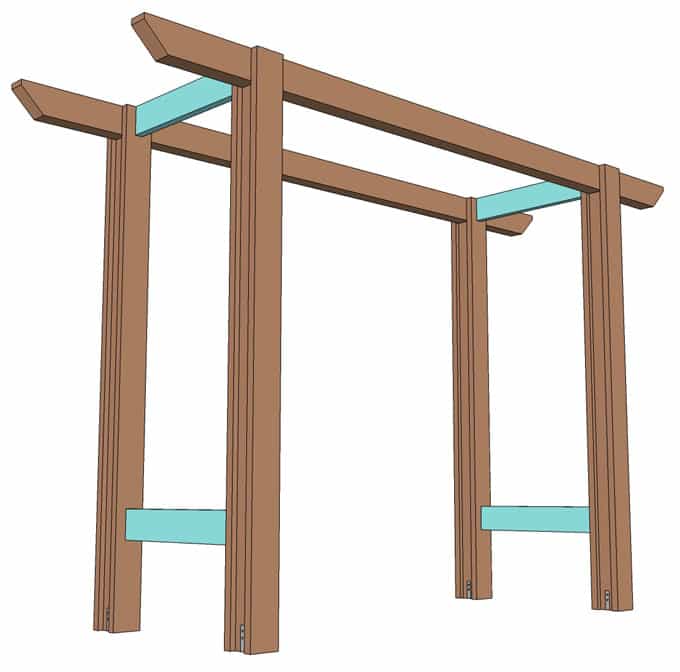
These braces also add beauty and strength to the DIY pergola. They can be screwed onto the post trim with pocket hole screws.
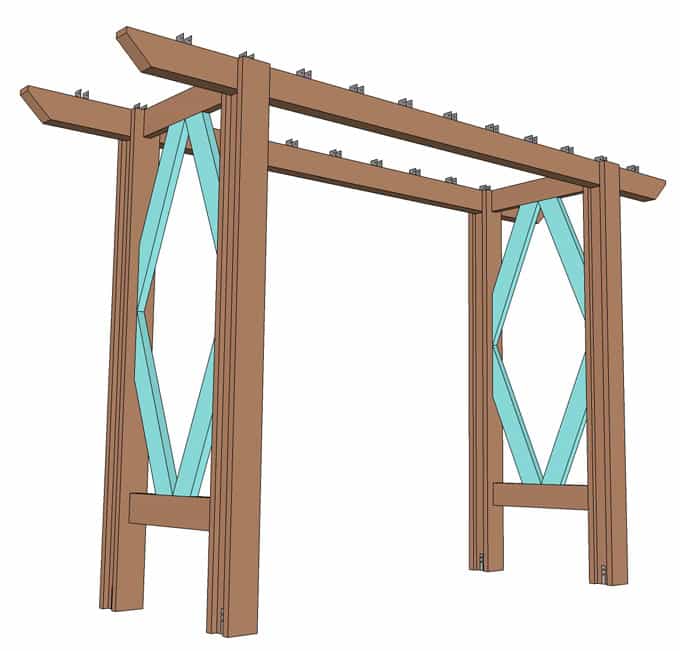
First install the two horizontal 2x4s on each side. Use a plywood or even cardboard template to cut out the shapes of the four 2x4s that form the diamond pattern. Feel free to improvise on the center designs.
Step 5: Add 2×4 runners to DIY pergola canopy


Space 11 runners at equal intervals along the length of the beams. Take time to measure the spacing and overhangs to keep the whole set of runners in alignment. Simpson Strong-Tie RTU2 steel brackets are used here to connect two 2x members – the beam and the runner – intersecting at 90 degrees. First mark each of the connector steel brackets and secure them to the beams. Then insert and screw each runner to the connectors.
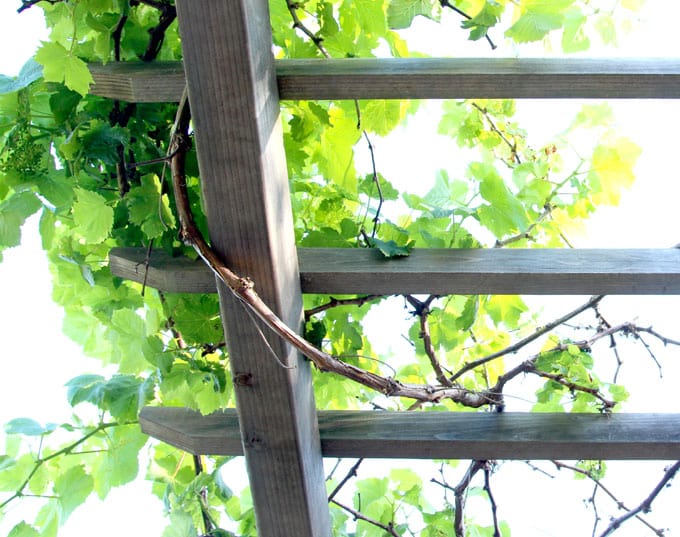
This grape vine climbing onto this DIY arbor is going to set some delicious fruits soon! This simple arbor would be great as a garden entry pergola as well!
Helpful tips and resources on how to build a pergola / grape arbor:
DISCLAIMER: THIS ARTICLE and PERGOLA PLAN is for visual design ideas and building resource only. Please follow local building codes and professional safety guidelines when building anything structural!
- IMPORTANT: Before digging any holes for the post footings, it is really important to call your local utility and cable companies (such as Blue Stake ) and have them mark the location of any underground services.
- Check your local building codes on size / load / height restrictions or any construction engineering requirements!
- Simpson Strong Tie not only has great products but also lots of information and booklets for builders and DIYers here.
- There are many good books on how to build an arbor / pergola / trellis, such as these- Trellises and Arbors: Over 35 Step-by-step Projects You Can Build, and
Black & Decker The Complete Outdoor Builder – Updated Edition: From Arbors to Walkways - Follow safety practices while working with hand tools and power tools. Always wear eye goggles and work boots while building.
More ideas for your outdoor space with a beautiful pergola: 10 easy & attractive DIY outdoor landscape lighting ideas, such as solar lights, string lights & more!

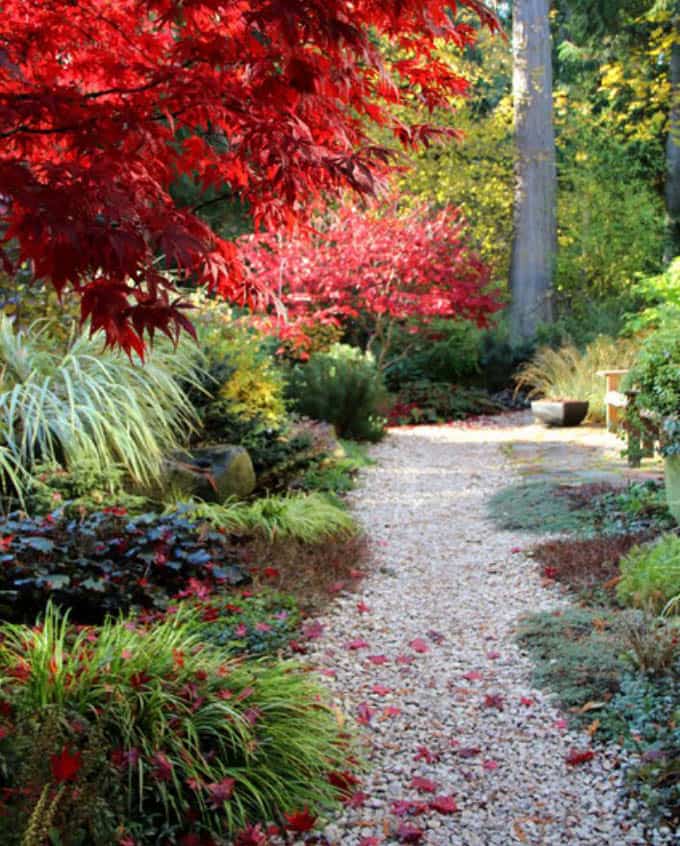
Other garden projects you may enjoy- 25 beautiful DIY friendly garden paths
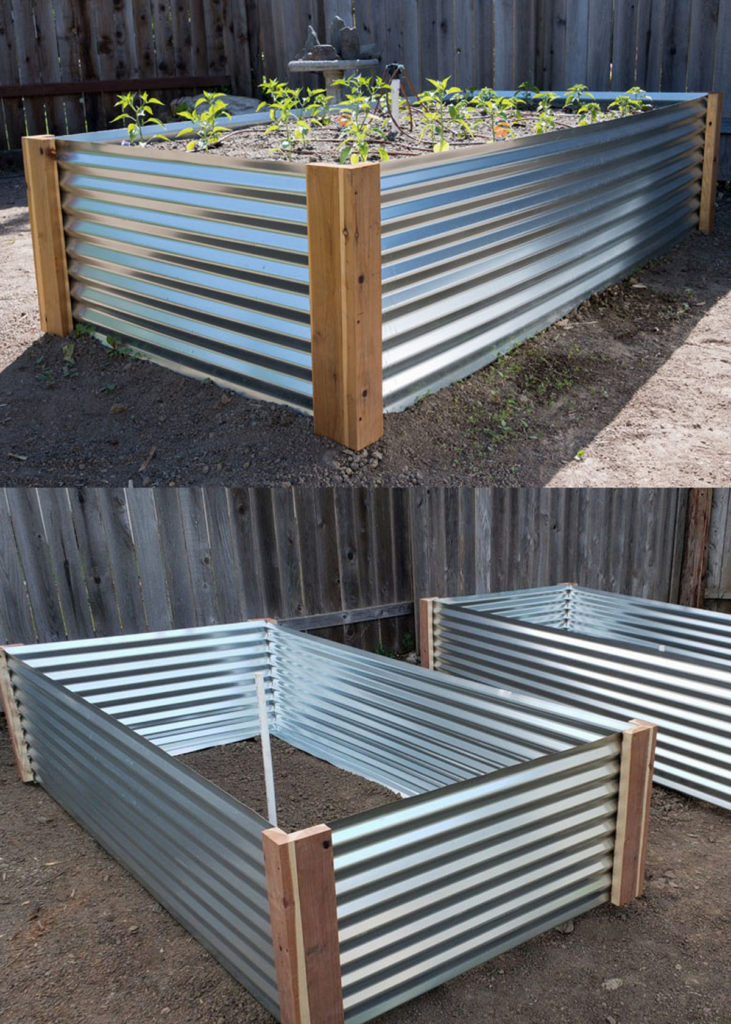
How to build productive and attractive raised bed gardens-
If you build this DIY pergola, tag us on instagram @apieceofrainbow. We always love seeing what you build! 🙂 Wish you lots of happy days in the garden!


Your posts are very instructive, which I later learned a lot from. It was great I hope you get more new posts! I am one of your Permanent Visitors
Thanks for the perfect instructions. I will try to make it in this weekend.
I want to build something like this for my patio and weave a cover through. I assume I could just sit it on a patio. Any idea to make it work better for a patio?
hi Mary! structures like this will definitely need footing or post anchors that attach to patio or to footings below, depending on the patio floor material! just like in any pop-up gazebo like these- https://amzn.to/38NHFDf, you will need sand bags / weights to secure them because of wind. 🙂
Thank you for the instructions, I’m building this later this week!
Can you share any guidance on how you attached the braces to the posts?
hi! thank you for a really good question! here’s a great discussion on ways to attach the corner braces, will add more info to my post. here it is- https://woodworking.stackexchange.com/questions/10619/in-what-direction-should-the-screws-go-on-corner-braces-with-two-45-degree-angle
Your supply list states you need “beams: (2) 4×6 @ 12′ ” but I’m guessing these are 2x6x12 not 4x6x12 right. I have not found ANY 4×6″ wood in any length here. Can you confirm it is 2x6x12
Thanks,
Janet
hi janet! if you go to step 2, you will see how the 4×6 beams set over the 4×4 posts. yes they are 4×6! 🙂
Thank you for making great detailed pergola tutorial. It worked great.
I’m going to build a pergola with my dad. This plan is perfect. Thanks!
I’m a huge fan of DIY projects and gardening also. It looks like a beautiful garden. Thanks for your DIY arbor building plan hope this plane help to grow up my garden.
Grape arbor! Trying to leave but I am stuck here. This is so amazing Amanda! Also a very comprehensive guide. Definitely sharing. thanks
thankyou miriam! happy building! 🙂
Hey Amanda! Love your grape arbor, great tutorial and it’s nice and solid too. I’ve included it in our “15 Sturdy Grape Vine Trellis Design Ideas For Your Backyard Arbor” article and pinned to my Growing Fruit Pinterest board. Thanks for the info, it’s great! Elle 🙂
Great article. After a few decks and cedar shakes on my gables – if anyone uses cedar and wants a great protectant I would recommend trying Cabot Australian Oils. After a few coats the sealant lasts for years (especially on vertical surfaces).
thank you so much for sharing the tip Eric! 🙂
Do you have a printer friendly version of these instructions? Like a pdf or something? Or is there one and I’m just missing it? Thank you!
hi! you can right click and save the plans and images. i didn’t create a pdf, may add one in future! 🙂
Amazing idea, I’m a huge fan of DIY working and I got some good idea about building a Arbor. It helps me to building a arbor for my garden gate.
Thanks for the share.
Really cool pergola, Ananda, you have an amazing corner!
I have just pinned it.
Did you make all of these yourself or someone helped you?
this one is in a garden we visited, i didn’t build it 🙂
Is this structure one that you could attach a swing to in the center? I’m looking for a plan that could provide a swing option.
hi bridget, this one can very easily be adapted to hang a swing. i would have a good builder making sure the footings and beams are strong enough! =)
Please fix step 4
Your instructions call for 2×4 at 2′ 8″ but upon closer inspection, both the real pictures and the model show a 2×6 horizontal brace. The diamond shape braces still being 2×4. Wouldn’t want anyone else to run out of the lumber like i did. Otherwise great post
hi shane, thank you so much for the feedback! i think both 2×4 and 2×6 will work here as the horizontal braces, but you are right about the actual pergola, i will add notes to the post. thank you! 🙂
Hi, would this design work with 13′ beams? We would need to bury 3′ in the ground, and we need the arbor to be 10′ tall to be over 3 steps and bedroom french doors that lead to the backyard. Thanks!
Also, what kind of wood do you recommend?
THanks!
hi dana, yes you can increase post height, however, i don’t think burying wood post is the best solution because wood can rot when exposed to constant moisture. i would use metal post anchors designed to keep wood off the soil. 🙂
Great article, thank you for sharing! Your article lives on …
The runners are also 2×6 in the images. I wish you did change/add a note in the instructions above to match the images. I’ve just purchase all the wood but because it was below freezing I couldn’t build. To pass time I decided to sketch out the pergola (made mine longer horizontally and shorter vertically) when I noticed the discrepancy. I do think using 2×6 looks better and now I wish I hadn’t bought all those 2×4 planks. Thankfully I didn’t cut into anything yet.
hi Ben, i don’t see where the runners were referred to as 2x6s. i think they are supposed to be 2x4s. 🙂
What a wonderful post!!! I have to try to do it !
It’s nice that you can D-I-Y this. I love Grapes <3 This is awesome & perfect! Thanks for sharing this plan
This looks wonderful! I just pinned it to my future project board.
This is soo beautiful! I would love to do something like this in my backyard. It’s almost like a piece of art!
I love this! We had one for our wedding, and then brought it home for our garden. We left it when we moved, so I would love if my husband could build one like this.
This is so perfect! We are needing to replace our arbors. Our grapes are maturing and need a sturdier arbor then we have for them now. Pinning this for later. Thank you!!!
What a wonderful post!!! My friends are getting married soon and are making one of these!I will have to share this with them for sure
I have to try to do it !
This is amazing! We have a small (MUCH smaller!) arbor in our garden/orchard that we have a grape growing on but someday I really need to make this! Thanks so much for these plans!