How to Whitewash Wood in 3 Simple Ways!
In this step by step guide with video tutorials, we will explore 3 super easy techniques to whitewash wood, and some beautiful examples of whitewashed wood floors, walls and furniture.
Here’s a summary of the 3 whitewash wood techniques:
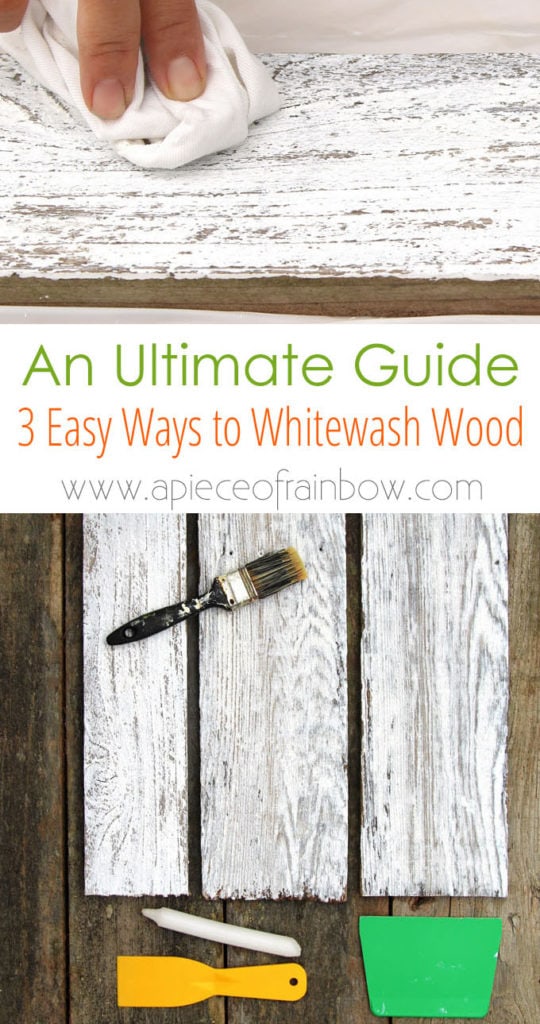
- Diluted paint method to create a smooth whitewashed wood finish. This is the easiest technique.
- Scraper technique to white wash wood with lots of textures in one easy step.
- Candle method to create distressed shabby chic style whitewashed wood.
The 3 whitewashing techniques will create different looks on different types of wood, such as smooth pine wood, pallet wood, and reclaimed wood. They are all really easy, quick and fun!
*Some resources in article are affiliate links. Full disclosure here.
Some of the most timeless and beautiful designs are born out of necessity. Whitewash, ( aka pickling ) is one of them. Traditionally, white wash is actually lime wash: a mixture of salt, water and hydrated lime used as an economical and easy way to make a farmhouse look clean and bright.
In modern times, when we recreate the whitewashed look on our DIY projects such as a wall or a piece of furniture, it is usually done with diluted white paint, which is what we will be using in the tutorials today. However, I am so curious about real lime wash I may just have to try it soon! 🙂
To see these 3 white wash techniques in action, check out the video tutorial below!
Materials for white washing wood:
- white paint: Choose a non-toxic, water based paint such as acrylic paint, latex paint, or chalk paint. I used Decoart Americana Outdoor Living Picket Fence White paint, which is great!
- mixing cups, lint free rags, paint brush
- a scraper like this or a piece of hard plastic for technique #2, and a candle for technique #3
- 120 grit sandpaper: you may not need to sand the whitewashed wood when using these 3 techniques. But if want just a bit less paint after the paint is dry, you can always sand the surface slightly.
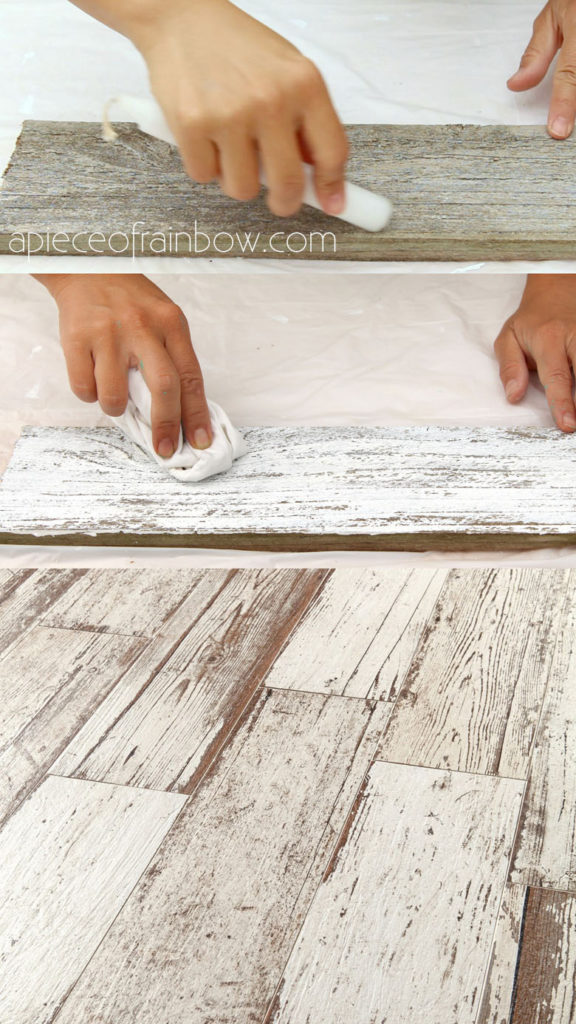
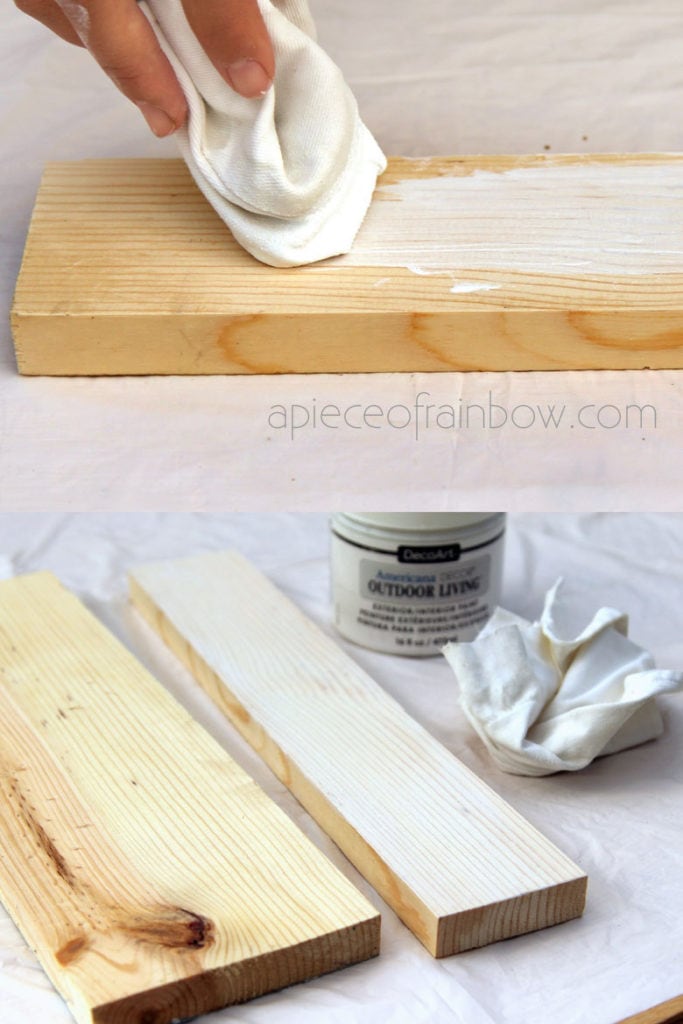
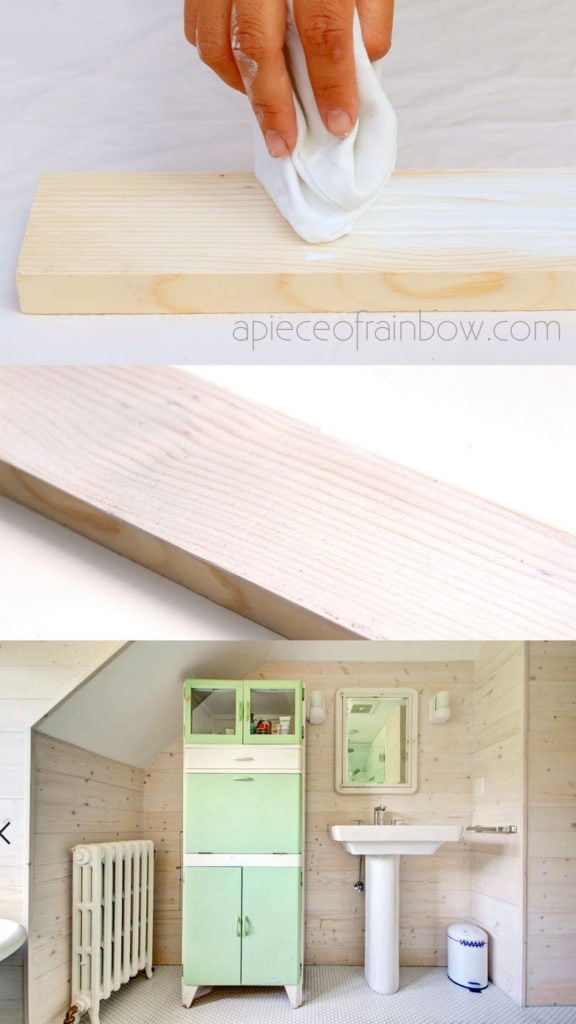
Technique 1: how to whitewash pine wood or other smooth finish wood using a rag and diluted paint
This is the easiest way to white wash wood, and the most commonly used. It is good for all types of wood, and easy to do on both floors and walls.
Many types of wood we get from hardware stores have a smooth finish surface, for example: 2x4s, common boards, plywood, oak, poplar, etc.
This whitewashing method is good for both smooth and textured wood. It creates a clean, refreshing and bright look, great for modern, farmhouse, or Scandinavian style.
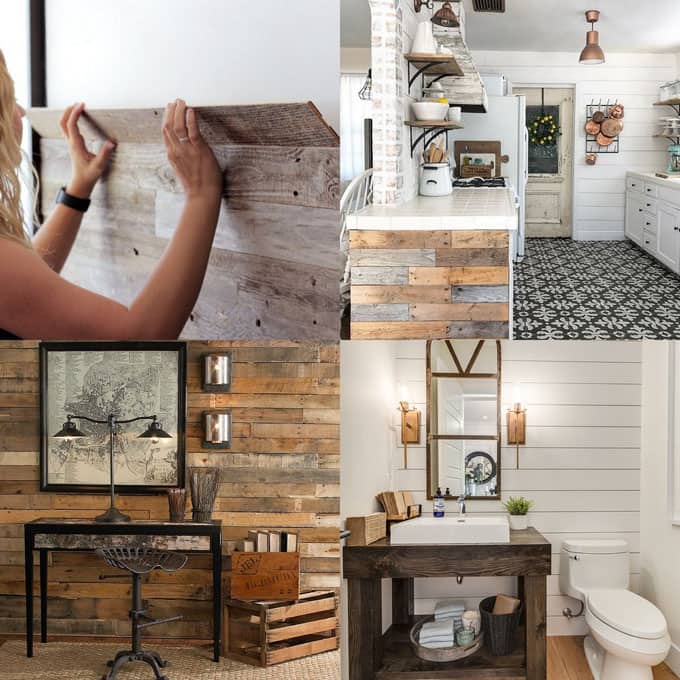
The beauty of white wash vs white paint is that the wood grain shows through and adds a richness to the finished piece. The whitewashed wood plank wall in the photo at top ( source) from a modern farmhouse bathroom is a great example.
You don’t need special whitewash paint. First dilute a water-based white paint with water, to a consistency of heavy cream. The water to paint ratio depends on the thickness of the paint. It’s usually about 1 part water to 1 or 2 parts of paint.
Dip a rag or soft paintbrush into the paint and wipe it onto the wood surface in the direction of the wood grain. Use it as a white wash stain. Repeat with another 1-2 layers if you want it to look more white. Let dry between layers.
I like using a lint free rag because it creates a very even whitewash stain without leaving brush strokes. Paper towel is not good for this use because it’s too fragile and may leave pieces of paper on the wood.
Update: I just put together 30 great examples of my favorite Pallet Wall and Shiplap Wall tutorials and inspirations you can check out here!
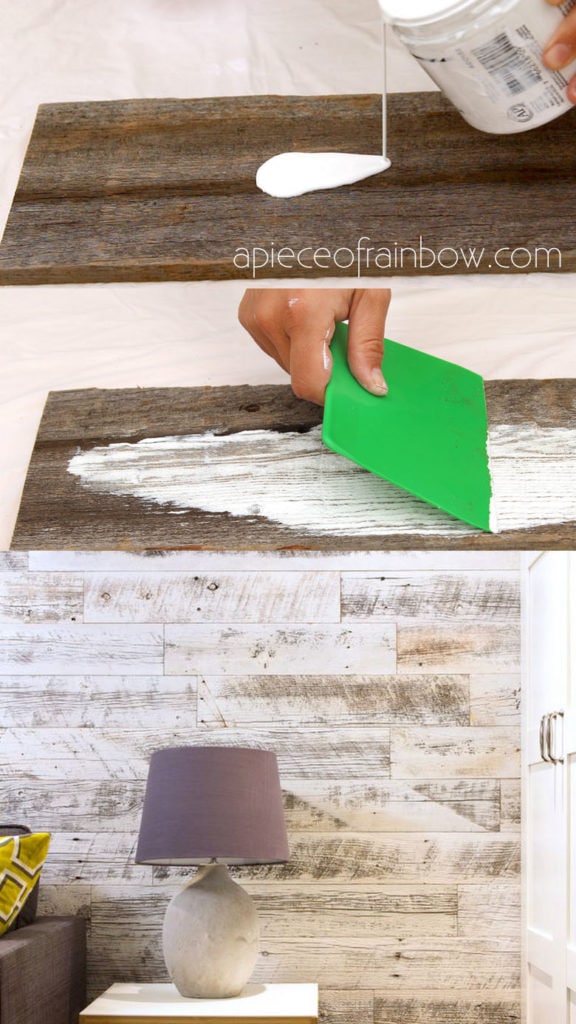
Technique 2: how to white wash reclaimed wood in one easy step using a scraper
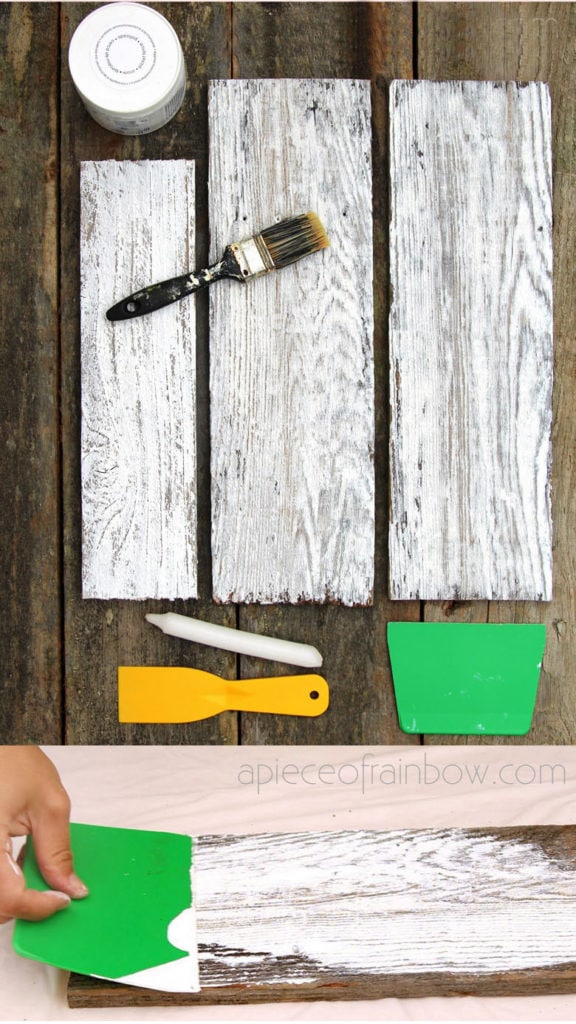
This method is incredibly fun! It works best on wood with lots of surface textures, such as reclaimed fence wood. Use this method when you want to create a rustic and aged look such as a plank wall made with old barn wood.
Clean the wood with soapy water and a brush. Let dry.
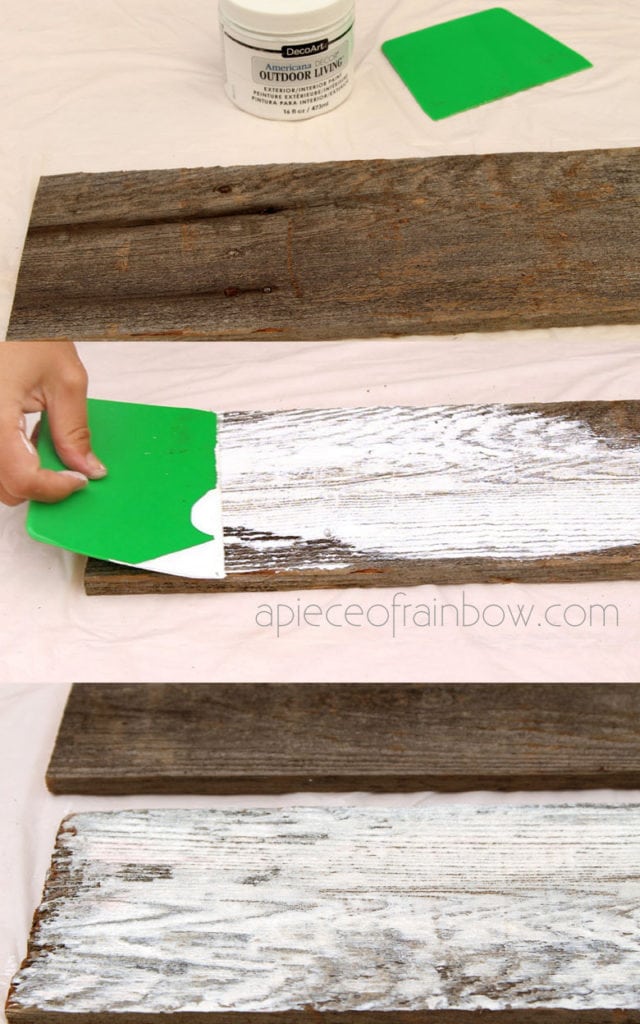
The Decoart Americana Outdoor Living Picket Fence White paint is the perfect consistency for this technique. If your paint is too thick, dilute the paint to a consistency of crepe batter.
Now the fun part: pour paint onto the wood surface. Take a scraper and scrape the paint along the direction of the wood grain.
Some paints will be soaked into the grooves. Let dry and we have a piece of rustic white washed wood!

The beautiful aged barn wood plank wall example above is from here.
Technique 3: how to create shabby chic style whitewashed look with the candle method
Shabby chic, distressed, chippy paint. These words are often used to describe a charming aged peeling paint finish and rustic look often seen on vintage furniture and decor pieces.

Take a clean piece of wood and a candle. The wood I used here is from an old pallet. It has a little bit of texture. This method will work with any type of wood. Rub the candle at random spots on the wood.
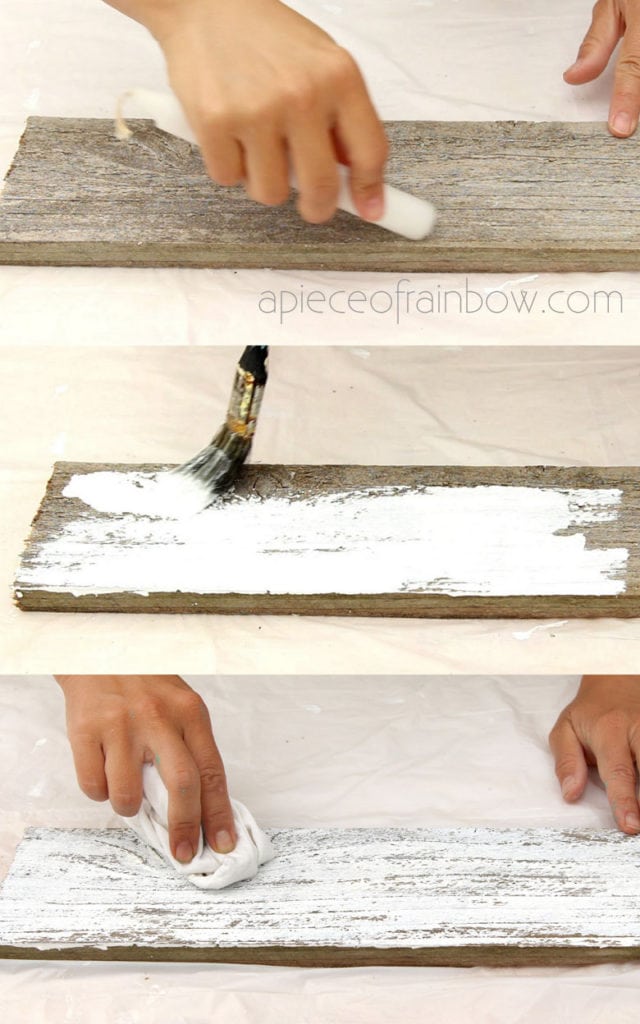
Paint the wood white. Let dry completely.
Use a rag and wipe the surface with some pressure. The paint will come off where the wax was rubbed onto the wood. How easy is that?
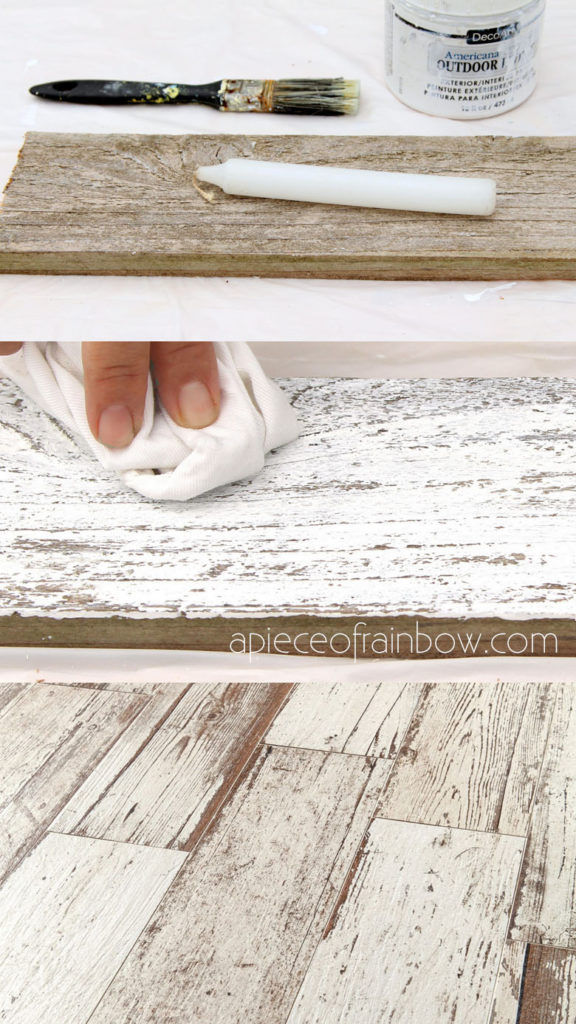
Below is an example of beautiful white washed wood floors ( source ). To be precise, they are actually ceramic tiles made to replicate distressed painted wood.
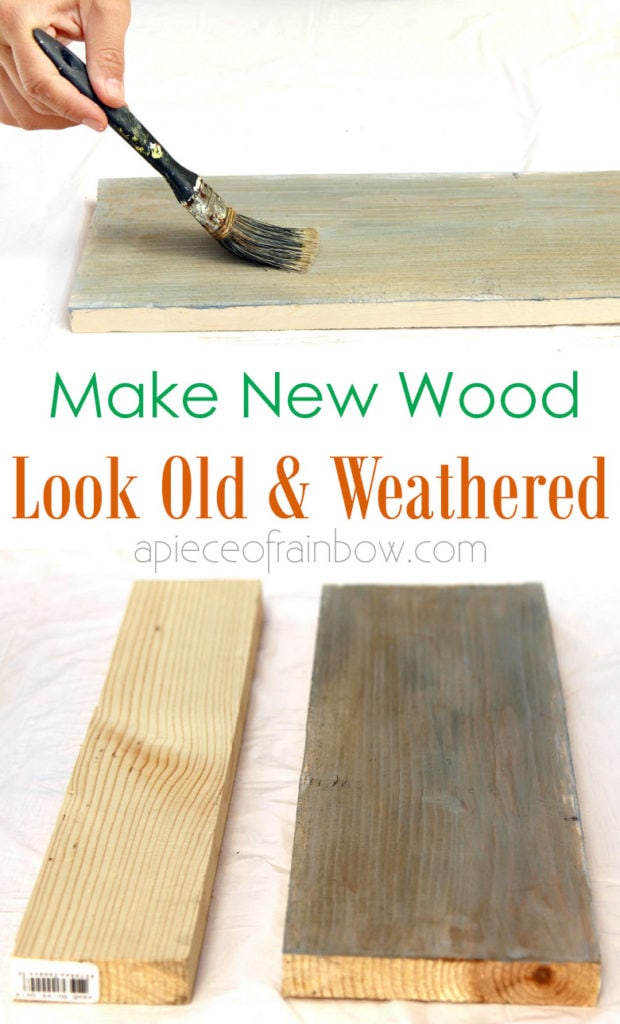
If you want to use this technique but only have new wood, you can start by making the new wood look aged by staining them with diluted paint or home made wood stains that are easy to make and very long lasting! See recipes here.

Which technique do you plan to use? You can see in the above photo that each one produces a different look! If you make anything from the tutorial, tag us on instagram @apieceofrainbow. We always love seeing what you create! =)
See you next week!


Whitewashing wood brings back memories of a DIY project I tackled last summer. I used the diluted paint method to give my old wooden bookshelf a fresh, shabby chic look, and it turned out beautifully. The step-by-step guide and video tutorials were a lifesaver for a novice like me. Kudos to the author for sharing such a creative and informative piece!
The detailed explanations of the three whitewashing techniques made me feel like I could tackle a DIY project with confidence. It brought back memories of the time I tried to whitewash some reclaimed wood for a rustic coffee table, and I wish I had known about these techniques then. The candle method for achieving a shabby chic look is particularly intriguing, and I can’t wait to try it on my next project. Thanks for the inspiration!
Hello, these videos are awesome…im making a tray and wanted to apply the 2nd method over stained wood but light so it shows some of the stain color and look similar to reclaim wood. Is it better to apply whitewash paint once stain drys? And is it better to just sand wood and not sand to make real smooth to get the look I’m looking for?
hi! yes it’s better to apply whitewash paint once stain completely drys. i would try it without sanding first, and you can always sand lightly later if you want a little more rustic look! 🙂
I’m thinking of doing the first technique. Do I need to put any kind of finisher paint/gloss after painting?
hi Lexcie! no need to add finish if you use the wood indoors or in covered area outdoors. otherwise a coat of outdoor sealer can help protect the wood from rain and sun. 🙂
What about pinecones?
hi Lucy! we actually have a tutorial on how to white wash pinecones here – 🙂 https://www.apieceofrainbow.com/bleached-pinecones-whitewash/
These are very simple and easiest way to whitewash wood. Thanks for your good share. Keep it up!
Hello! We have an entire basement that is clad with barn wood – like actually taken from a barn that was being torn down and nailed in place on every wall in our basement. So it looks like a barn. We even have two of the original barn doors. (We inherited this look when we bought the house). Can I use the second method you listed without taking the boards off? If I take them off I will ruin them, and don’t particularly want to replace an entire room right now, I mostly just want to look I look cleaner and brighter. Thoughts? Thanks!
Hi Sarah! Yes you can! I would test a little corner to ensure the painting-scraping works well with the paint thickness working vertically. Otherwise method 1 should work nice too, with a very quick sanding after paint dries to reveal the old wood texture if you prefer! 🙂
Would one of these methods work on an oak vanity?
hi trish! if the wood has a glossy finish, i would lightly sand it first, then use method 3. 🙂
where is the download button. all i ever see is the email sign which ive done.
download button is always in our welcome email and weekly newsletter. check promotions folder in gmail 🙂
I love the color, makes me feel a romantic and elegant. I’m looking for this kind of tutorials and you made my life easy.
Thank You for this very informative info! Been looking for a simple but effective method, and found 3! You guys are awesome!!
Love your ideas! I’ve very tempted to try the whitewash technique on a dark stained shiplap wall that we have. It is a pine wall that is stained mahogany. Any advice? I’ve never done anything like this before! Thanks in advance…
hi melissa! if the mahogany wood surface is absorbent, it will work well. if not, i would give it a light sanding first. 🙂
Good ideas! We love the look of whitewashed wood! Can’t wait to try these methods!
Great article. Thanks, very helpful advice. The easiest recipe for whitewashing boards is lime mixed with salt and water. A member of the forumhouse.ru Temra does not advise to process the walls of the house with purchased slaked dry lime – the walls will get dirty. Use quicklime: it is quenched, salt is added (salt as an antiseptic for wood strengthens its composition and gives shine), and the walls are whitened with this solution. In a state diluted with water, lime can be stored for a very long time, the main thing is to prevent it from drying out by constantly adding water. If the slaked lime is still dry, all the moisture has evaporated, then you will have to throw it away. Good luck!
Bonjour Ananda,
Quel magnifique tutoriel. MERCI a vous. j’ai une question : quelle méthode pour des meubles de cuisine équipée en mélamine blancs ?
MERCI d’avance.
Isabelle
hi isabelle, thank you! 🙂 it’s challenging to paint melamine, i would use this method here with peel and stick contact paper or vinyl- https://www.apieceofrainbow.com/diy-pallet-wall-shiplap-wall/3/
We just put up pine ship lap that is pretty much smooth. Is not primed or stained. It has great knots and natural wood patterns. I want to whitewash using paint diluted with water and a rag so the natural wood will show knots & streaks in an off white. A couple of questions. Do I have to sand the ship lap before using this method? And can eggshell paint be used, why or why not?
hi! no need to sand. and yes you can use eggshell paint! it’s always a good idea to test on a piece of scrap as practice first! 🙂
I have a tv cabinet that is a walnut finish can I white wash on top of a store bought piece of furniture.
hi! most store bought furniture has a finish that repel paint and stain. a light sanding would help, and i would test it on a not so visible area first to see how much sanding is needed.
BRAVO cela redonne vie au bois . Ces méthodes sont ‘elle valables sur des poutres au plafond?Les poutres blanchies redonneraient de la clarté à mes pièces sans abîmer la beauté du bois.
Merci
hi, yes you can whitewash ceiling wood beams, the first method would work best. 🙂
Thanks for these idea. Im planning to something similar in my cabin hallway.
I tried to find an answer but can you do white washed with wood that is already painted or stained? It’s a dark greyish color. It might be pretty trying to do white washed to it with some of that color in background? I thought I could use sandpaper then wash it before using your rag or scraper method? Thanks for the help!
hi dina, yes i would sand it to create a more absorbent surface first , especially where the paint finishes is super glossy. 🙂
Great tips! Your finished look is awesome. Thanks for sharing!
i love this color
simple and romantic.
eugénieduchet@gmail.com
j’aimerais peindre le parquet en blanc je pense que la technique à la bougie est la plus belle ( je lave depuis longtemps ce parquet qui était ciré avant il est maintenant tres mat et je pense qu’il est possible de passer le blanc ) je vis à Bruxelles pensez vous que cette peinture soit trouvable ici ? Merci c’est tres beau
Any further tips for using these methods when the wood is already on the wall and not laying flat?
hi lori, the 1st method works best for that, and you can also sand a little after the paint dries if you want it to look more rustic. =)
Great tutorial! Love your white wash.
Thanks!
Also really curious about real lime, can’t wait to read your thoughts on it =) I really liked technique #2, the scraper looks practical and efficient!
Love your whitewash!
We have an old parquet floor that I would like to do but it has quite a glossy finish to it. Even the parquet tiles in the box that are left over from previous owners have the same shine. Is this going to have to be sanded in order for the whitewash to stick? Ugh the mess. Or are there floor sanders that suck it up at the same time?
hi vicky, i believe you can rent floor sanders that have a vacuum in it. =) test on the extra tiles before you do it though!
I just read this post ( it was linked by another blogger ) and I LOVED it !!!! I am so wanting to try this with different types of wood on different projects.
BUT….my biggest attraction was the one where you said it was ceramic tile made to look like wood. I am “BEGGING” you for any further information you can give me, link me to…provide me with. I have the worst tiles in my kitchen and dining room….they only can be described as old Italion terra cotta orangy brownish looking type. (AND you should see what is on my counter and back-splash ). I do not have the funds to remove or replace them; so if ‘painting them’ is an option…I HAVE to try it. I was just thinking of a dining room makeover…but now I want to start with the tiles IF it is possible…so any information you can offer; I would so greatly appreciate. Thanks in advance !!!!
hi laura! that was a sample tile i got a few years ago and no longer made. if you google ” white distressed wood porcelain tile” there are many great choices to buy!! 🙂
I am sorry but what I am looking for is a way to PAINT my tiles to look like wood tiles….I do not want to buy anything..or replace the ones I already have….. I have tried google….pinterest…etc..and I do not see anything that is helpful to me. I have been ‘led’ back to you on a few occasions. What should I try typing in the search bar? I just keep getting actual ’tiles’ that are looking like wood….not A WAY to PAINT them. Thanks again in advance.
hi laura, i would search “how to paint over tiles” and use that technique with the candle method here =)
hi laura, this might be better – peel and stick vinyl
Maybe consider a paint stencil to change the look. It’s more labor intensive but not expensive.
Love the examples provided for each technique. Plan to use reclaimed pallets to blank my ceiling but will be white washing the wood to keep the room light.
that sounds beautiful patti!! 🙂
Wow! What a great tutorial! Thank you so much! I do have one question… When you mention diluting the paint, that is with water, correct?
Thanks again for the wonderful advice! This is great!
yes, with water. happy painting! 🙂
I would love to do this on an outside table. I’m assuming I would need to seal it since it will be in the sun. Do you have any suggestions on what to use to seal it?
hi lisa, exterior paint is UV resistant, no need to seal =)
Could you whitewash over a pine paneling that was lightly stained many years ago?
yes, i think it will work nicely! i would test a small area first. if the stain repels the white wash, just sand it a little. =)
Have used white paint over projects that were old and the stain actually came through and made the paint have yellow spots. I’ve since learned if you have an issue with that you can seal the piece with something like Zinsser clear shellac spray then paint over it with whatever technique you are using. I’ve also heard you can use this product if you have a “smelly” piece of furniture (cigarette, musty smells) and it will help with that.
Did it work?
Boy I can’t wait to try this, You did a great job explaining how to get the Look I Love. Thanks Ann
Would this work on wood paneling?
the candle method would be best, i think!
Love your blog and ideas. Will try this one.
Love that all of these recipes and accompanying photos are all in one spot! Great post! Thanks for sharing.
Very informative! Thanks!
This looks great! Do you think it would work on my 80’s vintage barnboard paneling in my family room?
hi tracy, i think so, but i would test and practice some on a few pieces of scrap wood with similar texture, before working on the vintage wall! =) also keep in mind that if you don’t like it or make a mistake, you can wash it off within the first couple of minutes and start over!
Awesome
Thanks for sharing how to do this. Saving this page for later. My husband is going to make some wood boards for our site, so this will be very helpful!
So amazing, great work, You are very talented!
Great tutorial! I love the different techniques for the different looks/wood types!
Awesome tips!! I could have used these when I was working on a project last week but I’ll just save them for next time. Thanks for sharing!!
Love the idea of using candle wax to get a white wash! So brilliant!
I may have to try this in the future. My dad is going to make me a farmhouse table, and I may use this technique on the chairs. Not sure yet. Painting furniture scares me LOL.
I love white washing! I normally just dilute the paint in water, but these other techniques are great!
these are awesome! that candle one is genius!
I have used the white vinegar with steel wool method. I let it sit for about two weeks and strained through a cloth. I poured it into a spray bottle and used it on a cheap light wicker laundry basket from the Dollar Store that I paid two or three dollars for. It turned into the prettiest shade of golden brown. I now use it for some of my throw blankets.Think I’m gonna have to try some of the other methods.Thanks!
thank you so much Robyn for sharing your wonderful tips!! happy creating! 🙂
Steps 2 and 3 are on dark colored wood. If the wood had more of a smooth surface, could i stain it first before doing technique 2 or 3?
yes! just make sure the type of stain does not repel water when it dries and it should work nicely! 🙂
Oh wow this such a fantastic project, especially to spice up the home. Need to grab some plywood and white paint and definitely give this a go.
Wow this is such a neat DIY project with wood. I have a ton of plywood and white paint left over from a project that I’m definitely going to be rolling my sleeves and trying this.
OMG I love that second white wash look! This would be great to use for a background for flatlay photos, I’m going to have to try this!
I have tried to whitewash my photo boards but they did not turn out this good. I need to follow your advice.
These look so good! I’ve always wanted to whitewash wood but I’m nervous I would screw it up!
I have loved white washed wood for years and I have done quite a few pieces and you are right it is easy and fun, you really can’t make any mistakes as long as you remember to dilute the paint.
You did a great job on the tutorial and I always look forward to your posts. I always learn something new, like the candle method, can’t wait to try that
Thank you so much, for all your DIY tips and tutorials and decorating tips.
thank you so much dear Patty for your kind words! the candle method is surprisingly easy with beautiful effects! =)
Wow-these look great! I know what I’m doing for my next wood sign!
I have always enjoyed the look of white washed boards and bringing it inside is a perfect look.
I have always wondered how to do this! This is a great tutorial.
This is such a great step by step – I want to do this for some pieces that would be perfect for my shore house!
The whitewashed look is one of my favorites, but I’m terrible with paint. This tutorial is so helpful!