Weave a Boho T-shirt Rag Rug With Easy DIY Loom
After our first t-shirt rag rug tutorial, I got lots of questions on how to make a rectangle shaped DIY rug. I am always happy to weave another rug! 🙂 It is so much fun, and a hand-made rag rug looks beautiful in any style home from farmhouse, to bohemian, to modern.
A little while ago, I discovered a GREAT book on weaving T-shirt rag rug, wall tapestries, and other types of cloth rugs. The author’s passion is totally contagious, and I just have to make not only another rag rug but also a DIY rug weaving loom!
The whole process of building a simple rag rug loom and weaving a t-shirt rug was so much fun! I will share with you a couple of ways to build your own adjustable loom and some short cuts I learned on how to weave this colorful boho style T-shirt rag rug!
Materials and tools to make a t-shirt rag rug and a DIY loom:
( Some of the helpful resources are affiliate links. Full disclosure here. )
*Some resources in article are affiliate links. Full disclosure here.
To make a T-shirt rag rug, first we need to make some t-shirt yarn or any fabric yarn. Here’s our first tutorial on how to make t-shirt yarn and weave a round rug.
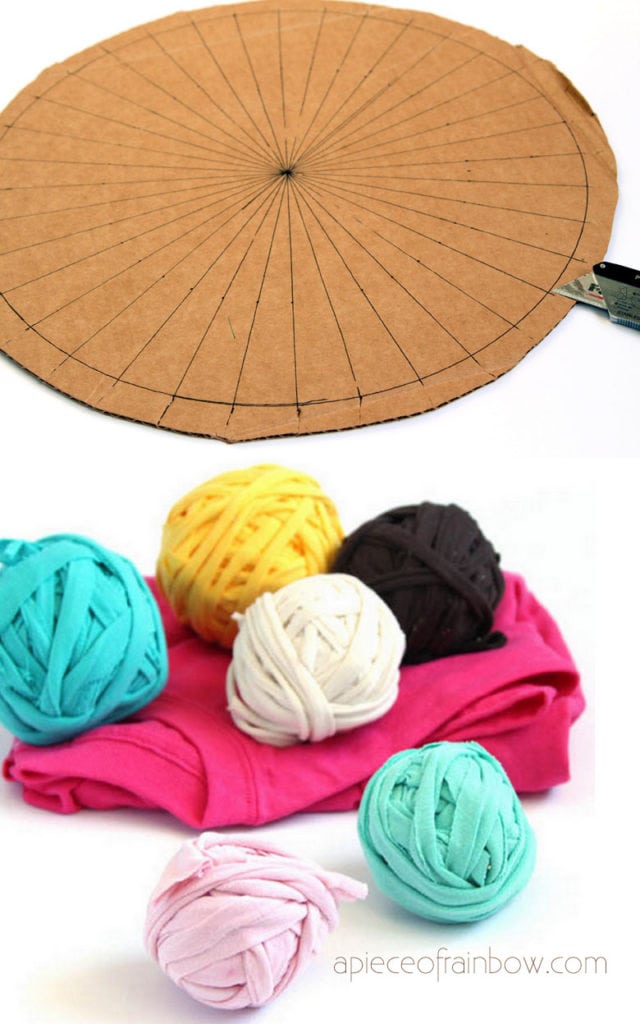
Optional but very helpful: this great rotary cutter really speeds up the t-shirt yarn making process, and here’s a cutting mat to use with the cutter!
For the DIY loom, you just need a hammer, some wood, 2 wood dowels, and 2 inch flat head nails ( the flat head will keep the yarn in place.
The book that I love so much is called Twined Rag Rugs, by Bobbie Irwin. It is the result of a chance meeting between the author and an 80 year old lady who made magnificent rag rugs. which inspired her life long journey to revive this traditional craft. She also published another beautiful book called Twist and Twine: 18 Ideas for Rag Rugs and Home Decor.

Step 1: make an adjustable DIY loom!
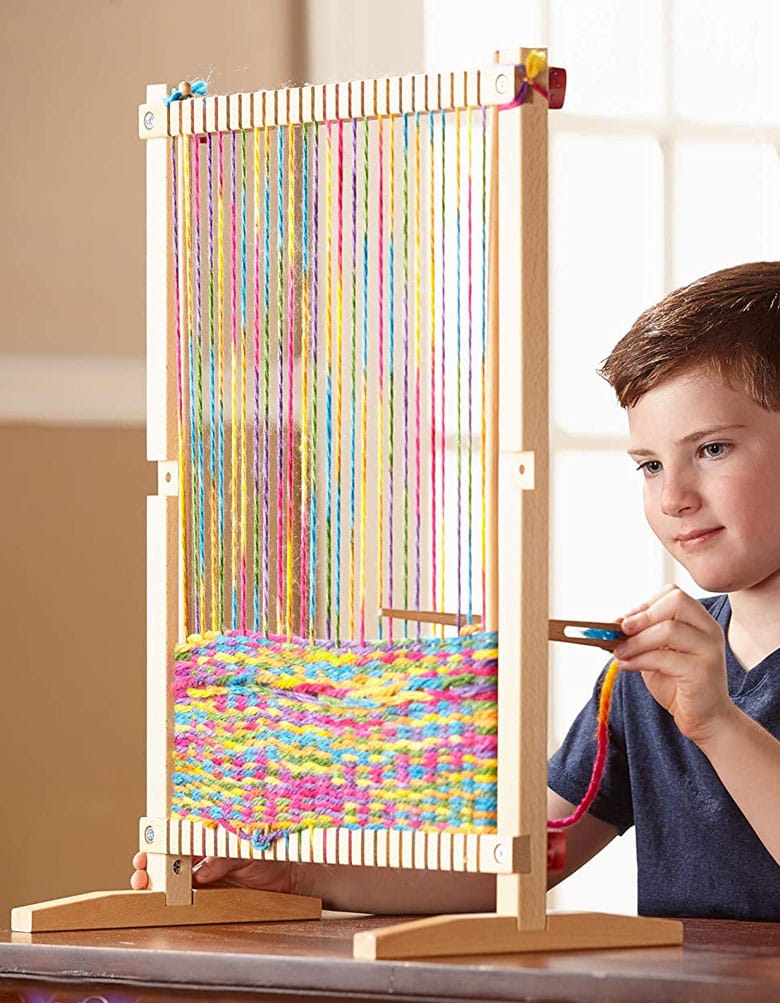
We made a super simple loom which you will see. There are also some nice weaving looms you can buy on Amazon, like this one below which has a weaving surface of 25″ by 20″-

Or this one below which has a 20″ by 13″ weaving surface.
You can build a simple loom frame with 1x2s or other scrap wood you have, you can build them any size. Secure the four corners with dowels so the frame is adjustable length-wise. See plan below-
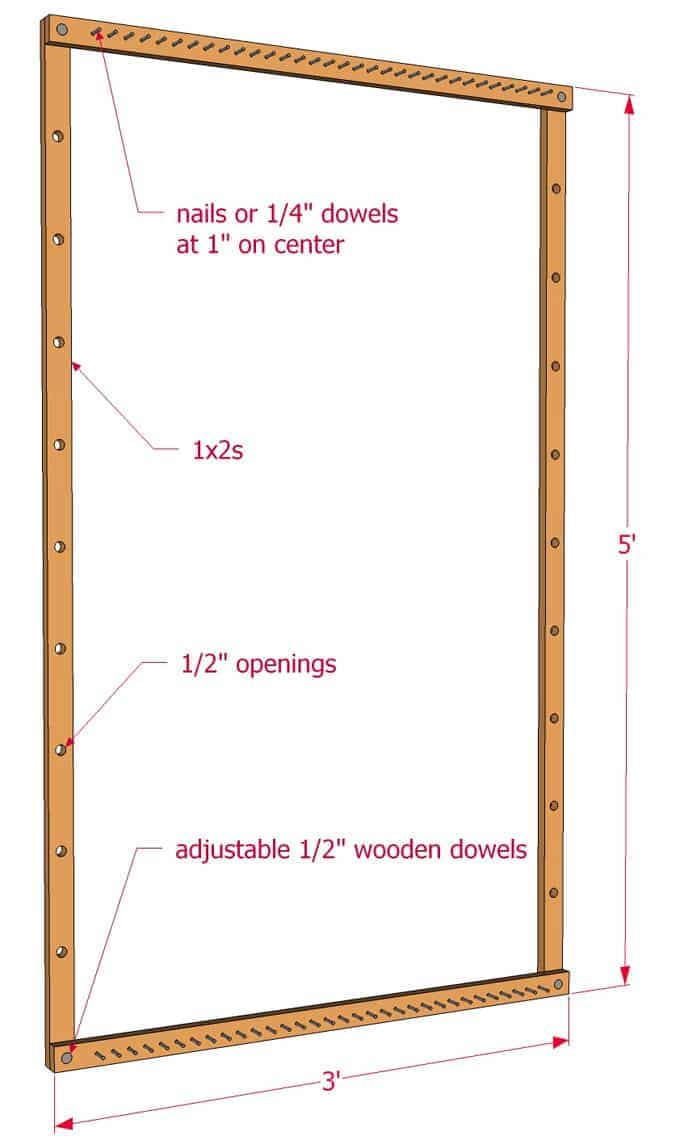
You can build a stand for this loom, or just hang it on the wall.
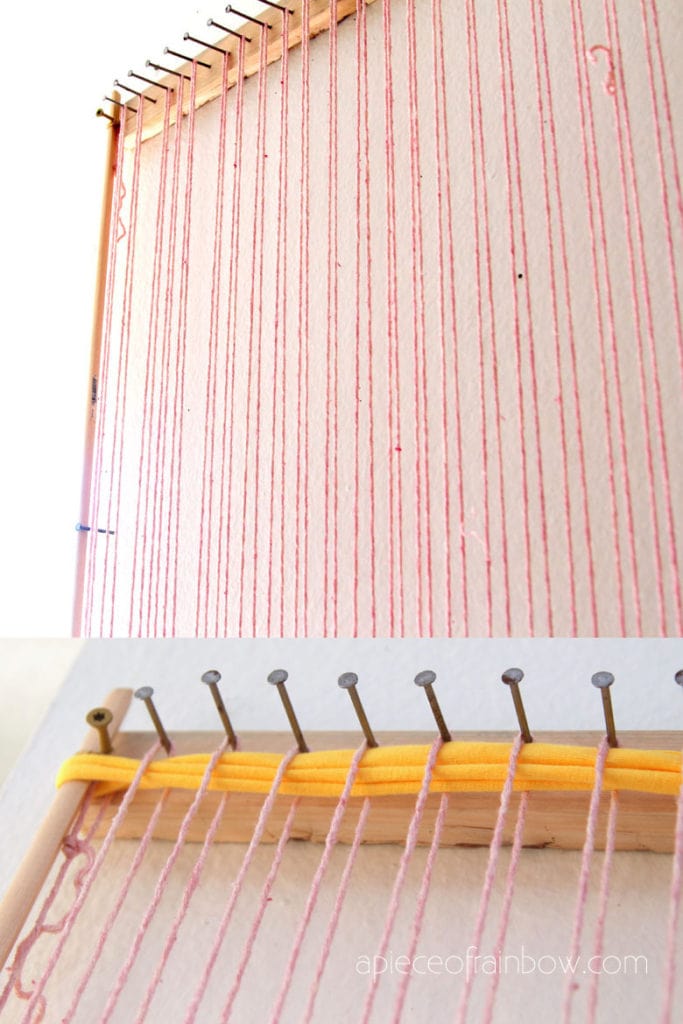
We did it in a even more simplified way. Instead of building the whole frame, we only set up the top and bottom bars, and screwed them into the wall. (If you don’t want holes in your wall, then build the whole frame like shown in the plan!) The nails are spaced at 1″ apart.
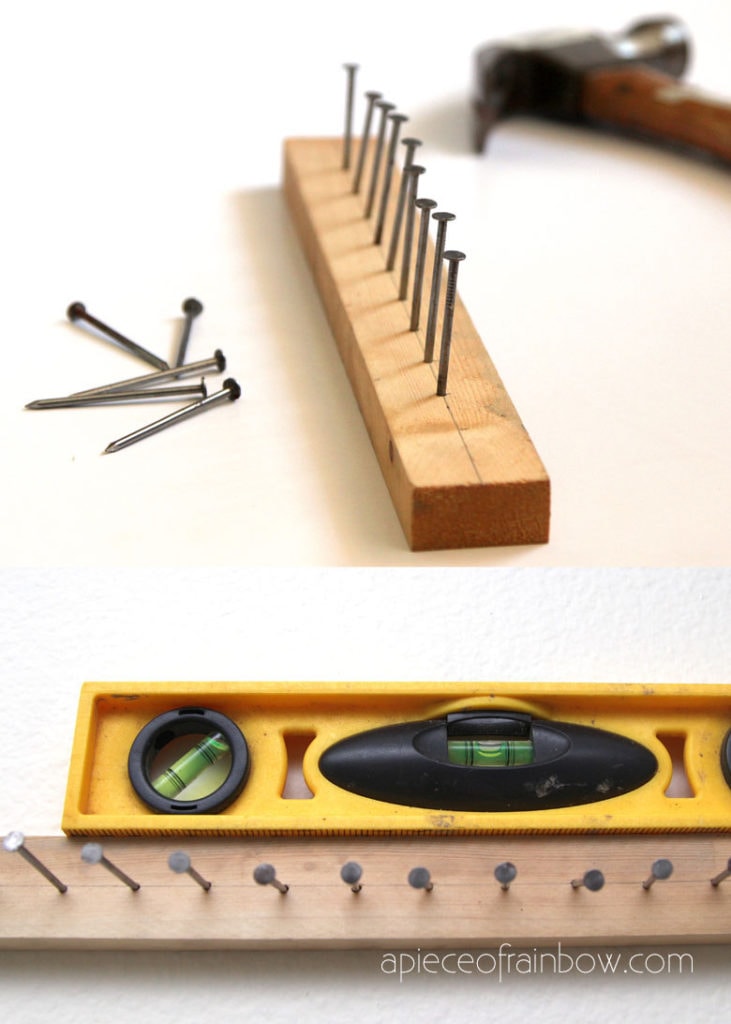
It is also important to add two 1/2″ to 3/4″ diameter wood or metal dowels, one on each side of the loom, see photo and description in next step below.
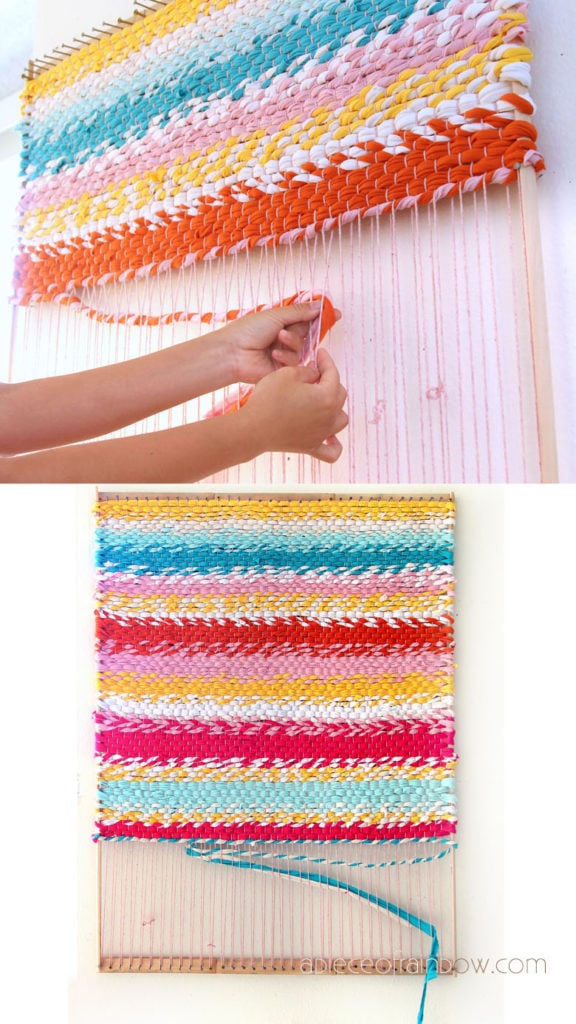
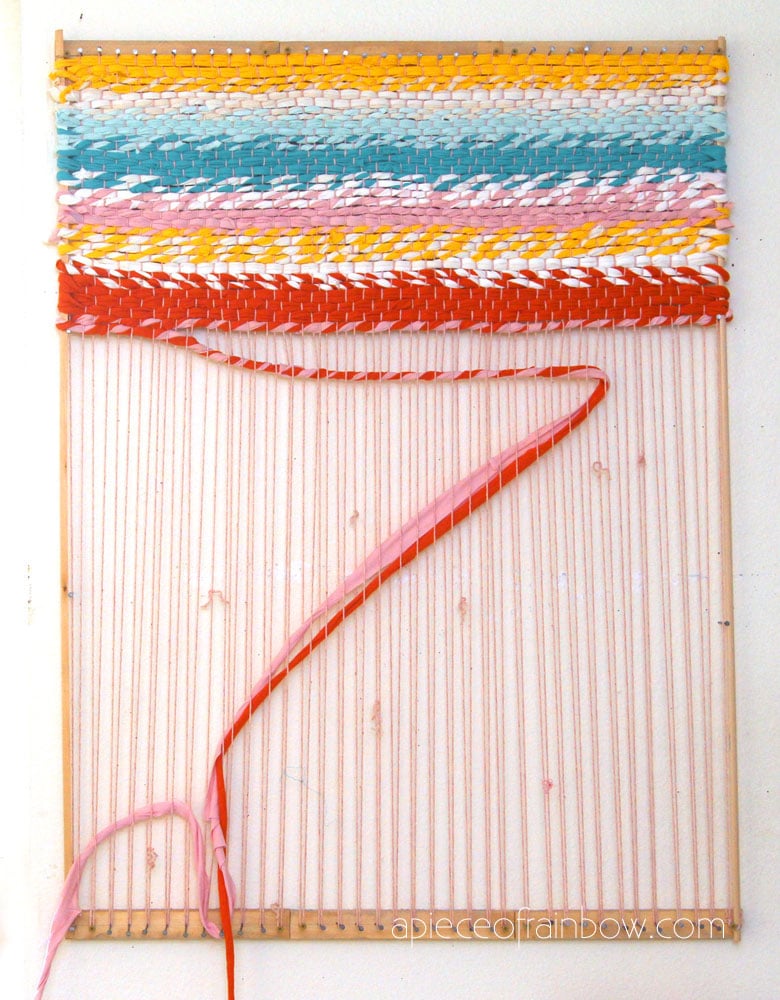
Step 2: Start weaving the rug with continuous warp.
Remember these two words: warp & weft.
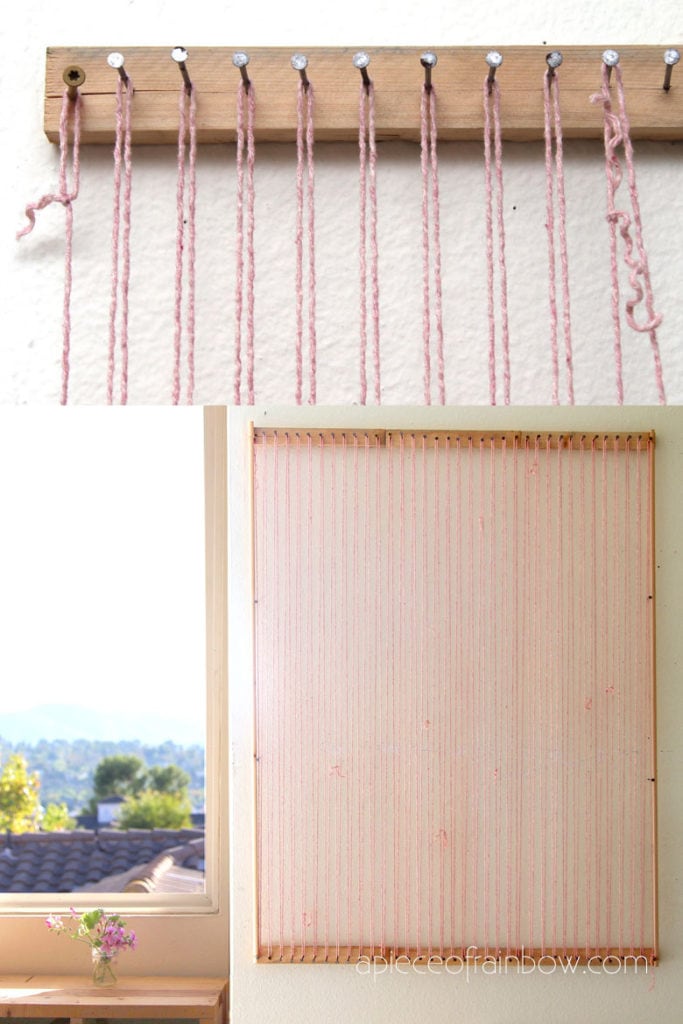
Warp: in weaving, the threads on a loom (the pink yarn threads shown here) over and under which other threads (the Weft, in this case our colorful t-shirt yarn) are passed to make textile.
You can use string or t-shirt yarn as warp. I used some acrylic yarn.
Tie a loop at the very beginning. Zigzag the warp onto the nails on the upper and lower bars. Tie a loop at the end.
The warp should not be stretched too tight. As we weave, they will become tighter.
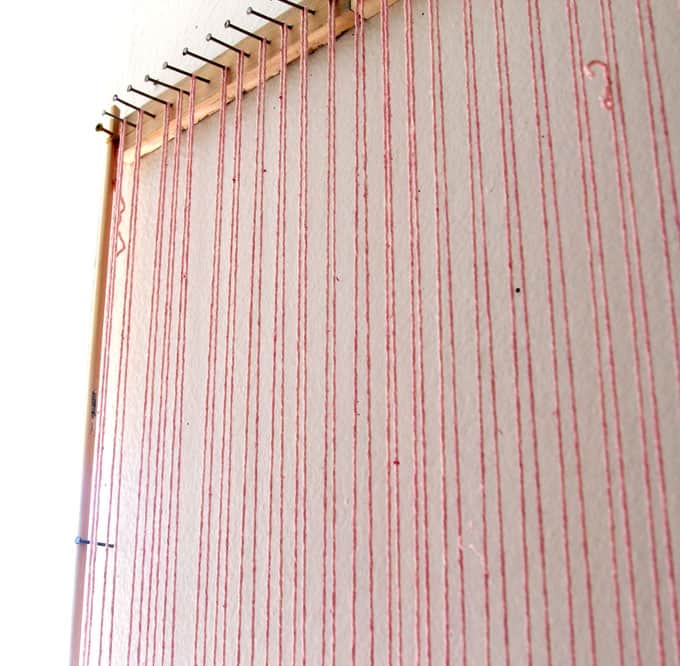
In addition to the frame, you will also need two side “bars” to help the rug stay rectangular as we weave, because the tension will pull the shape towards the center.
I used a piece of quarter round trim piece on each side. Thin metals rods or 1/2″ to 1/4″ wood dowels are popular choices also. Tie a string to secure ends of these bars onto the end nails / screws . We will need to be able to remove the from the rug at the end. See following steps.
I found the tension to be quite strong that the wood trim pieces stated warping. So I added 1-2 extra nails to help them stay straight.
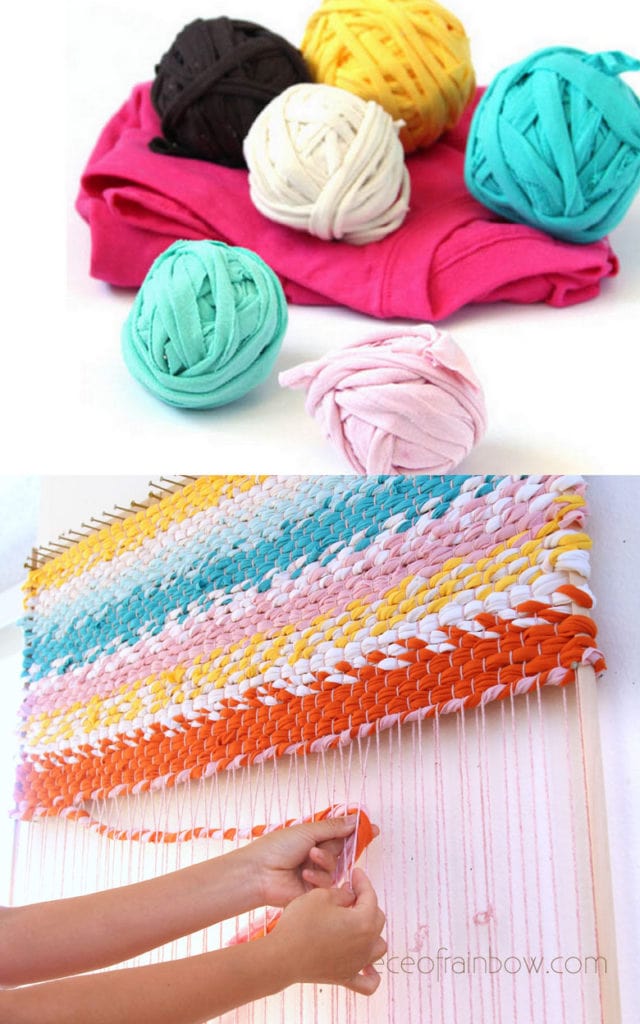
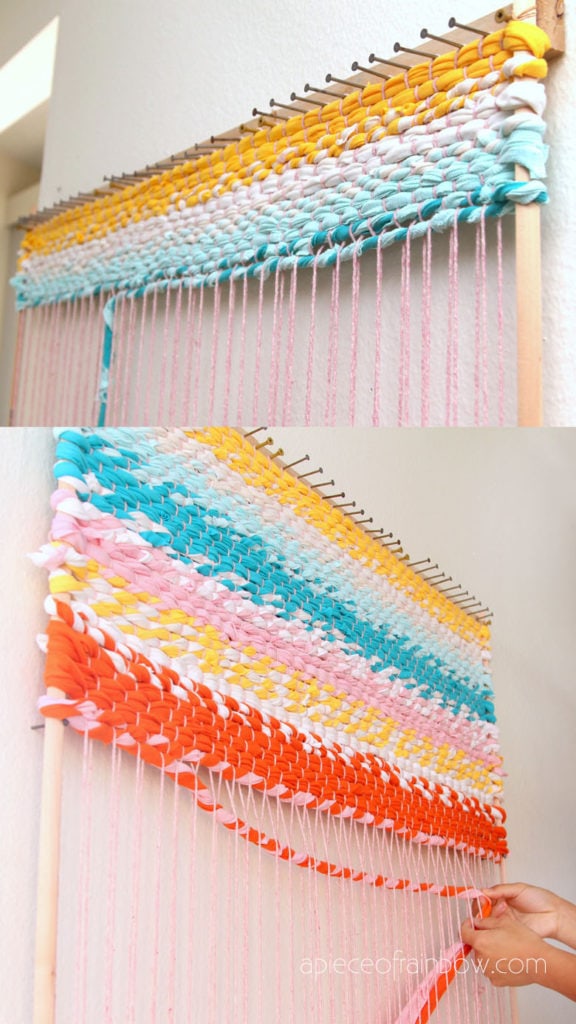
Step 3: Double weft rug weaving
Take a piece of t-shirt yarn, fold in the middle so you have a double strand.
Go through the first loop we tied on the warp like shown above. This is the only tricky part. You can also stitch this spot, or tie a knot- the goal is to prevent the t-shirt rag rug from unraveling at this beginning spot.
Now take the doubled weft and weave it over and under the warp.
In case you missed the definitions – Warp: (in weaving) the threads on a loom over and under which other threads (the Weft) are passed to make textile.
When you reach the end, turn the corner and weave the weft over and under the warp, alternating from the row above.
That’s the basics. Next we will look at how to change colors and create designs in our t-shirt rag rug!
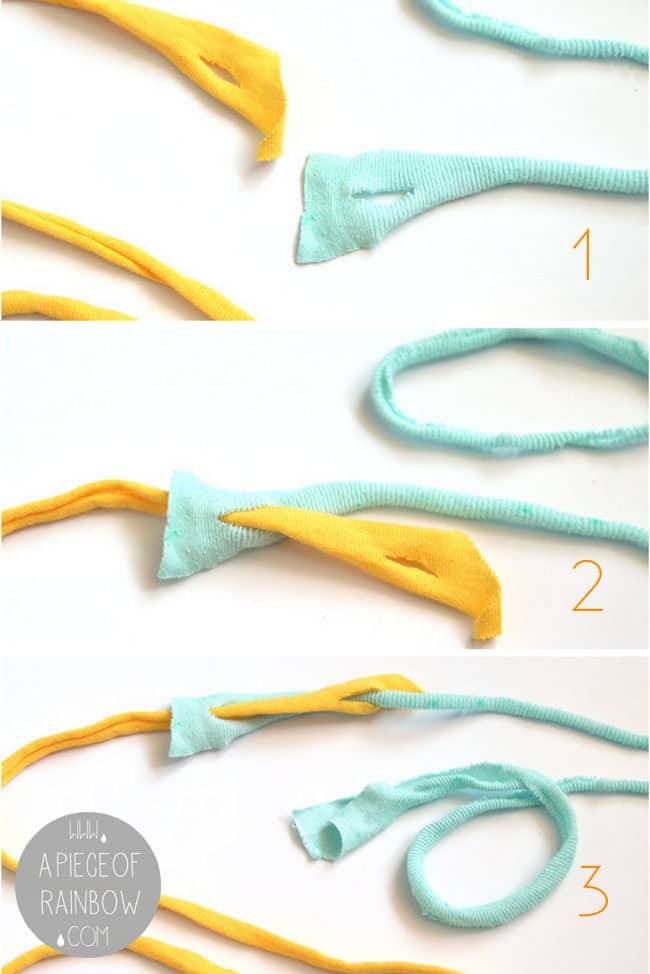
When you reach the end of a piece of t-shirt yarn, just add more using the method in this detailed tutorial on how to make continuous t-shirt yarn.
Because I was weaving with double strands, it was fun to play with combinations of colors.
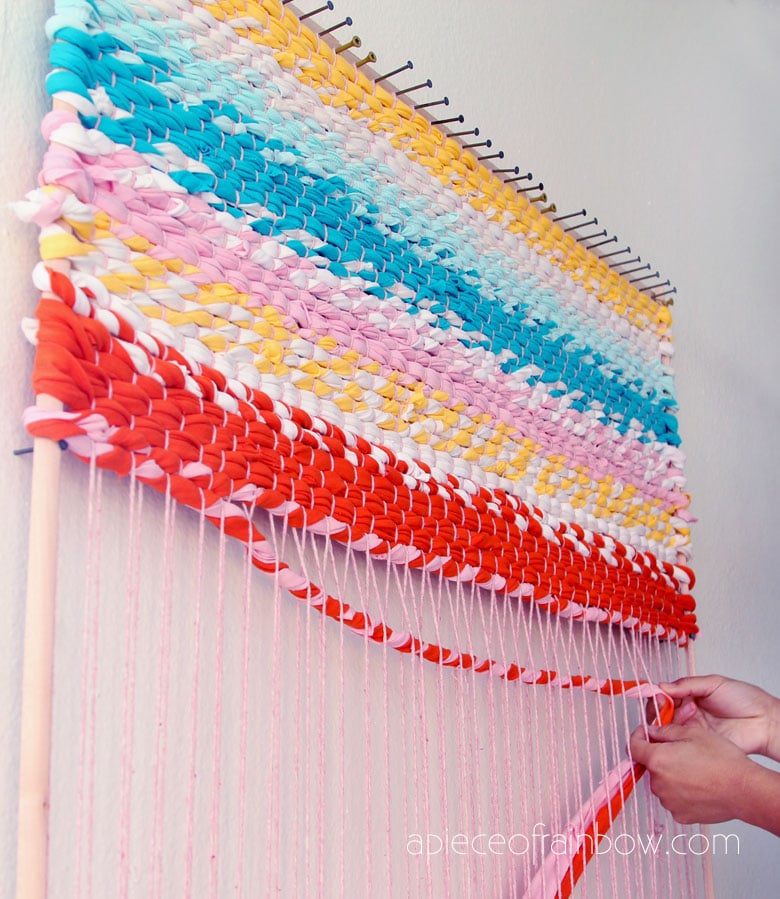
As you can see, I changed the colors from yellow-yellow, to yellow-white, to white-white, etc. The possibilities are endless!
When using two colors, you can create a “peppermint” look by twisting the two color strands as you weave.
Push each row up as you weave. The rug will stay nice and tight, and you can take a break and come back to it anytime!
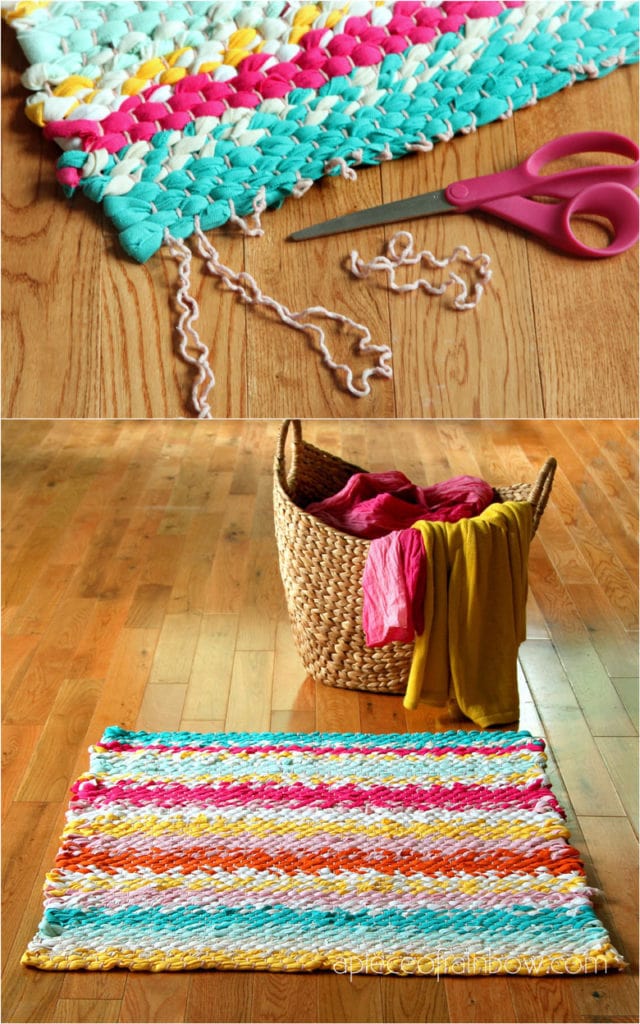
Once you reach the desired length on the t-shirt rag rug, remove the warp one section at a time from the bottom bar. Tie a knot as you remove each piece. Slide out the side bars from the rug.
Trim the warp at where we tied the knots. If you weave all the way to the bottom bar, you may not have any extra warp to trim.

You can also dye white t-shirts to make any colors for your t-shirt rag rug. I can just imagine something beautiful like indigo! Here’s a tutorial on how to make your own indigo tie-dye fabric –
Happy creating!
DIY Wood Pallets Ideas, Tips & Projects: An Ultimate Guide

DIY Bed Frame & Wood Headboard ($1500 Look for $200!)

Easy Wood DIY Headboard & Bedframe

How to Paint a Fridge ( Inspired by a $2,999 Retro SMEG )
Anthropologie Style DIY Oyster Shell Trinket Dish

DIY Niche Shelf: Old Bathroom Medicine Cabinet Makeover
How to Paint Kitchen Cabinets (& #1 Mistake to Avoid!)

DIY Paper Mache Clay Pedestal Bowl

Anthropologie Knock Off $0 DIY Galvanized Zinc Vase
Easy $2 DIY Faux Leather Storage Basket (Surprise Material!)
45 Amazing Christmas Paper Crafts & Decorations


Back in ’72 I had to take a weaving courese as part of my Occupational Therapy major. I never was very good at it, but it gave me a lifelong appreciation of color that I will be forever grateful for. Your post is just fantastic–and I hope it will give others that same appreciation!
hi Kathy! weaving is such an interesting craft but it does take so much time and patience! i have some half finished baskets that i may just have to go buy the finished ones lol! happy summer to you!! 🙂
Woww.. so beautiful.. thnx
HVALA ZA TAKO LEPE IN KORISTNE IDEJE !
glad you like it! 🙂
Oh my THANK YOU SO MUCH what a great talent you have for teaching. I’ve always admired these rug’s. And now thank’s to all your hard work i can now make my own and loom i’m so excited. It’s so nice to hear from like minded people on your blog. I have told my mum not to throw out any t-shirt’s. I’m lucky to have a great relationship with my local charity shop and will be asking to buy the worn out t-shirts they cant sell in bulk. Thank you again 🙂 xxx
so glad to hear! thank you Lucile and have a great time weaving your beautiful rugs! 🙂
when you remove the warp one at a time from the bottom you are tying at knot on each one as itcomesoff. My question is at the top. What is happening there as you are taking the bottom off & is there enough warp at the top to tie off? What am I not seeing?
hi deb, the warp at the top is tight and secure, the bottom part has extra warp hanging at the end of the weaving process. which is why we tie them to tighten. 🙂
Thank you so much for this! I made my loom with wood on all four sides, so I didn’t have to put it on a wall, and feels sturdier. I also made it in a large square shape, which allows me to make both rectangle objects or square ones. I am loving it! The dowels on the sides are crucial, but I found I needed to make an extra pass with the warp on the outermost nails to keep the outer edge tighter when I take the dowels out. I’m not doubling the t-shirts for the weft which perhaps is making my rugs thinner, but it’s still working nicely!
thank you so much Janna for sharing! 🙂 feel free to tag us on instagram if you post a photo there!
i made the loom and everything but i didnt nail it to the wall. i couldnt keep an even tension throughout, so some parts are tigher/shorter and some are looser/longer. also when i removed the poles it left big gaps where the pole had been and doesn’t look good. did you double weave throughout or just the first part?
hi vera, i think the rigidity of the frame and the poles are super important, because the “yarns” are stretchy. and yes i kept the same double weave from strat to finish.
Nice tutorial.
If I want to make a runner, can I join several rugs together? And if so, how?
hi patty, that’s a great idea! you can use a piece of t-shirt yarn or string and tie them together in a few spots, or weave them together along the edge. 🙂
Love this! Two questions-
1. what happens to the sides when you pull the rods out, it looks like there would be a gap..?
2. are the pieces of yarn individual loops on each set of nails across the loom. like one loop of yarn for one set of vertical nails? thanks!
hi angela, when you pull the rods out everything stays in place because the way it is woven. yes you can have a continuous piece of yarn looping up and down, or individual loops on each set of nails across the loom, both ways will work the same. 🙂
If I purchase skeins of t-shirt yarn vs. making my own, any idea how many. Yards of tshirt yarn are needed for the size shown vs. number of t-shirts? I’m thinking of having my high school interior design students make one for a project but I’m concerned about cost.
hi dawn, i am not so sure, but you could estimate by the size of the rug you plan to make. why not have each student gather some old t- shirts from family members and reduce the cost 🙂
I have pre made rolls of t shirt strips. I can’t figure out how to weave with them without detaching the strips
Can you help?
hi donna, you can weave with smaller rolls, just have to tuck them through the vertical strings, bigger rolls will be harder to get through.
Es una alfombra preciosa y unas buenas instrucciones, pero ¿no sería más fácil tejer hacia arriba y no hacia abajo? He tenido telares verticales y que yo sepa siempre se teje de abajo a arriba, es mucho más fácil, no se cae el hilo y es más fácil apretarlas las hileras simplemente bajandolas con los dedos o con un un peine.
hi helena! the fabric does not fall off at the top, but thank you for the great tips! i have never tried that, but weaving from bottom to top sounds great, and i will try it next time! =)
Hi Ananda,
How long of a doubled strip of tshirt yarn were you able to work comfortably with? How do you join the lengths of yarn? Other than that,for me, the instructions are very understandable. Thank-you!
hi ann, i usually have a length about 3 rows at a time, because it is really easy to add more length to the yarns, detailed instructions are in this earlier tutorial – http://www.apieceofrainbow.com/make-rag-rug-from-old-t-shirts/
happy crafting! =)
Thanks! I’m certainly going to give this a try!
Hi thank you for this tutorial!, I am wondering, when you put the warp on initially, do you tie a knot on each one or do you just use one giant piece of string?
hi paige! i used one continuous piece here, but you can also tie loops. both ways will work! =)
Excellent excellent tutorial. Thank you! I’ve been saving t-shirts for awhile. Yours is the best process I have seen.
thank you shelly, and happy weaving! =)
Never seen a weave t-shirt rug diy loom. I’m totally in love with your work. The pop colors are looking very gorgeous. Thanks a ton for the lovely instruction. You explained it very well. I’m going to try this rug as spring is around the corner.
Girl! A+ for the tutorial. Awesome job. Thank you.
Thank you for sharing and been there !!
Hi, I’m very new to this, so forgive me if it’s a silly question. If I want to make my rug narrower than 3 feet, so I just tie the side rod to one of the inner nails instead of the outside of the frame? Thank you! I’m so excited to start this project!
great question amanda! 🙂 yes that is it! just remember to add support in the middle if the rod is somewhat flexible, because there’s a lot of tension there. 🙂
I will try it. Hope for wonderful results 🙂
You linked to instructions on how to make your own t-shirt yarn. I’m curious as to how much t-shirt yarn is required to make a rug as large as the one you made, and thus how many t-shirts I should collect to reuse. How many medium/large sized t-shirts will I need to “steal” from my family members?
i would steal at least 20 so there’s some flexibility as your designs come together 🙂
Thank you so much!
wonderful idea. thanks 🙂
Wow, love all your ideas!!..I’m an active gardener, art appreciate and budding entrepreneur: a millionair-ess formula! WATCH THIS SPACE!
That looks awesome! My grandma used to make this type of rugs, but in huge sizes. Now that I know how to make the loom, I can do them myself. Thank you for sharing the info about the book also!
wow gabi, your grandma sounds awesome! =)
Awesome! I love it!I love it I am gonna bookmark this page, thanks for sharing.
This is gorgeous! Thanks for a great tutorial 🙂
What a great idea?! This reminds me of doing this in a livelihood class when I was in grade school. And yeah, that clothing drying rack, that looks interesting for me. G
Thanks for sharing your GREAT easy to follow instructions!!!!!! I have started a small loom out of cardboard, maybe 2′ x 15’….the directions I found on the internet were to make the warp? thread 1/4″ apart, and yours states 1″ apart???? So now I am confused?? I am guessing, it depends on the type of “material” you are using to weave?? Am I right?? All the looms I looked at (on line and expensive!!!) did not LOOK like they were adjustable in the warp?? Can you clarify this for me? I am having fun with weaving, and want to continue doing it!! Thanks again, and hope I used the correct terminology in my questions and concerns!!
Hi paulette! great questions 🙂
i learned the 1″ spacing from the book I mentioned, it worked great for the thick double weft. if the weft is thinner i would use 1/2″ spacing.
the length of the rug is adjustable by moving the horizontal bars up and down. the width can be adjusted by only using a certain number of dowels when you wrap the warp! hope that makes sense! 🙂
Waouhhhhhhhhhhhhhhhhh! It is all I love…You are a wonderful artist !
This looks fantastic and possibly something even I could at least try! I have actually started to knit a rag rug using old t shirts on big knitting needles, but one t shirt doesn’t far plus the rug isn’t very wide. So I may unravel it to make this instead. Thanks for the inspiration. P.s I love your star drying rack!
thank you chris! have fun! 🙂
Hello, Thanks for the editorial. I’m wanting to make a blue jean rug and I’m wondering if using a double strand is necessary, can I do single strand?
Also what is the purpose of the holes on sides of frame?
Thx so much for feedback!
hi jayme, yes you can use single strand. double strands just make a thicker rug. if you are talking about the poles on the left and right side, the purpose is to hold even tension from top to bottom. otherwise the rug may come out curved in the middle. 🙂
The holes on the side, I assume, are so you can change the length of the rug. You can move the bottom bar up closer to the top bar by putting the dowels on different holes.
I’ve been wanting to try weaving for a while now and after reading your ever-so-clear tutorial – this will be my goal for the summer…. my very own t-shirt rag rug! Thanks so much for sharing – yours is just lovely!
Awesome this is creative!
This is so cool!
Great instructions – even I could follow those! But I have to ask…does the star clothes dryer roll in the wind?
I LOVE it! It’s beautiful! Your colors look amazing together! I don’t think I’ve ever seen someone make a square t-shirt rug, but I think it’s cuter than the circle ones. Thanks for sharing!