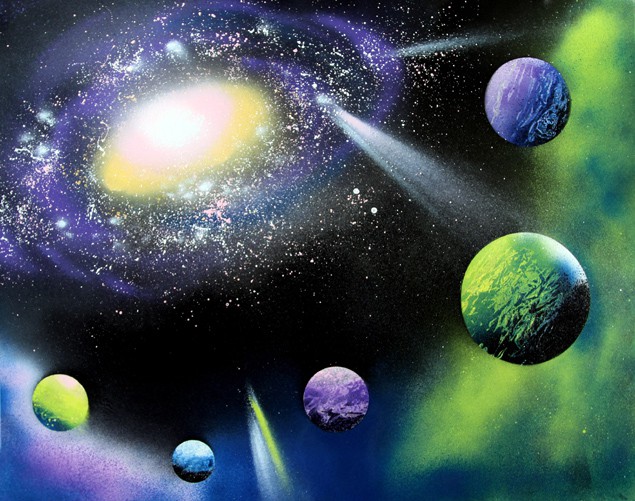
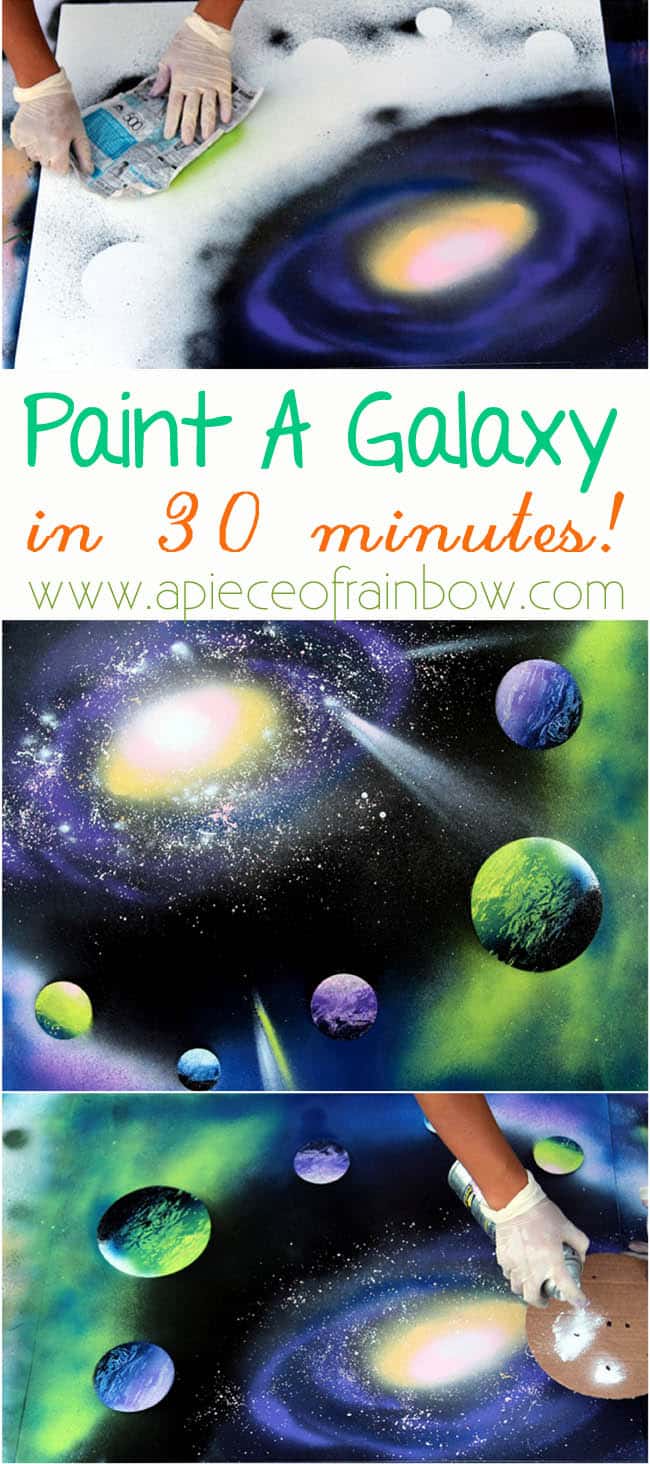
Spray Paint Galaxy Art in 30 Minutes!
How to spray paint galaxy art! Easy step by step tutorial for beginners. Learn many pro secret techniques to make great wall decor & gifts!
Inspired by the street artists on our trip to San Francisco, I decided to try and paint a galaxy, something I always thought to be so magical and mysterious. In this little project, all you need besides spray paint and paper, are things you can find in your recycle bin, and no art training required!
The first part of this tutorial is here, where I listed tools and materials, and shared a simple 5 minute painting of some planets floating in space. Now you saw the warm up, let’s paint the real thing and amaze yourself at how fun and easy it is to create art!
We will be using a 22″x28″ poster board here and this 3M painters mask works great if you plan to do a lot of painting or other finishing work!
Step 1: spray paint the spiral galaxy
*Some resources in article are affiliate links. Full disclosure here.
Place an oval stencil (Covered Stencil Method, see a list of all the cool techniques at the end of this tutorial) in the center of the galaxy, and create a dark background covering half of the painting with soft mist of black and metallic blue.
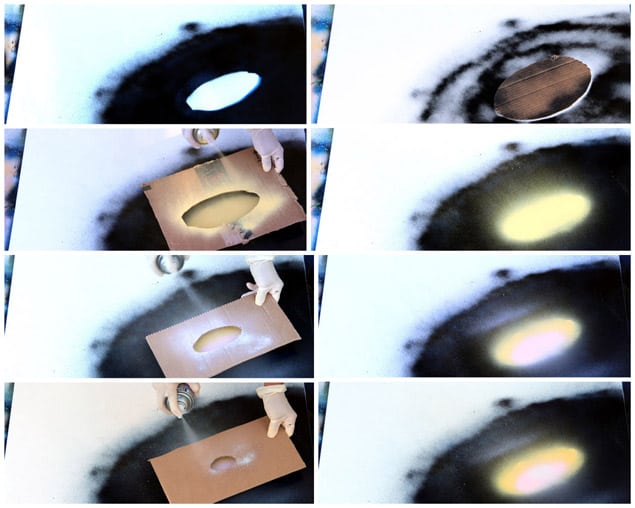
Make 3 cut-out oval stencils, going from larger to smaller, lift them about 1″ to 2″ above the surface of the painting (Raised Stencil) and paint the center of galaxy from yellow, to pink, to white.
Cut out a couple of spiral forms in another piece of cardboard, and again use the Raised Stencil method to create several spirals going outward from the center of galaxy, using purple and blue paint.
This method allows us to create more accurate spiral forms with nice soft edges.

Step 2: how to spray paint galaxy planets
Place some of the circular objects where you want the planets to be, gently spray a little black paint to mark them, and remove the covers.
You probably won’t see the street artists do this, because they know very well from hundreds of paintings where the planets should be. We do it because it allows us to play around and find a balanced composition before we put all the paints down.

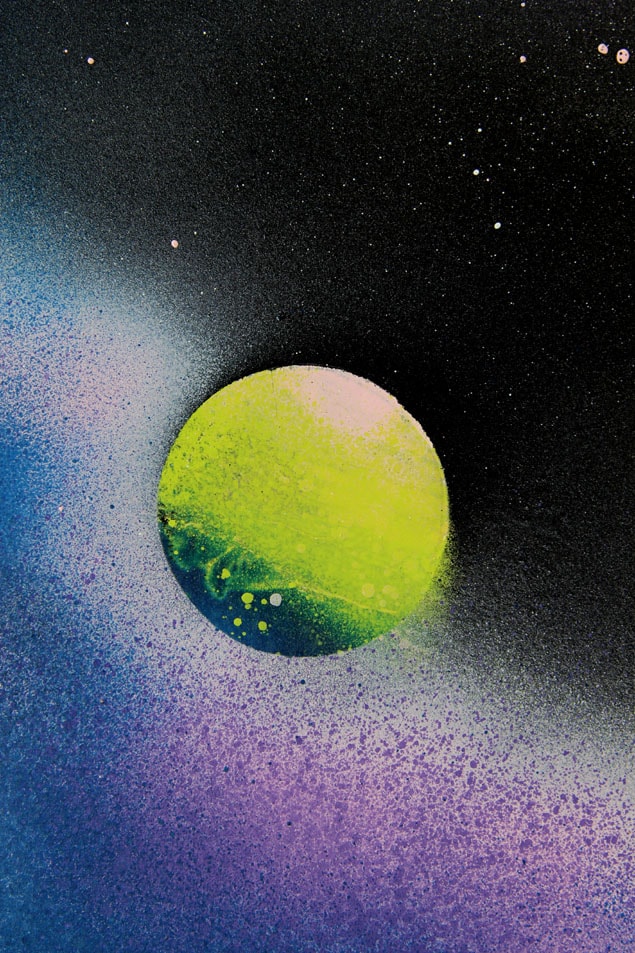
Start with the first planet, use 3-4 colors, and start with either the lightest color, in this case lime green, and quickly go to the next shade – metallic blue, and the darkest – black, overlapping the adjacent colors. Don’t be concerned about staying within the planet makings. You can also go from dark to light colors, which creates a lighter planet.
While the paint is wet, quickly crumble a piece of newspaper, open it, and lay it on top of the painted planet area, very gently run your fingers on top of the paper. This will lift some of the paints and create a cool texture on the planets. Lift the paper and here we have the start of a planet!
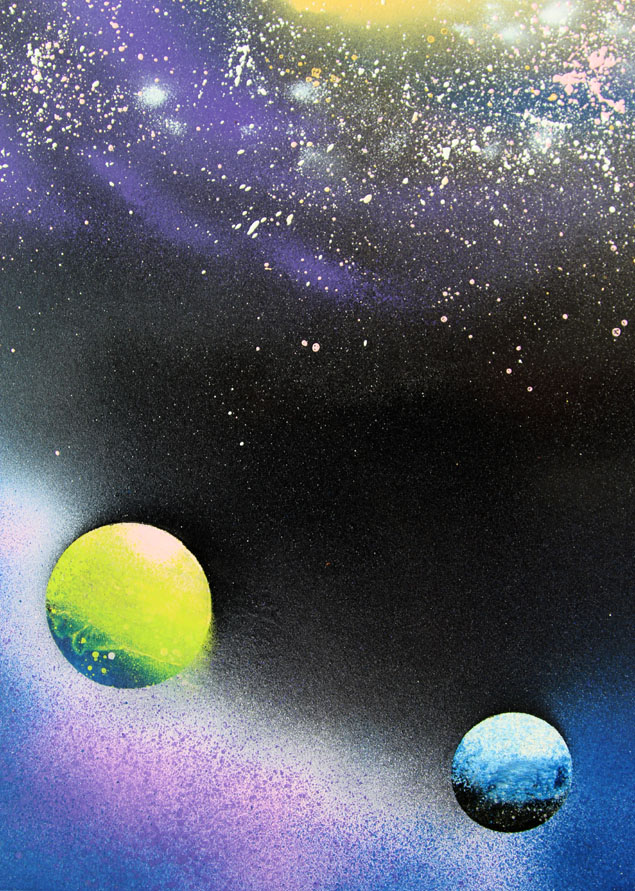
The colors for some of the other planets are white-purple-blue-black, pink-green-blue, etc. See final step for more tips on color harmony!
After all the planet areas are painted, we will cover them with those cans and lids, and create the space around them.
Step 3: spray paint deep space of the galaxy
Starting with black, create a dark void between the spiral galaxy and around the floating planets using the Soft Mist method. Then using metallic blue, lime green and purple, softly spray some flowing colored light through the dark space. Keeping the nozzle at least 12″ above the paper will create softer transitions.
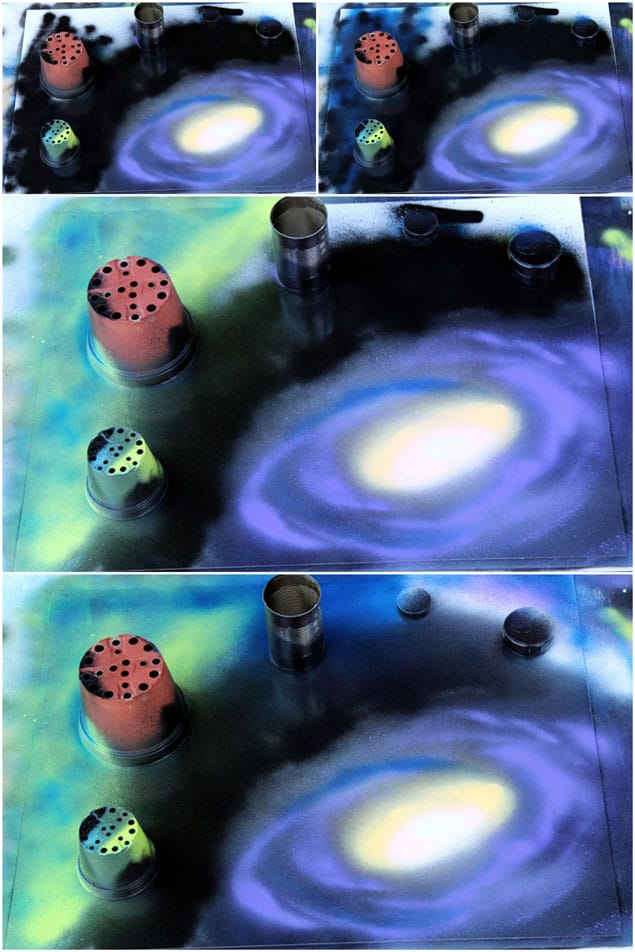
In this painting I wanted to create a subtle movement of light from the edges toward the center. You can improvise and create any flowing forms you like!
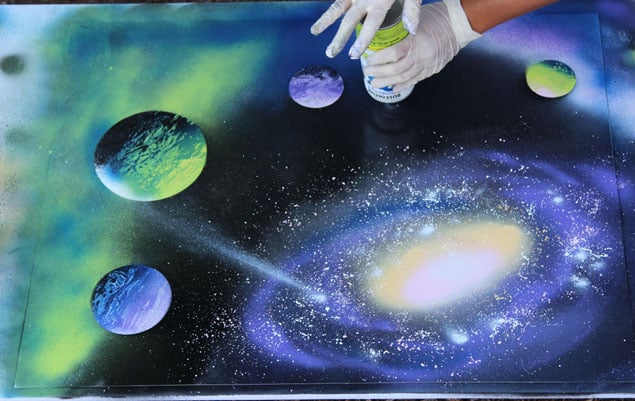
Step 4: how to spray paint stars and Comets
Now we can lift the covers, and move on to the final and super fun steps: stars! Spray some white paint onto a small piece of thick paper, there should be enough paint yet not too much that it drips. Face the paper down where you would like to have the stars, and tap with your fingers on the back of the paper to create clusters of stars.
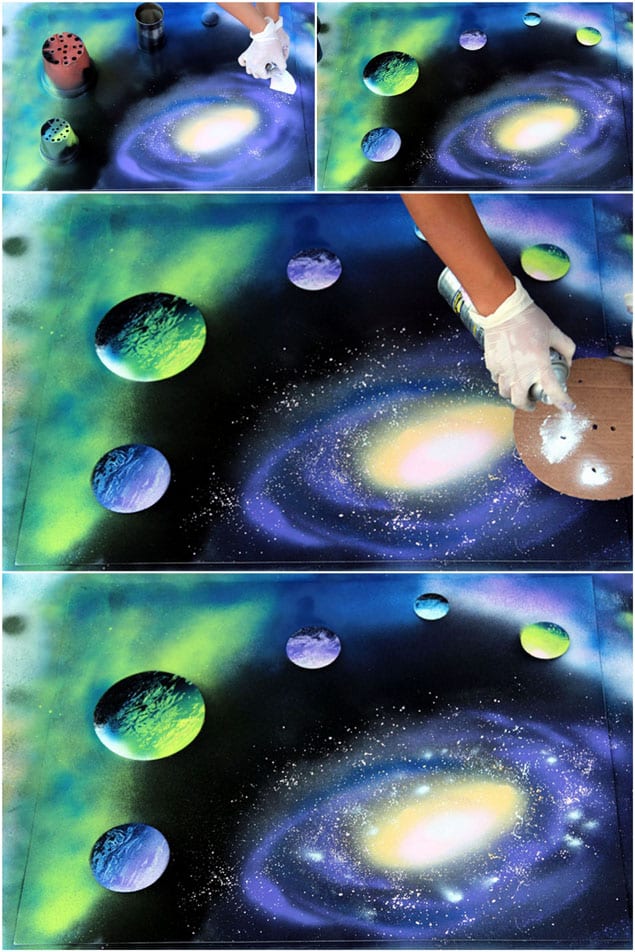
The bigger stars are created with the Raised Stencil method – poke a hole in a piece of cardboard, lift it a couple of inches from the paper, and spray with white over the small opening, now you have a shimmering star!
And those comets! They are the easiest – just place the can upside down, face the nozzle toward the direction of the comet, and give a quick tap on the bottom of the can.
Here’s a summary of the techniques used to make spray paint galaxy art
- Soft Mist :after creating some uneven blobs of paint, I figured this out- it sounds so counter intuitive- instead of pressing the nozzle then start moving the paint can, do the opposite, get the can moving, then press the nozzle! This will create a even and natural looking mist, without a heavy starting point. See Step 1 & 3
- Newspaper :while the paint is wet, use newspaper to lift some of the paints and create a cool texture. Can be used to create planets, mountains, etc. See Step 2
- Covered Stencil : stencil touches the painting, creates defined shapes with sharp edges. See Step 2
- Raised Stencil :stencil is lifted a couple of inches from painting, creates defined shapes with soft edges. See Step 1 & 4
- Bounced Paint :spray not the painting, but a straight or curved surface perpendicular from the painting to create a very soft line. I used it to create the spiral galaxy in an earlier painting – but find method 4 easier and quicker. Still, this method has a lot of potential for sure!
- Star Clusters :spray some paint on a small piece of thick paper and tap with your fingers on the back of the paper to create clusters of stars. See Step 4
- Comet :a quick tap on the bottom of a upside down spray can will create a comet / shooting star. See Step 4
- consider the temperature of colors from warm to cool. warm colors such as red, orange, hot pink creates a more exciting feeling, such as the earlier painting, and cool colors such as blue, green and lavender creates a more peaceful feeling, as in this one!
And, the ultimate goal is to forget the techniques and fly with your imagination. I am really in love with spray paint as an art medium! It offers lots of new creative possibilities, and it’s super fun to use. It almost feels like you are not painting with paint, but painting with air!
Happy creating!
Love painting? Check out how to easily paint a watercolor tree with unusual and fun methods in just 10 minutes! 


I always find something fascinating about Galaxy pieces, and this will make an excellent design for my longboard build I want to do!
I like how you suggested using newspaper to lift some of the paint and create a cool texture
What brand do you buy? I would like to buy and find the colors you have. I have never tried anything like this. And I really need to get in a new state of mind and do something new.
if you are in US, rustoleum offers a lot of colors, which are what i got! =)
Nice looking great a leap forward to space
How cool is this! If only my little man was a little older, I’d do this with him! 🙂
Sooo cool! I love it. That looks like a fun project.
Wow, this is amazing! You make it look super easy but enough Pinterest fails have taught me a lesson. The easier it looks, the more I should just stick to admiring it from afar. lol.
Thrifting Diva
http://www.thriftingdiva.com
Wow, this is amazing! It looks so real and magical!
Great job on the tutorial, btw. You really show how it all came together!
This is pretty cool! I can’t believe that only took 30 minutes.
How cool is that! That reminds me of the street art I have seen painted in NYC! Awesome 🙂
This is amazing! I’ve always wondered how those street artists do it so quickly in the videos! This is a brilliant insight and kids would love it as an activity!
Katie <3
Whoa! That is way cool, my kiddos would love to help me with something like this!
Turned out beautiful! I love galaxy paintings, never knew how to make one so thanks!
How much fun and creative. I will have to give this a try, I love to paint.
This is so cool. You made it look so easy!
Woah! This is amazing. It looks so real!
This is so cool! You make it look so easy!
That’s crazy!! I like to think i’d be able to handle even something as clearly laid out like this but i’m not so sure I’ve got even that much talent…. i’ll have to try it and let you know!!
This is amazing! I have watched people do this before and I just don’t understand it, even right after watching them do it. So cool!
This is some serious talent! I have seen a street artist do this before and it was amazing!
Oh wow, this is amazing!! You are very talented!!
This is SOO cool! I’ll have to remember this one!
That’s beautiful. Hope I’m as talented as you.
yes you are, may be more!! =)
I don’t think art has any rules, but you have defintely exceeded my expectations. I wouldn’t have thought to do this at all and I LOVE the outcome. I primarily use acrylic on canvas and ocassionally sell my pieces 🙂
thank you dear nancy! xx
I am hopeless with art but was so impressed with how easy your watercolor tree instructions were, this is another project where you have made it look so easy!
oh andi i am sure you can do this! i have loads of behind the scene failures too! =)
This is SO COOL! I am pretty sure mine would not turn out as beautiful as yours! 🙂
thank you heather! yours will be amazing! xx
Very cool. Your galaxy is beautiful!
thank you angela! xo
This is beautiful! It would be a nice little project so that I can have some personal artwork in my home!
thank you! personal art is more special than bought ones right? =)
I love looking at paintings of the galaxy and this is such a thorough tutorial.
thank you dear friend! i love galaxy too!
I will have to remember this!
Wow, this is gorgeous! I’ve seen those street artists, and yours is JUST as good, if not better!! <3
thank you shipra! i will hit the street then ! =)