Pallet Coffee Table and Bench: Easy DIY Outdoor Pallet Furniture
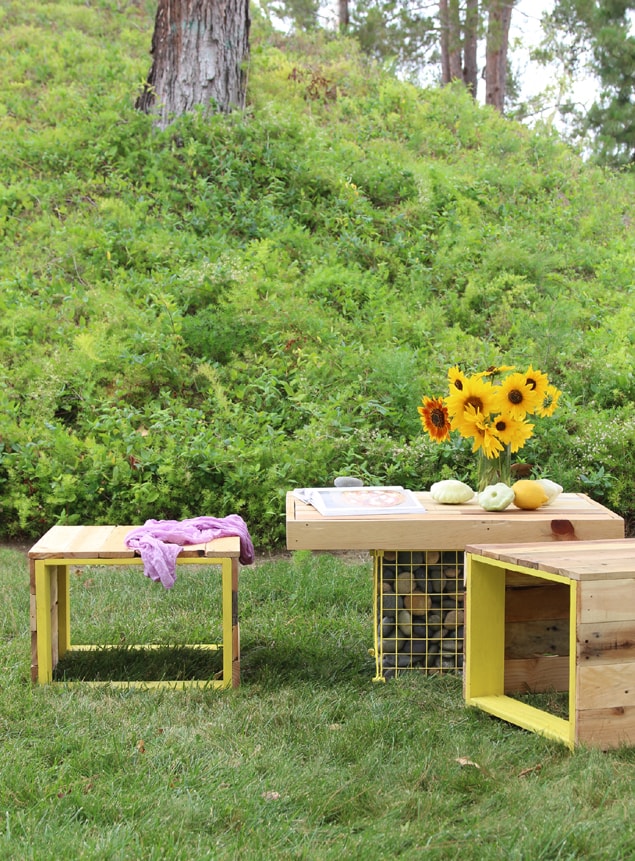
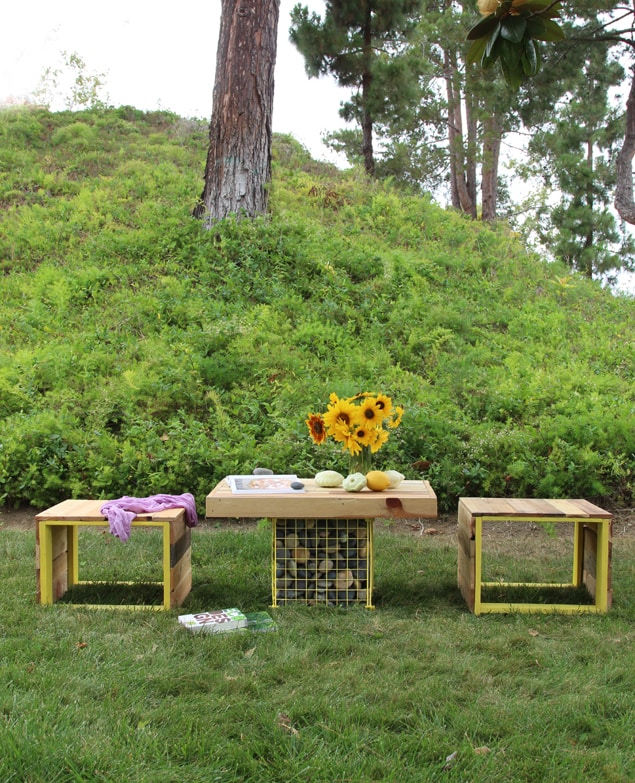
Our DIY pallet coffee table and pallet benches are finished! So happy to finally share with you the free building plans of these easy DIY pallet outdoor furniture!
The unique pallet table and benches are made from reclaimed pallet wood, a modular metal shelving unit, and a material that’s locally abundant – beach pebbles. We love the blend of rustic pallet wood, fresh colors, simple clean lines, and a touch of industrial gabion ( a cage filled with rocks or concrete, for use in civil engineering, road building, etc) !
To build any pallet furniture, the first step is to find quality pallets.
Not all pallets are made equal. After building so many pallet projects, we have realized that the right pallets will make your project a lot easier! Here’s a detailed guide All About Pallets: where to find, how to select and take apart pallets!
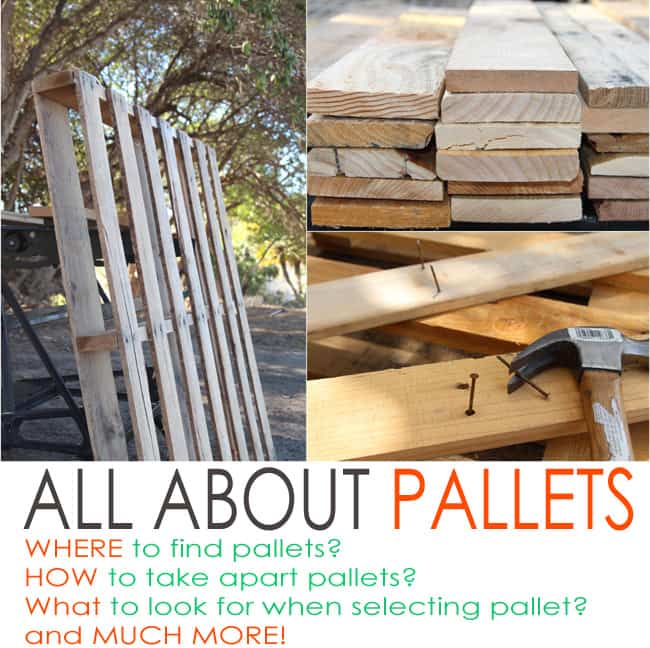
All About Pallets: where to find, how to select and take apart pallets
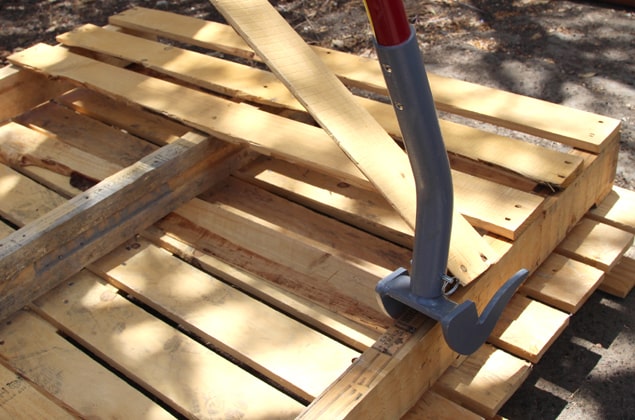
( Some of the helpful resources are affiliate links. Full disclosure here. ) Below is our favorite tool to use when taking apart pallets: a Duckbill Deck Wrecker we got on Amazon , love it!
Tools and materials to build a pallet coffee table and bench:
- Pallets, and tools to dissemble pallets: our favorite method is with this tool – a Duckbill Deck Wrecker we got on Amazon. This tool lifts those boards easily, and you can take out the nails with a hammer.
- IMPORTANT: wear eye goggles and dust mask
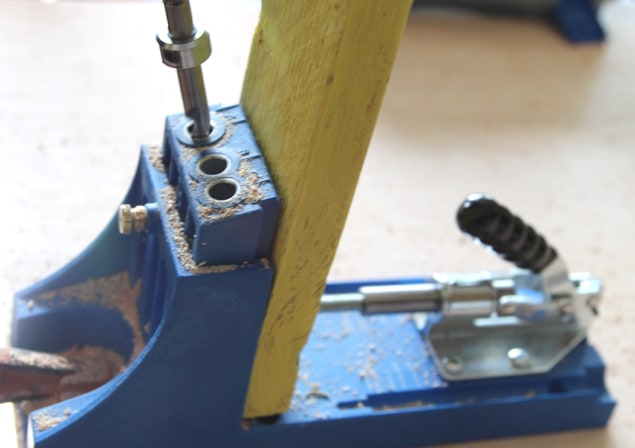
- Kreg Jig K4 Pocket Hole System and Kreg screws. The Kreg jig is super useful and easy to use for creating very strong joints.
- Circular saw or jig saw. We also made a cross-cut jig, see Step 3. (If you have a table saw, great!)
- Sanding pad or power sander, wood glue and clamps,
- acrylic paint or other type of water proof paint, wood finish or furniture wax – recipe to follow
How to build a simple pallet bench.
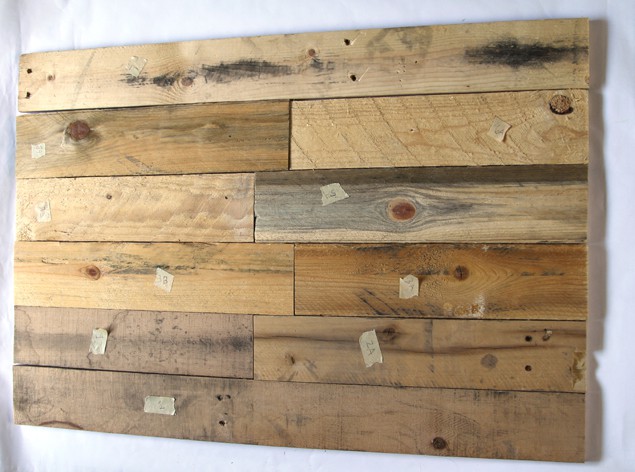
For the DIY pallet bench top ( and table top ), select board of the same thickness. Although most boards on pallets are either 3.5″ or 5.5″ wide, the thickness can vary from 0.5″ to 0.8″. The sides of the benches can have more variations.
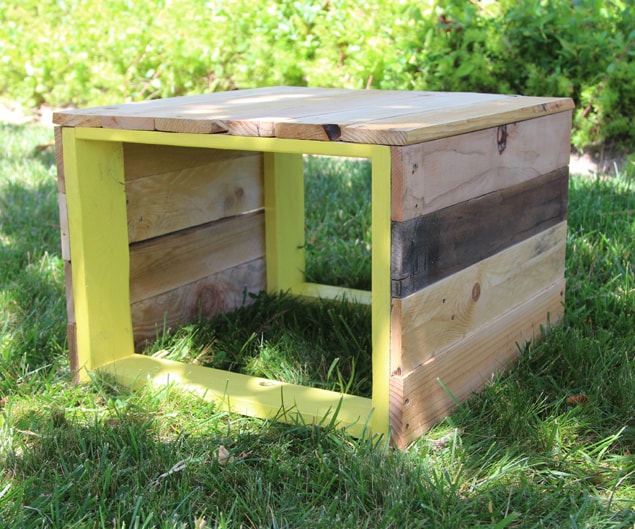
After all the pieces are cut and sanded, we painted the frames of the pallet benches a happy lemon yellow.
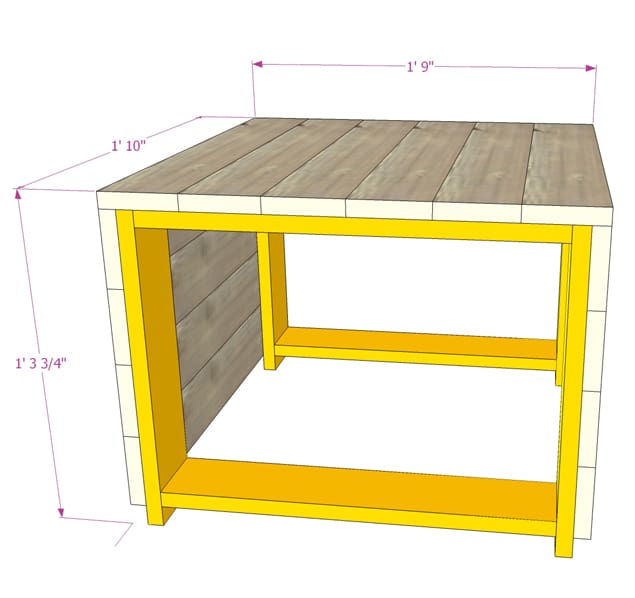
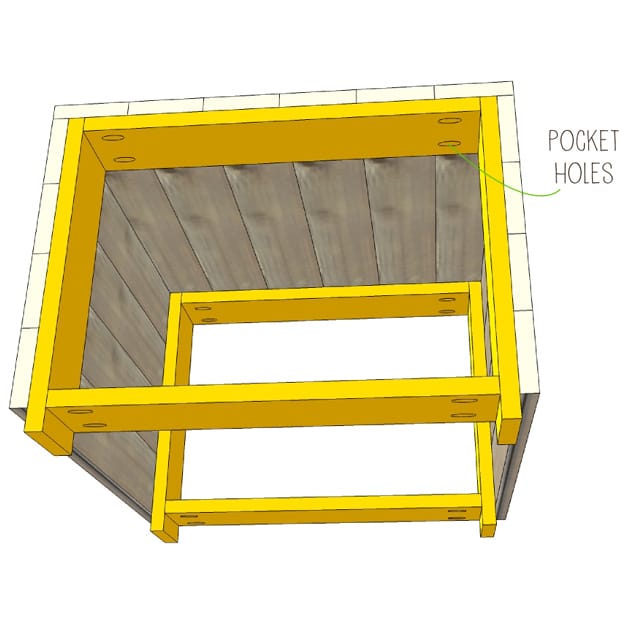
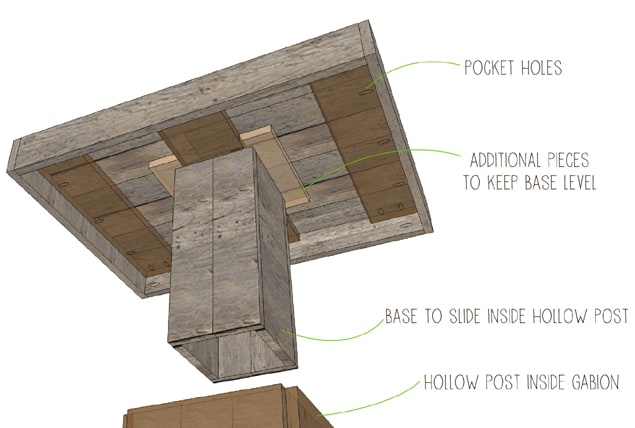
Next, drill pocket holes in the pieces the needs them, such as the bracing pieces under the pallet table top and the pallet bench top, and the frame around the table top.
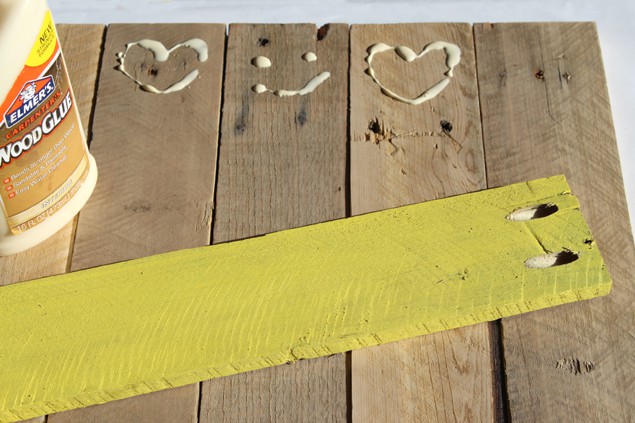
To make the pallet bench, the easier way would be to build the frame first with pocket hole screws, then glue or nail the side and top boards. ( I always realize a better way AFTER! )
As you can see we need a lot of pieces of the same length. Even though pallet wood is quite irregular, we still want the cuts to be as clean and square as possible. This jig worked great. See below.
We used 1/4″ and 1/2″ plywood, and finished wood 1Xs to make the jig, after cutting the pieces using a straight edge guide which came with the circular saw, we glued the pieces together.
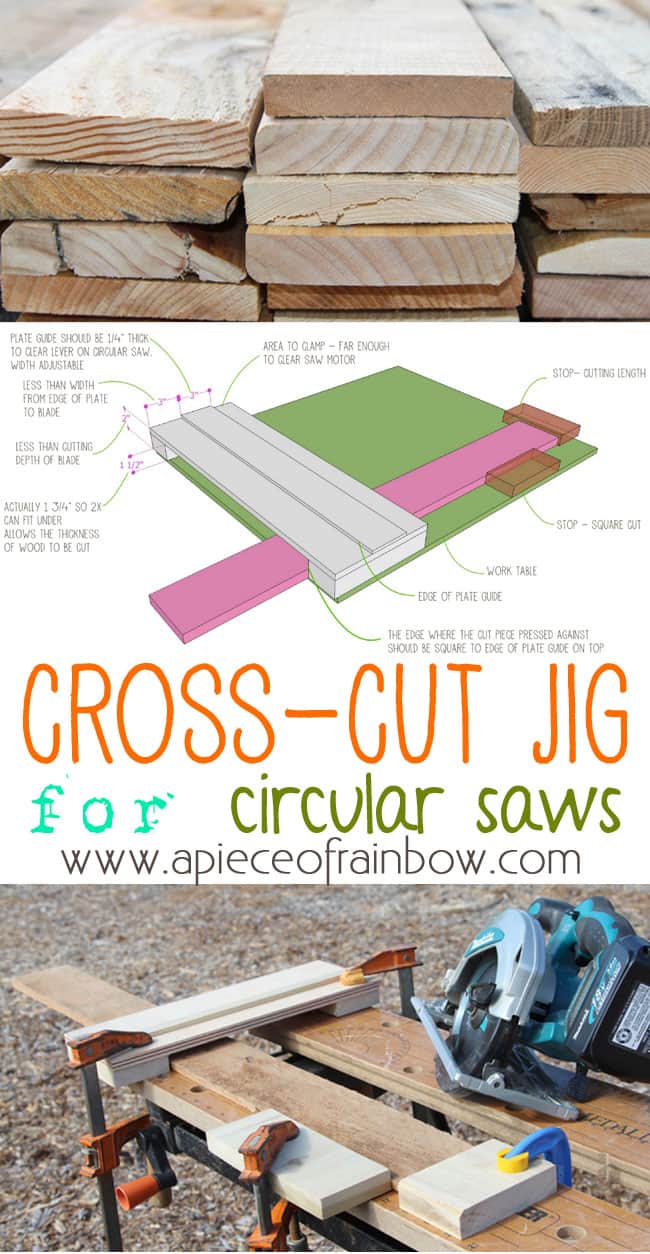
This jig is made for our Makita circular saw, and cuts pieces under 1.5″ thick. It very simple to make, but there are lot of considerations from blade cutting depth, to clearances on several parts of the saw when it slide along the guide. Please refer to the diagram here (right click and save if you want to print it out) which explains the design considerations for a jig that will work for your saw.
How to build an unique pallet coffee table.
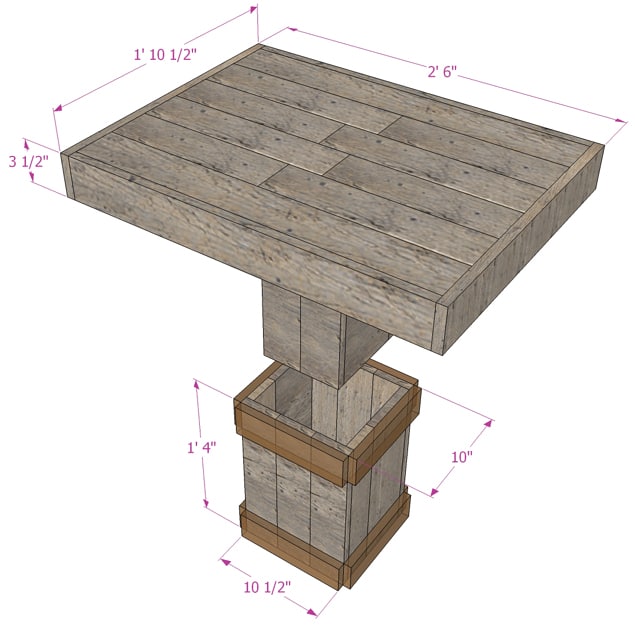
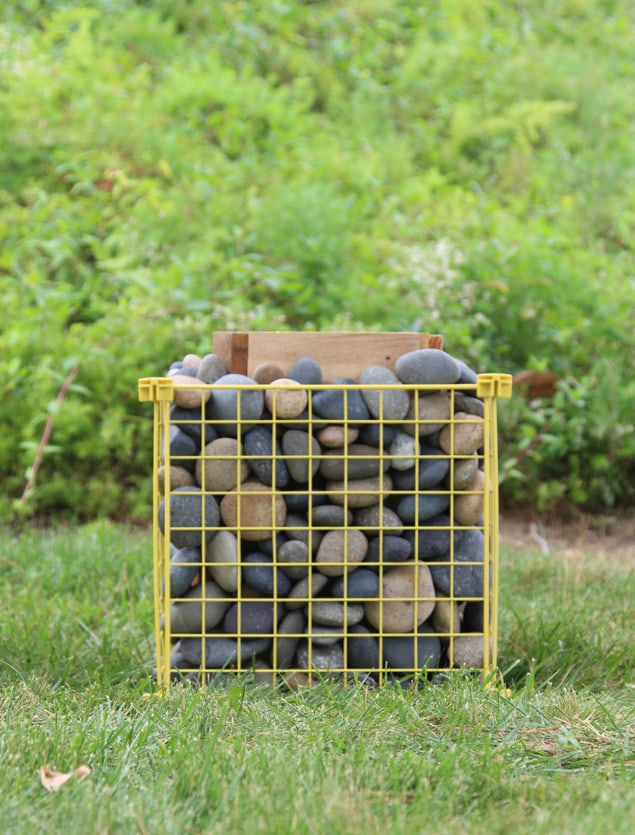
The hollow post that the pallet coffee table top fit into will be secured inside the gabion. Because the gabion cage in this case is 15″x15″x15″, the post needs to be a size that fits inside and still leave room for the pebbles / rocks, which are not just decorative, but more importantly – they contribute to a strong base.
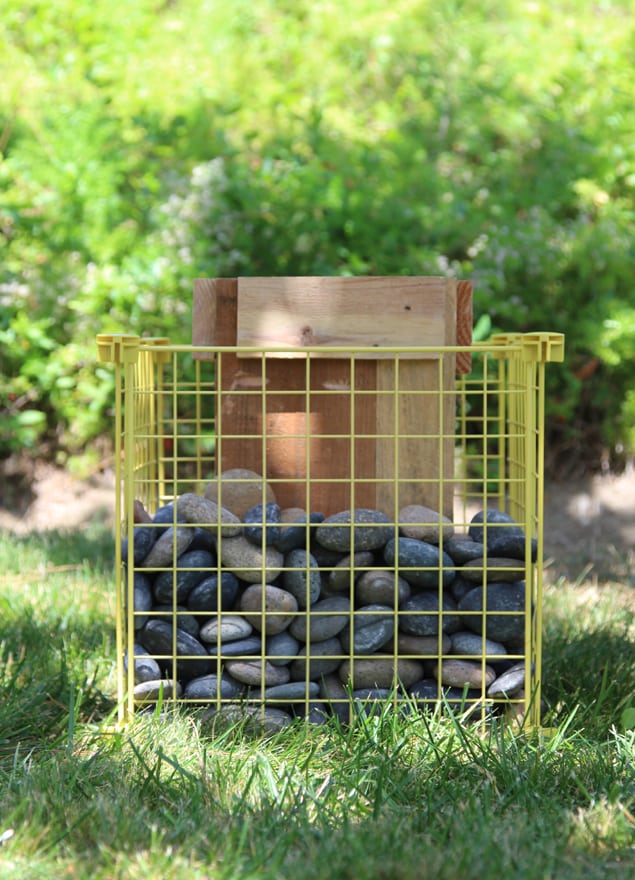
The base of the pallet coffee table slides into a hollow post stabilized by the metal cages filled with rock / pebbles. When making the base and the post, the most important thing to remember is that they should be the same height, and fit snugly. The dimensions shown in the diagram is adjustable depending on the size of your metal cage and the size of wood you are using. We made them with vertical boards joined together by horizontal braces, and pocket hole screws at right angles. There are about 2″ to 3″ of spacing all the way around between the cage and post for the pebbles. And that took 50lbs of pebbles to fill!
To make the tabletop, arrange the measured and cut boards in a way that accentuate the variations of the pallet wood, attache back brace pieces with glue or nails, then attach the frame all around the 4 sides with pocket hole screws.
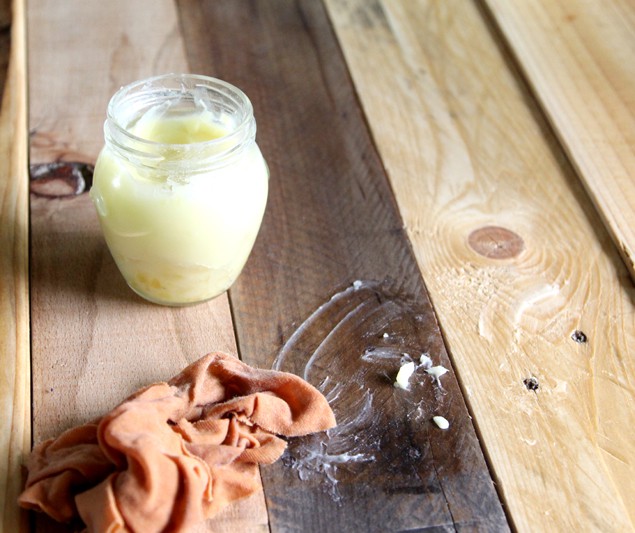
We applied a finishing wax mentioned also in the pallet wood crates project – apply a generous amount onto the wood surface, and enjoy the delicious honey smell on your pallet furniture!
 To assemble the pallet coffee table, collect some pebbles or rocks from your mountains and rivers nearby. We used beach pebbles, which make us think of the ocean.
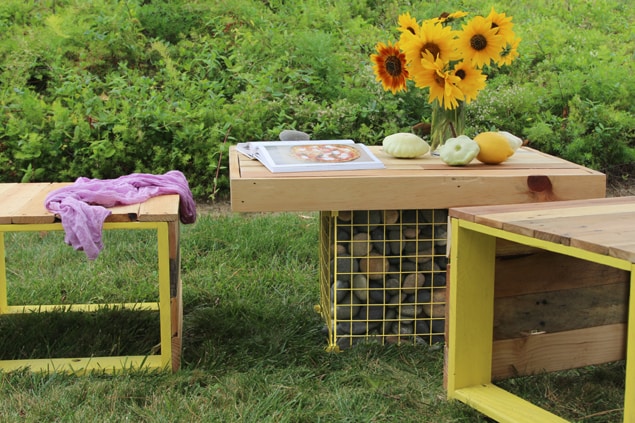
Center the hollow post inside the metal wire cage, fill pebbles all around the post to the top. Slide the pallet coffee table base inside the post. The pebbles heavy weight hold the post and table in place, and create a strong and sturdy base.
Now we can sit in the garden and enjoy a nice book outdoors accompanied by bird songs!
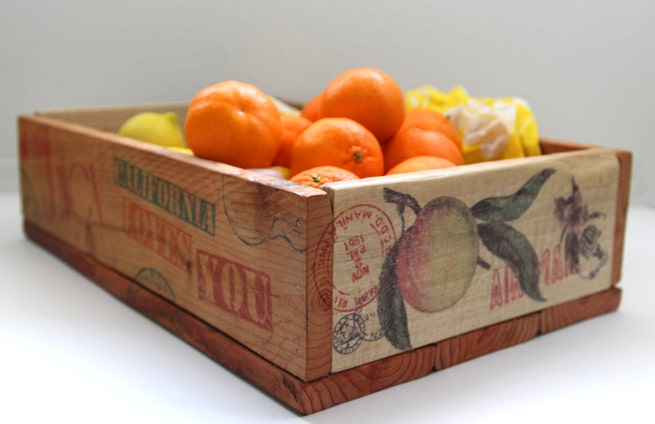
And the pallet crates and image transfer tutorial mentioned earlier is here-
Update: Now the furniture is part of this: We turned a rental patio into a beautiful pallet outdoor room! 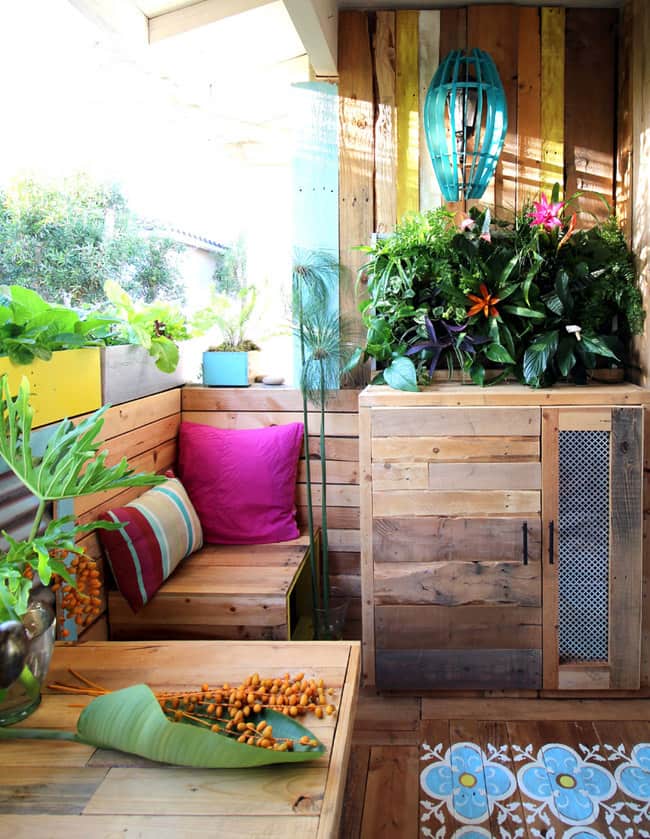
Makeover: a rental patio into a beautiful pallet outdoor room
Happy creating! See you soon!


This was so great ! Thanks for sharing this!
Great Work! now I can appreciate my pallets in my backyard!
Looks great!!! Awesome pallet DIY idea.
Great article, really like how the pallet furniture turned out! Making a set for our patio!
Love the amazing and creative DIY pallet wood bench style. This is looking so beautiful Thank you for sharing this amazing idea.
Such awesome DIY outdoor pallet furniture ideas! Thanks for sharing many wonderful DIYs with us. Please keep it up!
Thank you so much for such great ideas on pallet sofas! We are going to build one!
Great work. I love this type of DIY work as I am a home lover. Thanks for the sharing us.
It looks so Great!! Ananda, you are creative like Steve jobs.
Wonderful sharing! I have been looking for things to with my kids now that they are indoors. This is a perfect guide
Awesome!! Very creative and impressive. Am a big fun of DIY projects and I must try this concept.
Good work, keep posting!!
Great Work Ananda! many thanks for sharing your wonderful thought with us. love your blog and bookmarked it.
Have a nice day!
I was lingering to build some outdoor DIY pallet furniture. Glad that I’ve found this post its easy step by step process will make me get back to DIY’ing. Thank you for creating this guide.
happy building Alex! 🙂
Making tons of DYI projects with wood is so AWESOME and fun!! i wish i could do this..
Looks great!!! Awesome DIY idea. Surely going to try this out on my yard. Thanks for sharing
Thanks for the idea! Pallet wood is a wonderful material for home decorating.
Excellent post! I was looking for pallet furniture ideas, and some of these pallet projects are just what I want to build!
Yes! You are right. To find quality pallets is the best to build any pallet furniture.
This article is very good & informative. I have gain so much information from this blog. I like your blog. Thanks for the post.
That’s a great DIY idea, I’m pretty sure I’m going to try it out after finishing my yard.
Thanks for sharing this wonderful DIY idea for the wood bench.
Keep up the good work!
Looks great! I always love DIY things that’s why I love your article and enjoy this article very much.
Thanks for your amazing article. Keep Sharing!
Just awesome. I read your article very carefully it’s very interesting and very helpful. It’s inspired me to do some DIY work.
Thanks
Awesome!! Very creative and impressive. Am a big fun of DIY projects and I must try this concept.
Good work, keep posting!!
Pallet furniture??? Such cool ideas and concepts with using pallets. This is really inspires me to refurbish some pallets!
Great post, the KREG pocket screw jig was the best thing I ever bought. Great for building racks and tables, a little bit of wood putty to cover up the holes, light sanding, and some paint and nobody can see a thing.
Many of us either have pallets lying around or can get hold of them from the many businesses that are only to happy to get rid of them. This can be a great source of cheap lumber for construction. But cheap can also be good build quality with a little planning.
It’s so amazing! Thank you so much for the tutorial! Looks like the table and bench I need for the backyard.
Thank for sharing!
Nice work Ananda .Thanks for the share. Keep up writing so that we can get more informative blogs like this one.
Great post Ananda …I am looking to create my coffee table…your post really helps thanks you 🙂 bookmarked your site you have great DIY tips.
It was great piece of information. Was looking for something to build myself to spare my time in backyard to create something worthwhile and beautiful. It definitely gonna help. Thank you very much.
Nice post. I was checking constantly this blog and I’m inspired!
Very useful info particularly the remaining part 🙂 I deal with such info a Lot. I was looking for this particular info for a very lengthy time.
Thanks and good luck.
This article is so cool – my company sells gabions in different sizes and this is a very nice example of the countless design possibilities they have.
Therefore this is a very interesting post for our customers. Do you allow me to use the pictures and translate the post into german making it easier to understand for our customers?
hi tom, we only allow use of one photo and a summary with a link back. thanks!
One of the best DIY I have ever seen. Thanks for the idea pal..
Great post Ananda! Keep up with the good work. This is certainly one of the best DIY sites.
Awesome post it is!
Oh wow! I really love this!! love the pebbles and the yellow
Excellent! How could you fin this Gabion? I’ve had such a hard time finding any that aren’t from specialty stores online and are crazy expensive.
i used shelving panels, you can also use rebars from home depot! =)
It’s so amazing! Thank you so much for the tutorial! Looks like the table and bench I need for the backyard.
What a beautiful and creative thing you shows I am very impressed with your creativity.
Thanks for sharing this post with us
Liked the idea tropical PALLET outdoor room and preserving courage to do it myself at my own home. All credit goes to you. Thanks in advance.
Few days ago i was trying to make Wood Bench but its was not good finishing now i have got some great idea about making some Pallet from your post buddy thanks for your post i am going to make it!
With or without pallet wood these pieces would look great. Nice job and great design.
It’s important to remember that for a lot of people, pallet wood is all that they have to work with. Woodworking doesn’t need to be just for the wealthy and free pallets offer a great solution for people who like to make things!
This looks just perfect for my garden lawn. You have explained it so beautifully and in great detail.
Guess I’ll have a great weekend preparing this.
Thanks again.
What a great job!!! It looks so beautiful and creative. I loved it. Thanks for sharing.
Great patio set! I really like the idea using a box of rocks. It’s very beautiful, creative and easy to make. This seems to be a perfect patio set for RV or off-grid tiny house living. Thanks for sharing your inspiring project.
This is the best DIY i have ever seen. thanks for the awesome idea
This is a fantastic post, great instructions Ananda!
My wife and I would love to build something like this, as we’re currently planning on living off-grid somewhere (like Oregon or Alaska). Making these simple material household items looks so appealing.
(Bookmarked this blog)
thank you martin! Off grid is our goal too! 🙂
Great Work Ananda! many thanks for sharing your wonderful thought with us. love your blog and bookmarked it.
Have a nice day!
What a beautiful and creative thing shows in this blog.I really loved it.Thanks for sharing.
Wow! You are so talented! I’m really loving this as a fun summer project.
It looks fantastic and Great!! Ananda, you are creative like Steve jobs 🙂
can’t remotely compare to Steve, 🙂 you are very kind!
Great work ananda, I am trying to do almost the same thing. Will you please tell me from where you have collected the stones? Amazon? It’s kinda pricey for me. Is there any other place to get those?
hi morgan, i got them here on the beach for free 🙂 see if you can find local river rocks in nature, or call some landscape materials center near you 🙂
I love this and thanks for sharing the detailed steps to make it, too! I love the creativity in the table and bench – it is something unique and different compared to other pallet wood benches I have seen around – great work!
Fantastic! Where did you get/find the gabion? I’ve had such a hard time finding any that aren’t from specialty stores online and are crazy expensive.
thank you Melissa ! this was a hand me down, but someone tole me they saw similar ones at target or walmart. 🙂 I am also posting a little improvement – add more strength to the gaboon by tying some fishing line On the sides!
Those are awesome!! Love the pop of color and yellow just rocks. I need to show these to my husband so he can make them 🙂
thank you dear marni! so nice to have handy hubbies hehe =)
I love these so much! How creative! You did a fantastic job!
thank you so much susan, so nice to see you here! =)
Oh wow! I really love this!! love the pebbles and the yellow
thank you natasha for visiting! =)
Looks great! Love the pop of yellow…
thank you laurel for visiting !
That is so creative! I’m so impressed!
thank you dear meredith!
With or without pallet wood these pieces would look great. Nice job and great design.
thank you so much kelley! =)
What a great idea!! I found you on facebook and I pinned and shared this on facebook. Great instructions for a great project
thank you and great to meet you helen! =)
Again I love your creativity, and how you come up with these great ideas. I also love your final picture–the setting is perfect–great job! Happy 4th of July.
thank you mary ann! i always feel ideas are the easy part, making them work isn’t always easy, but hubby helped a lot on that hehe! happy july 4th to you! =)
Wow Ananda, these look incredible, you really are so talented, I absolutely love them!
oh emma you are so sweet! can not take all the credit : hubby did a lot of the hard work ! =)
beautiful, just beautiful….if i ever get a house….. 😀
thank you dear andrea! =)
Great tutorial. Your seating and table came out really nice. Would love if you shared this on the Merry Monday Linky Party.
thank you erlene! i will stop by this evening! =)
GREAT tutorial! I didn’t know what a gabion table is, but I absolutely LOVE it! I’m loving the rocks – it’s such a cute set! Swoon!
so appreciate it dear kristi! =)
What a job!!! It looks great!!! And the yellow and pebbles work good together! Thanks for the tuto…i might copy you… Besos
thank you sofie and have fun! =)
Would look great on our patio! Beautiful!
let’s make a set! xo
I LOVE your Renter’s Tropical Remodel…….The only thing that you didn’t mention how to make was that cubboard looking item……Do you have the directions for that??? Would love to be able to make that too !!!!! Can you add the directions for that on your website ??? PLEASE !!!
THX……Cathy
hi cathy! i have been thinking about how to write that one, because the hinges were a bit tricky! check back towards the end of september, i have something similar & super gorgeous (built by a friend) that i am drawing plans for! =)