How to Make Cardboard Furniture
How to make cardboard furniture with flat pack design! Lots of tips on building cardboard table & chair! Great learning activity with kids!
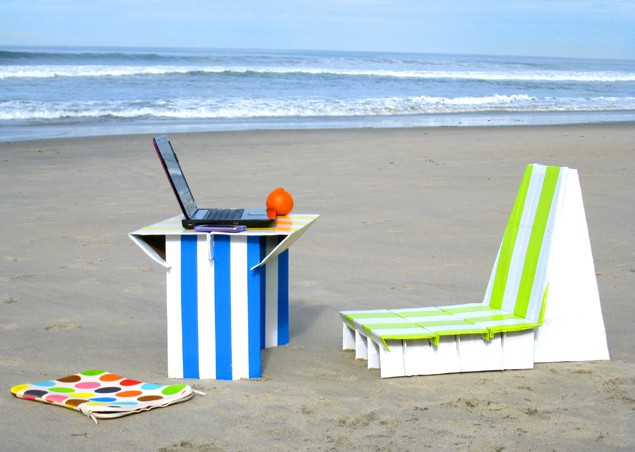
Let’s hit the park or the beach with these light weight, easy to pack and assemble furniture made out of cardboard and duct tape! ( Updated March 31, 2017 )
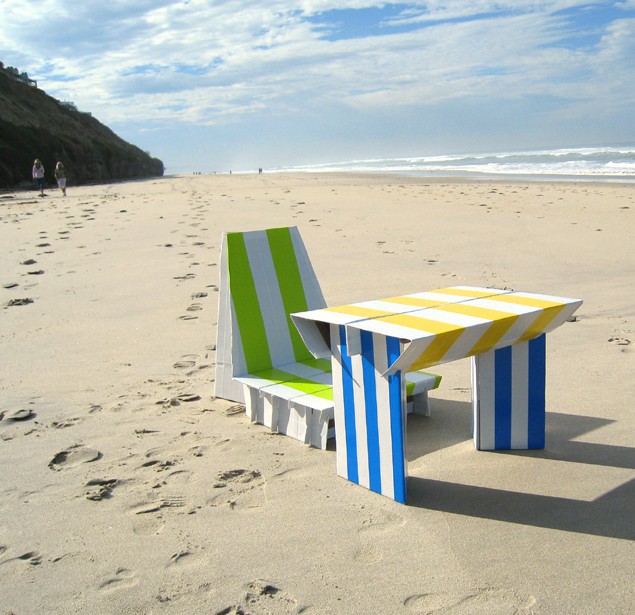
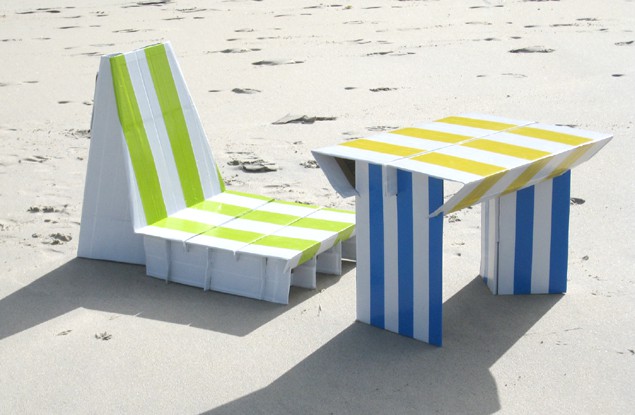
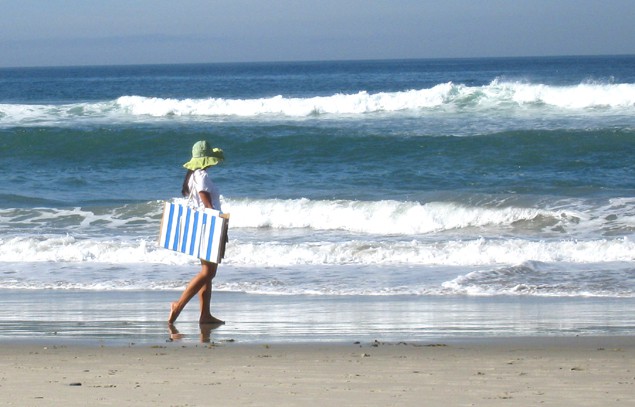
This set of table and chair are made of cardboard and duct tape only, and weigh less than 4 pounds together. They can be easily put together and taken apart, and every component opens up into a flat piece. The 2 table legs become the carrying case when opened.
I got inspirations from many cardboard furniture and packaging designs, went back and forth between designing in Sketchup, and testing the structures with cardboard. Through this process I became more and more appreciative of cardboard as a construction material.
*Some resources in article are affiliate links. Full disclosure here.
Materials and tools to make a table and a chair from cardboard
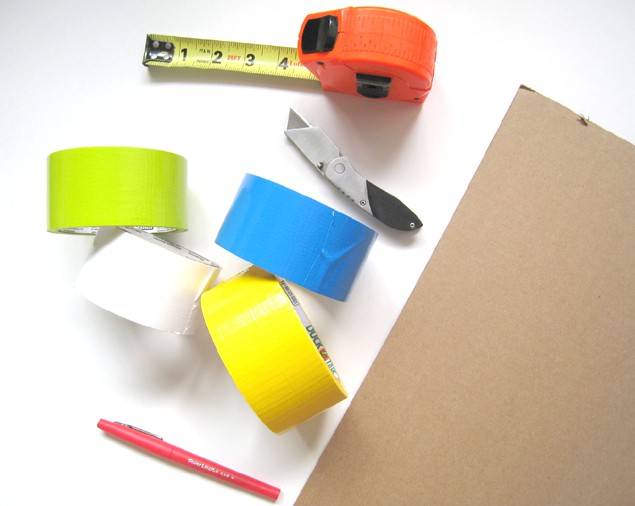
- Cardboard: upcycle all those boxes! This project utilizes single wall corrugated board, but some improvement can be achieved by using double wall corrugated board. Will discuss that later.
- Duct tape: your choice of colors
- Box cutter or Xacto knife, and good cutting surface
- Scissors for cutting slots (shown in next step)
- Measuring tape. Drawing pen for marking the cuts and folds. Straight edge and a butter knife to make creases
Cardboard as a building material:
The humble cardboard contains some genius structural engineering. When placed vertically on its ends, the corrugation / flutes form vertical columns, capable of supporting considerable amounts of weight.
In this project the components that support lots of vertical weight, such as the structure beneath the chair, is made with the corrugation running vertically.
Step 1: The ABC of Cardboard Construction
This step explains all the basic methods of how to cut, crease, fold, notch, & join cardboard, which will be used to create all the components in this project.
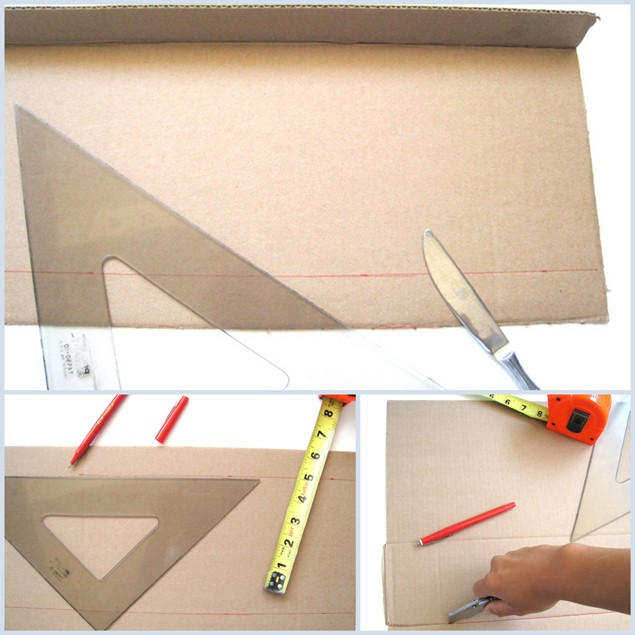
Precision is important when building a structure. Use tape measure, straight edge and fine marker to transfer the measurements onto the cardboard surface.
When cutting, I find it easier to make a shallow cut first, then go over it with a deep cut. If your hands are strong and steady, it might be different for you.

To create creases, use the dull side of a butter knife, and go over the marking with the help of a straight edge.
To join 2 pieces of cardboard in a 3D grid (used under the chair), notches are utilized here. Draw lines where notches are going to be made on the 2 pieces, then draw another line through the middle. Use scissors to cut a notch about 1/8″ to 1/4″ wide centered on the line. This will allow the 2 pieces to fit neatly together.
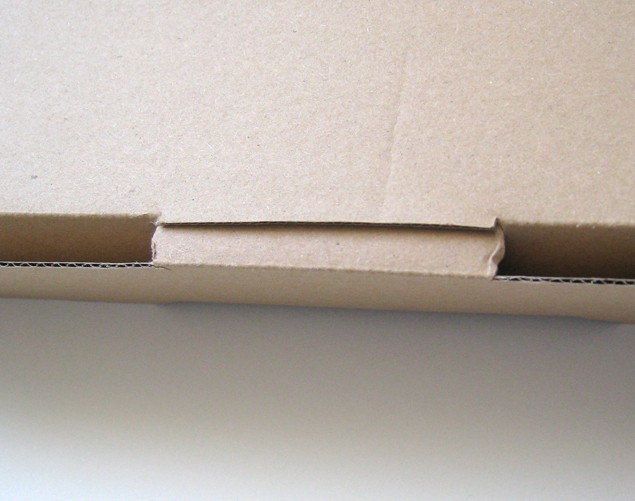
Last but not least, here is the slot and tab. We see them all the time, like on a gift box , the lid remain closed because the tab is inserted into a cut slot. The size of the tab and slot can be somewhat flexible as long as they fit snugly.
Step 2: How to Make Cardboard Table
If you can’t find a big enough piece of cardboard anytime during this project, you can tape 2 pieces where the creases are.
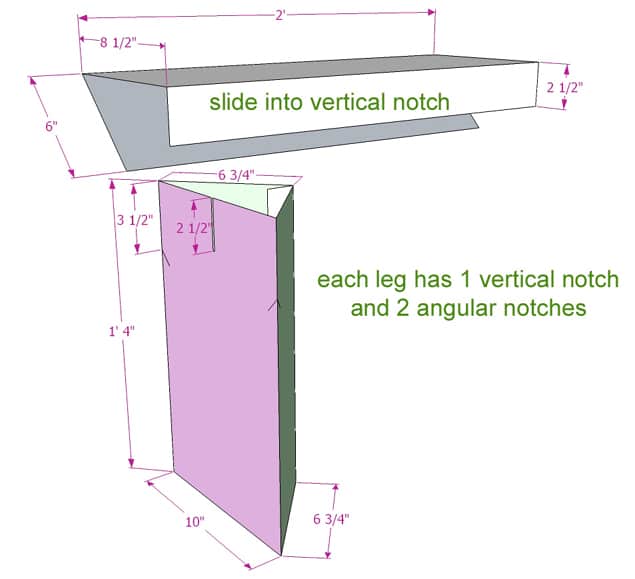
The table consists of 4 pieces- 2 triangular legs at 16” high with notches, and 2 symmetrical top pieces which slide into the notches and make up a 24”x17” top surface. The first diagram shows one leg, one top piece, and all the dimensions.
To make one of the legs, cut out a piece of cardboard 16”x27”. Make 4 creases as shown, cut out the 3 notches, and a tab and slot to lock the triangular form together. The tab and slot can be any length between 4” and 6”, and centered on the vertical length.
To make half the table top, use a 24”x17” piece, make 3 creases as shown in the dimension diagram,
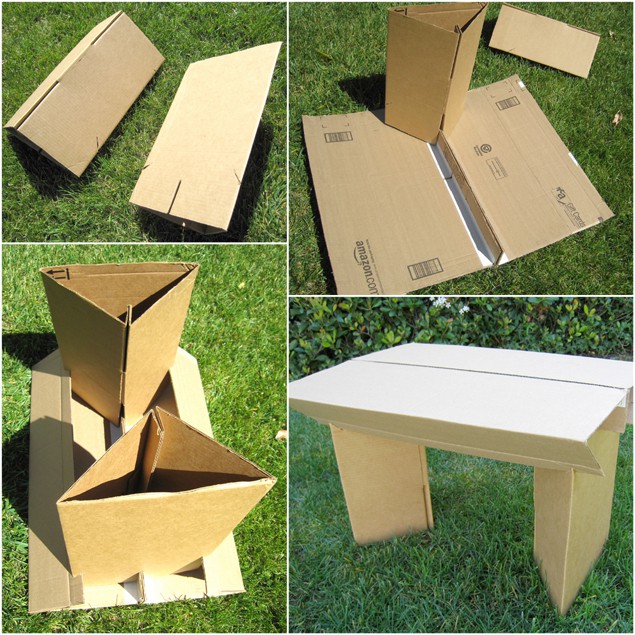
Once all 4 pieces are made, put the 2 table legs about 18” apart, slide the top pieces into the notches and that’s it!
Step 3: How to Make Cardboard Chair
Please refer to Step 1 for detailed explanation on creating notches, etc, and look through the pictures here first before reading, it’s actually not as complicated as it looks.
Start with the structure underneath the cardboard chair seat. In the diagram and the pictures, the green numbers refer to different pieces.
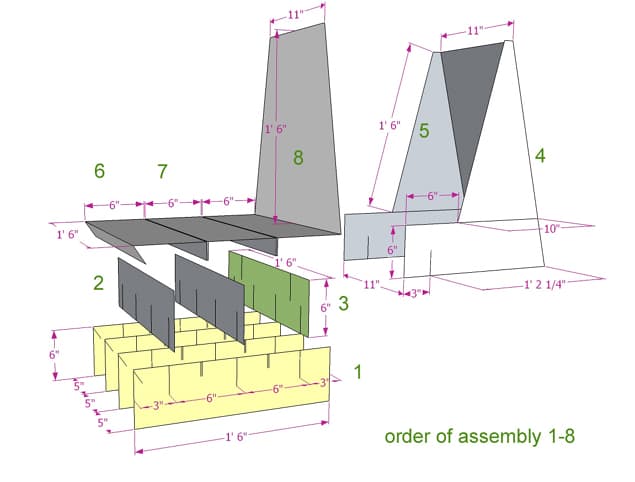
Pieces #1, 2 and 3 are all made with 6”x18” cardboard, and make sure the corrugations are running vertically. Cut notches where lines are drawn, and they will fit nicely into a 3D grid.
Once the grid is put together, the order of assembly for pieces #4 to #8 can be quite flexible.
Pieces #4 and #5 give the back of the seat a 15 degree angle, which is what I found to be comfortable, and the triangular shape transfers weight from the leaning point, aka our shoulder, directly to the ground. This was one of the aha moment after testing various ways to support the back of the DIY cardboard chair – the magic of triangles!
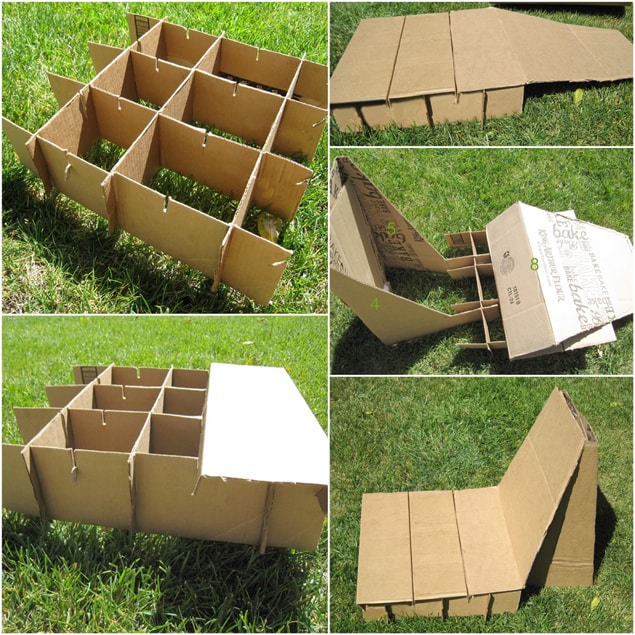
These 2 pieces connect to piece #3 on the grid, lock together with a tab and slot cut similar to the DIY cardboard table legs.
Pieces #6, 7 and 8 form the top and back of the seat. Each has 2 ceases which create folded flaps to slide into the notches of the grid. The flaps and notches are about 1.5” long.
Step 5: Duct Tape and Carrying Case for the cardboard furniture
The duct tape here plays 2 roles: functional and artistic.
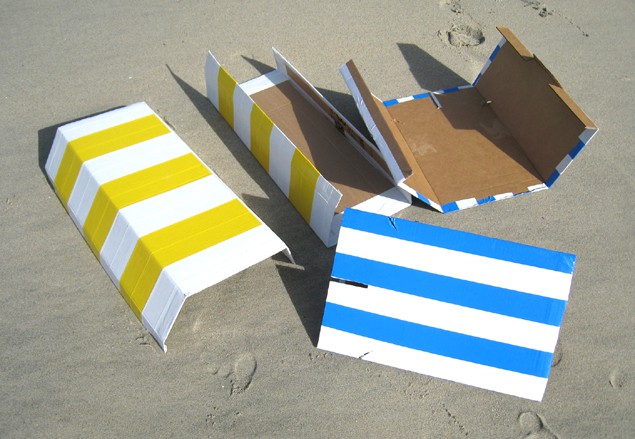
It provides protection from the moisture of the beach sand, and adds a lot of extra strength to the cardboard table and chair. All the cardboard furniture pieces that touches the ground are taped at least 2” up.
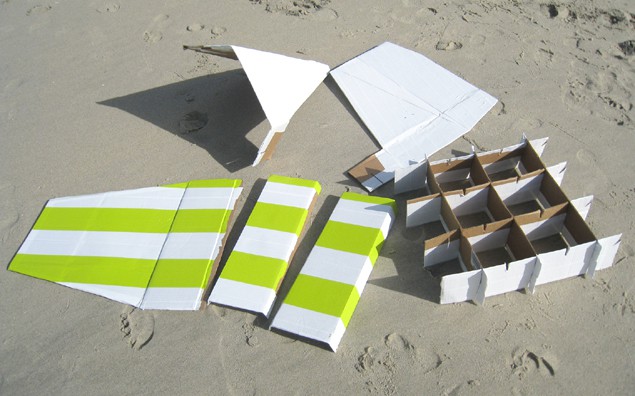
I also realized that some DIY cardboard furniture pieces are much stronger if made with double wall corrugated board. Because I only had single wall boards to work with, I doubled those pieces on the chair seat and back when applying the duct tape.
When it comes to artistic designs, sky is the limit. I went with the geometric look of double and single tape stripes.
To create the stripes design, make sure to overlap each stripe slightly.
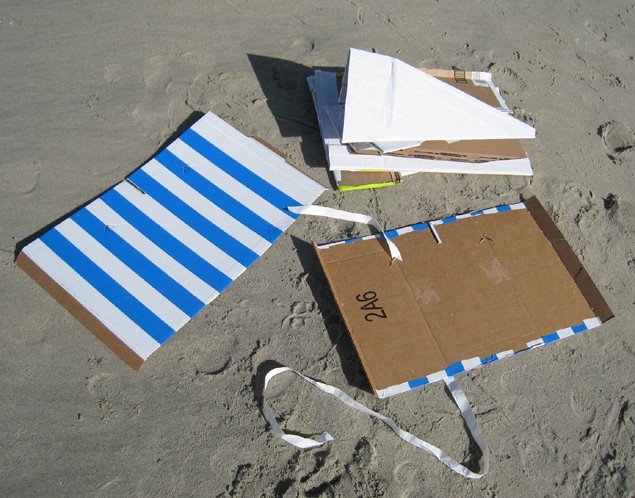
The 2 legs of the cardboard table, when opened up, will turn into a carrying case. Make duct tape ribbons by folding a 6’ to 8’ long into half, and make 2 of these. Thread the ribbons through the triangular notches, and sandwich all the other pieces in between, tie the ribbons together at the top, or in any fancy way you like!

I originally wrote this DIY cardboard furniture project and won a first prize in the Cardboard and Duct Tape Contest at Instructables before I started blogging. I want to share it with all my readers here because the concept of upcycling is so dear to my heart.
When something has served its purpose, such as a cardboard shipping box, we can give it new life through our creativity. It’s an fun and enriching experience to up-cycle and reuse. It’s also great for our planet earth!
If you love the idea of upcyling, please check out these Pallet Wood Crates & Easy Image Transfer

If you love the idea of something beachy, you may enjoy this one –Make Beachy Picture Frames from Fence wood

Happy creating! See you soon!


I need a pattern like this for a single bed with storage underneath! Have you any ideas or advice for me?
hi marsha, do you mean a cardboard bed?
Hola, cree que pueda elaborar un organizador de zapatos usando carton? gracias
hi! here’s a cardboard shoe organizer we made, that we LOVE using- http://www.apieceofrainbow.com/diy-shoe-rack/
酷!
hey!!! so nice to have one of my dear friends here!! =)
I love this and am doing it today with my kids. I am a local art teacher also. Could I teach this to others as long as I give you credit?
absolutely! have lots of fun! =)
Thanks! We will. 🙂
Wonderful! I love your designs and the way they pack up for easy carrying.
thank you ann! =)
thank you ann! =)
Hey ananda, very nice project you have here. I’m so glad I found this page.
I’m particularly interested in the table. I want to make it as a makeshift table in one of my rooms. However, I need the legs to be at least 2-3 feet high. I don’t exactly have an abundance of boxes, so I might just connect 2 legs to achieve my desired height. Do you have any suggestions as to how I should connect them while still minimizing wobbles?
hi nigel, thank you! i would try doubling the area where the 2 meets with some kind of outer or inner braces made of cardboard, or cardboarad tubes perhaps? have fun! =)
Yeah. I think reinforcing them with braces is a good idea. Thanks so much ananda.
Wow, this is so cool! Look sturdy too! 🙂
thank you onel for visiting! =)
Very original idea: colorful, smart, fun and unlike everything else around. Your pictures are just as original: full of light, taken in a great location related to your topic – what can I say? I love every bit of your creativity. I also read your (new) bio and totally admire the energy of your text and pictures 🙂
thank you dear friend! i stayed up late last night, again, to get that done! =)
This looks fantastic! I would love it if you joined and contribute your awesome posts at my link party at City of Creative Dreams starts on Fridays 😀 Hope to see you there at City of Creative Dreams Link Party.
thank you shanice for the invite! will check it out later =)
Very cute, what a clever idea
thanks much maryann! =)
Awesome! Really inspiring to see what can be made from cardboard!
thank you heather! cardboard is a great material!
These are so cool!!! I love them!
thank you so much kira! =)
Cute! I love the colors you selected.. My husband would love this. He is always saying we need a table when at the beach 🙂
thank you marni! have a nice beach-weekend! =)