How to Distress Wood & Furniture {8 EASY Techniques & Videos!}
If you love the aged rustic look of weathered wood, you are likely to have wondered how to distress wood or how to distress furniture.
During my DIY adventures, I have tried many techniques to distress wood and furniture, and finally decided to put my favorites all in on article as a reference for everyone, so you and I don’t have to keep wondering: “Vaseline? Sandpaper? Vinegar?”
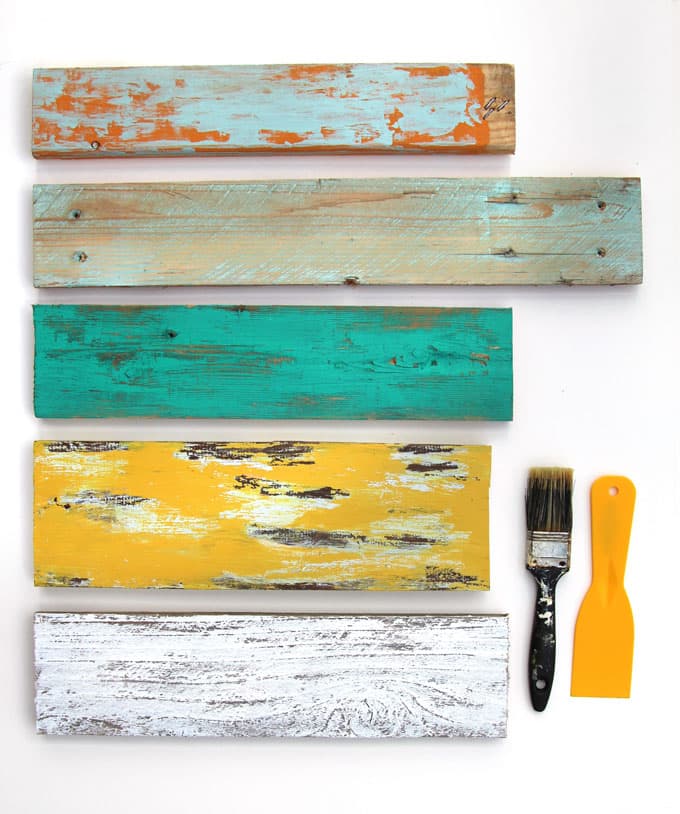
These distressing wood techniques are my favorites because they are all super easy, give great weathered wood results, and don’t require any special materials or tools. Each one creates a little different look from gently weathered wood to rustic chippy paint. You can choose your favorite based on your project and the style you like.

I have included videos on each distressing technique and detailed comparison on choosing the best method for your DIY project.
There’s something so irresistible about pieces of distressed furniture or chippy painted wood that stirs up our imagination and transports us to another time and place. Distressed wood look beautiful in so many styles of homes from farmhouse, shabby chic, and country, to industrial and modern.
*Some resources in article are affiliate links. Full disclosure here.
Here is our list of 8 easy painting techniques to distress wood and furniture:
Sanding technique, Candle technique, Wet paper technique, Dry brush technique, Scraper technique, Rinsing technique, Wood block technique, and Pouring paint technique.
A big thank you to our friends at Decoart for sending their gorgeous paints for our projects!
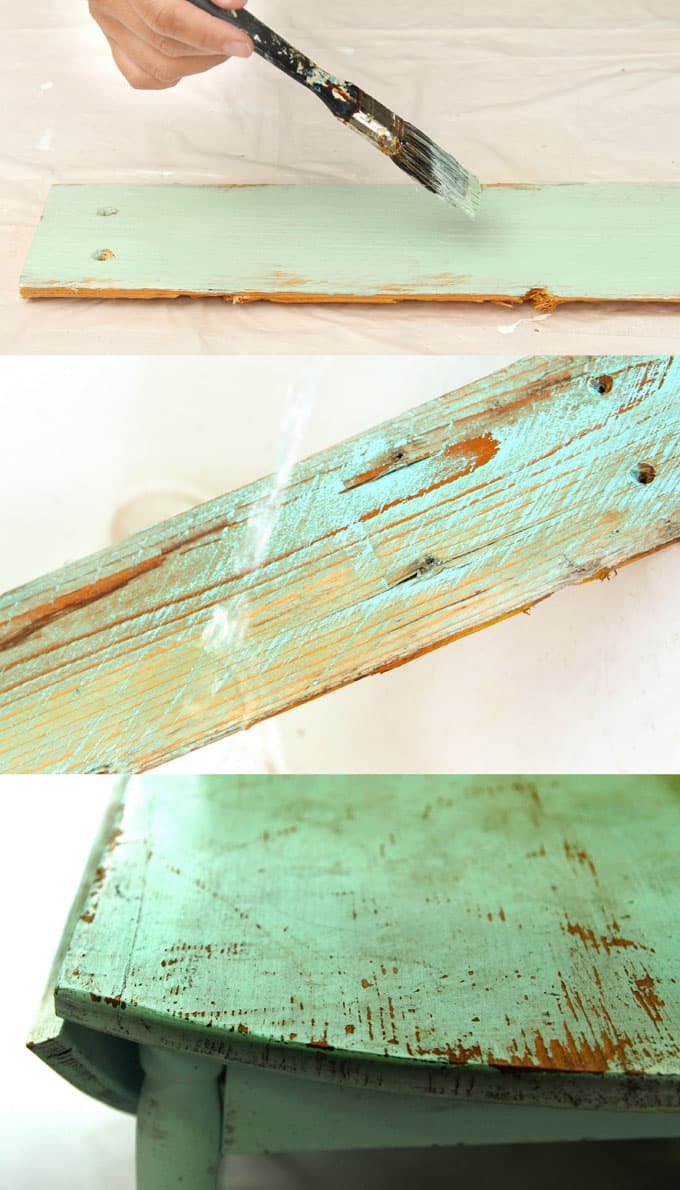
1 . Create Weathered Wood with Sanding technique
The most simple and straight forward method to distress wood is to sand some of the paint off. This technique works great on both already painted wood and unpainted wood.
The key is to sand random areas that tend to get bumped or scratched naturally, so it looks organic. You can also repeat the process on the same piece with several layers of paint. Let each layer dry, and sand in between layers. For example:

I used this method to distress a wood nightstand. After sanding the original paint as shown above, I painted the piece blue, then sanded it one more time. Check out the final finished nightstand and full tutorial here.
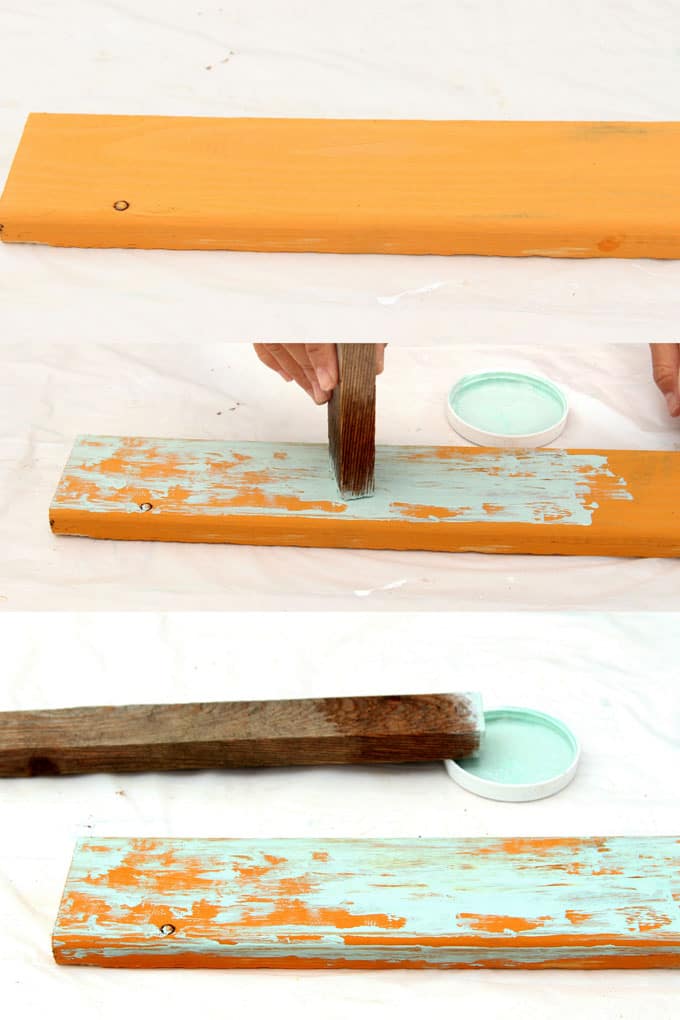
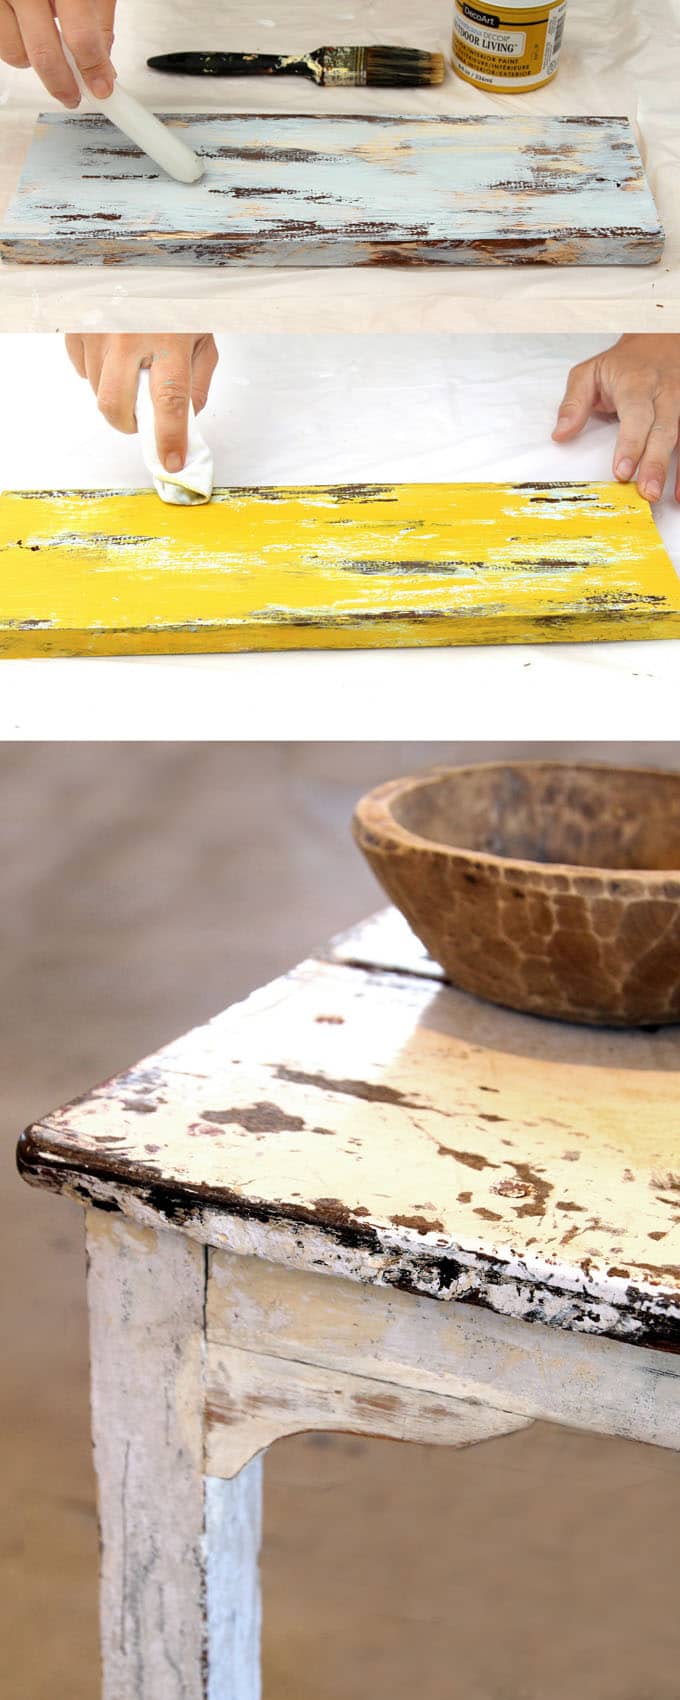
2 . Distressing wood and furniture with Candle technique
This is a super versatile technique to distress wood or furniture with almost guaranteed great result. It can be used on raw wood or already painted wood and furniture.
It is great for creating either single or multi-layered distressed look.
For example, I have used it in this Ultimate Guide on How to Whitewash Wood, and created an aged wood look with just white paint.
Ultimate Guide on How to Whitewash Wood
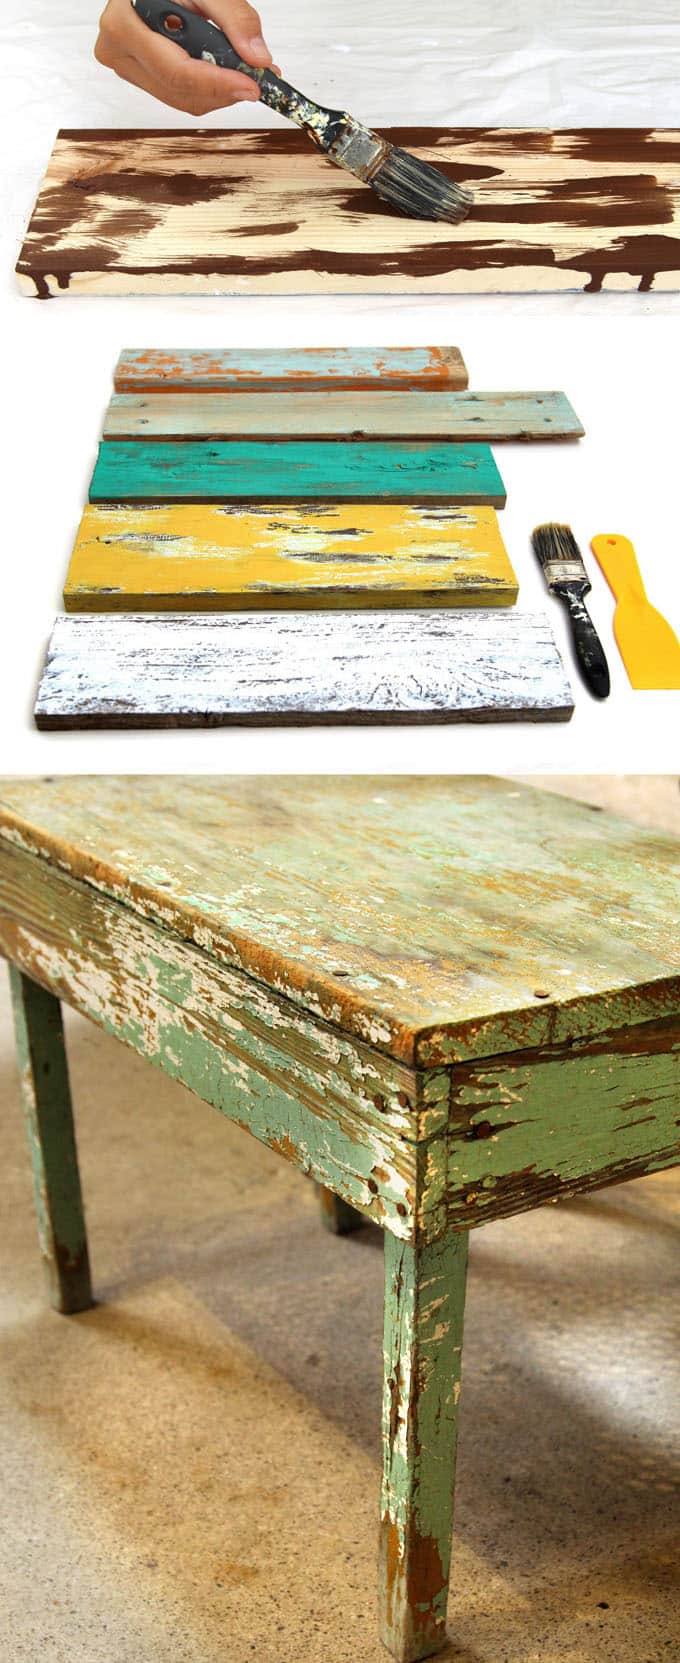
Here I am using this method to create a piece with layers of wood, plus brown, white and yellow paint.
Step 1: Decide on which color for which layer. Start with a piece of wood and the bottom layer color. (I used dark brown.) Paint the wood at random spots. Let dry completely.

Step 2: Take an un-tinted candle and rub it hard at random spots on the wood.
Paint the wood with the color for the next layer. ( I used white here.) Let dry completely.
Use a rag and wipe the surface with some pressure. The paint will come off where the wax was rubbed onto the wood.
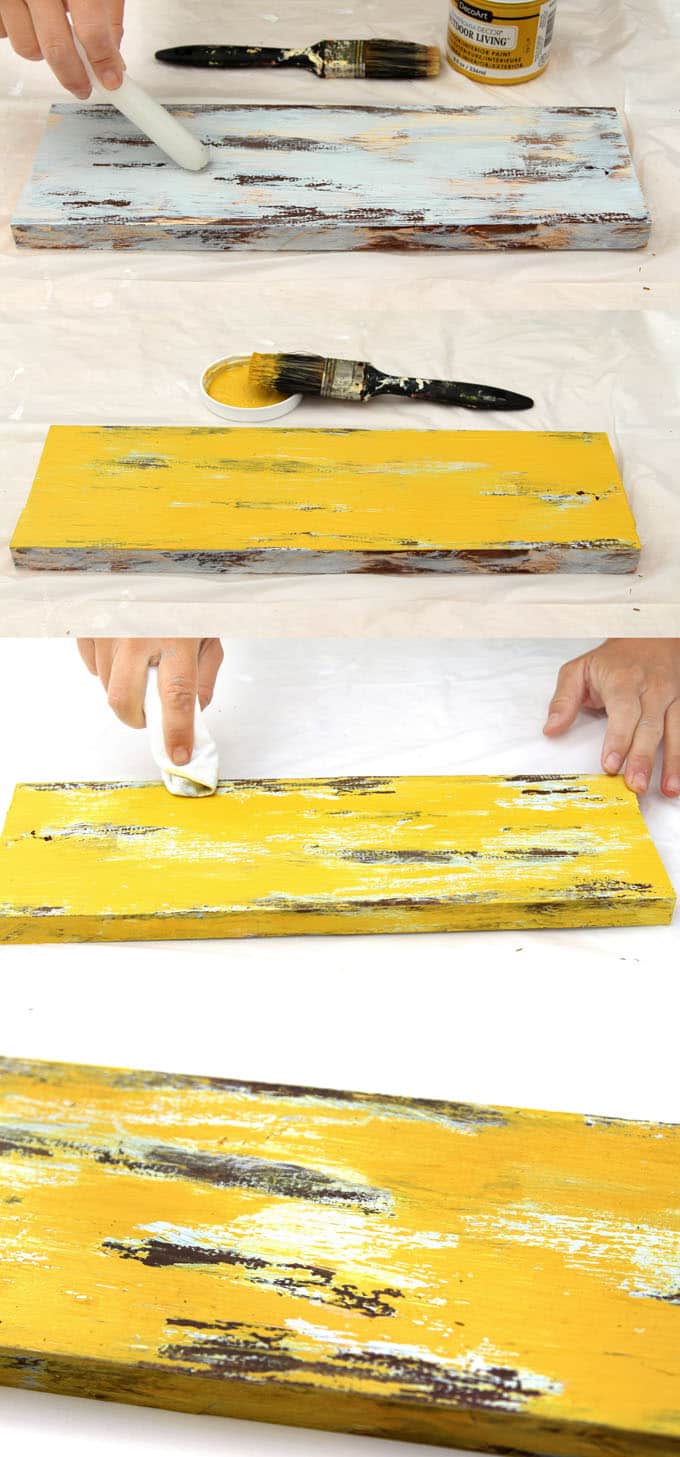
The gorgeous yellow is Decoart’s Outdoor Living seriese paint “Harvest”.
Repeat Step 2 for the third layer of color, which I did using yellow.
You can keep repeating this step to add more colors and layers. See video of the entire process below!
3 . Distressing wood using Wet paper technique
Both the Candle technique (see previous) and the Wet paper technique are good alternatives to distress wood or furniture using Vaseline.
All three methods work similarly in the way that they create a resist in certain spots so the paint can be lifted off later.
I actually came up with this method one day because I was too lazy to go out and buy Vaseline in order to start a project!

Got paper? Tear small pieces of paper, vary the sizes and shapes for a natural look.
Dip each piece in water and place it onto a piece of wood.
Before the wet paper dries, paint the wood then carefully lift each piece of paper off the surface. You can do this while the paint is still wet or dried. Below is the video tutorial-
Easy and no mess! You can repeat the process to add more layers, or sand certain spots to create the shabby chic look you want.
4 . Distress wood with Dry brush technique
The dry brush technique is great for creating an aged and scratched look. The key to success is to start with a … very dry brush!
Old paint brushes with hard bristles work great here.

Dip the brush in some paint, and skim off as much excess paint as possible.
Paint in a very fast motion, keep the strokes in different directions, take care not to cover the entire surface. See video below for more details.
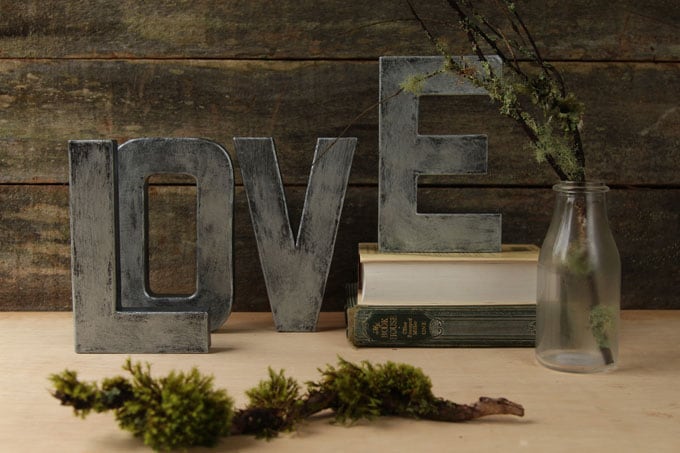
I used this distressing technique to create these faux zinc letters as you see in the video below.
I also painted the blue side table this way. You can see more details of the DIY chevron lampshade and side table makeover here.
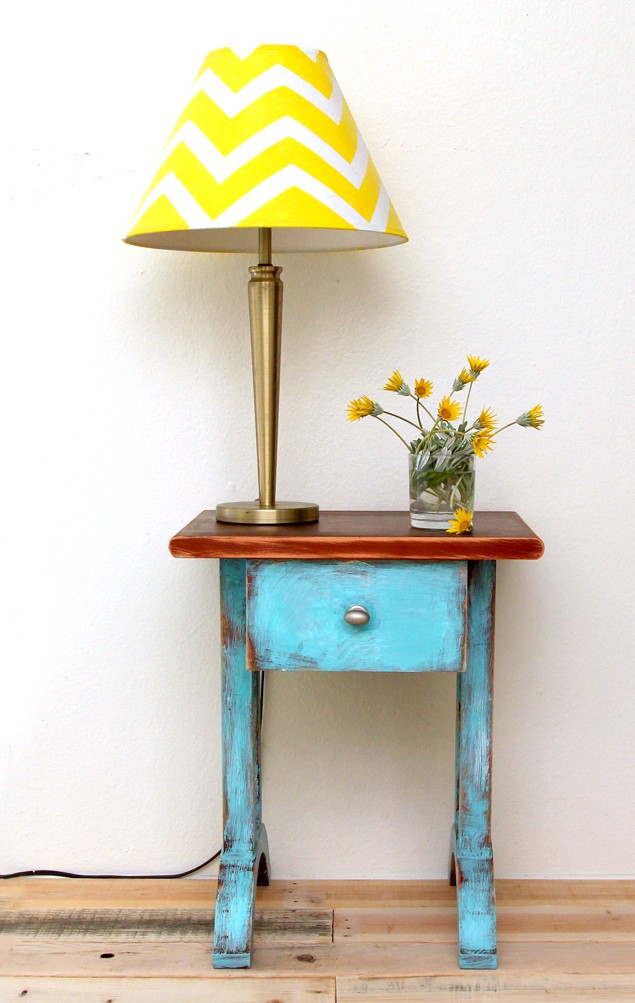
In this project I also used sandpaper to remove some paints after painting each layer.
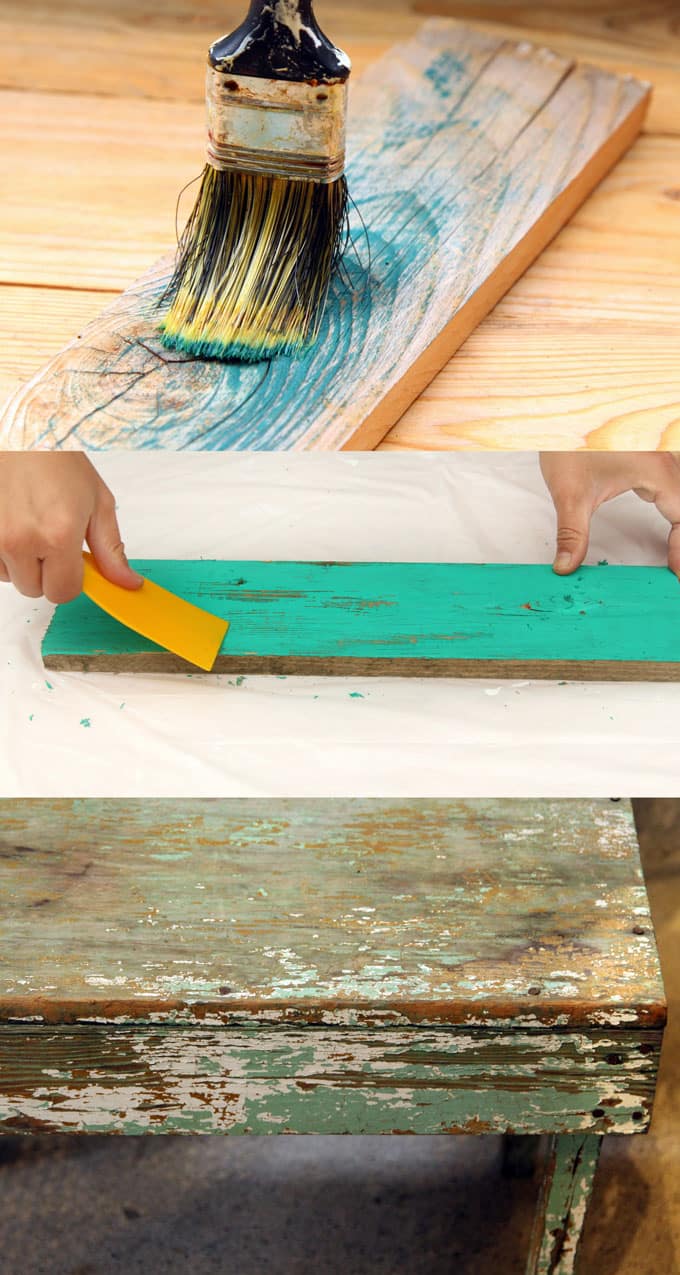
5 . Distress Wood with Scraper technique
This method is similar to the first technique, which is sanding. The difference is that sanding removes more paint and wood, and can expose the raw wood. This technique will only remove some of the paint before it dries. I love this gently weathered wood look!
First paint the wood. After the paint dries a few minutes and before the paint dries completely, take a scraper or credit card, and scrape off some paints at random spots.
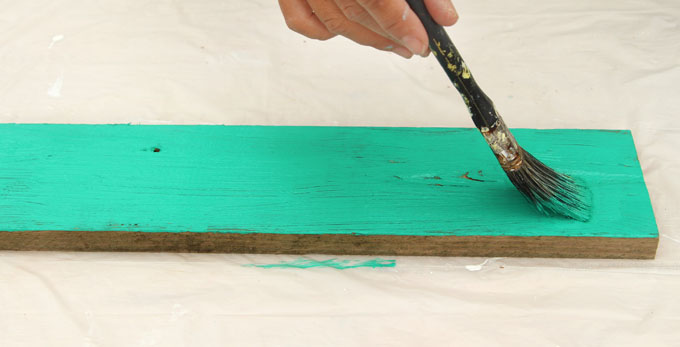
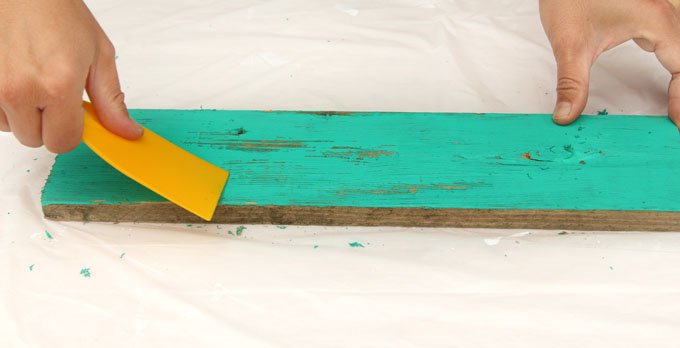
The beautiful green paint color is Decoart’s Outdoor Living Adirondack which you can get here.
If you are painting furniture, those spots that naturally get bumped onto, such as corners and edges, would be the best places to have the chippy paint effect.
The key is to scrape the paint when the paint has formed a “skin” but the surface is still a bit tacky to the touch.
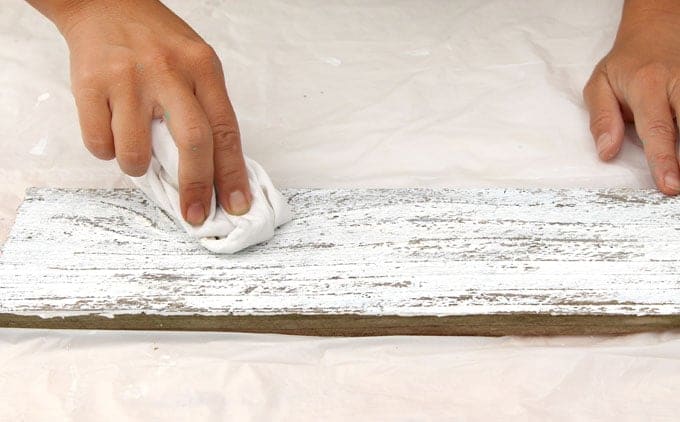
6 . Create Weathered wood with Rinsing technique
This technique to distress wood creates an elegant and soft aged wood look perfect for farmhouse style. It works best on pieces of raw wood.
Both the Rinsing technique and Scraper technique (above) are removal techniques.
Start by painting the wood and letting the paint dry for a few minutes.
Before the paint dries completely, rinse the wood in water quickly while gently wiping the surface with a rag. The goal is to washed off some paint on the surface.
I really like this piece- it looks like aged barn wood, doesn’t it?
7 . Wood block technique
This is a one step method to distress wood or furniture using the help of a wooden block. It creates more of a chippy rustic look.
Dip the end of a wood block in paint and drag it along the surface. Paint as many color and layers as you want. That’s it! See it in action in video below-
Have you seen furniture and decor made from reclaimed boat wood? This is a great way to make your own “boat wood” that is so full of character!
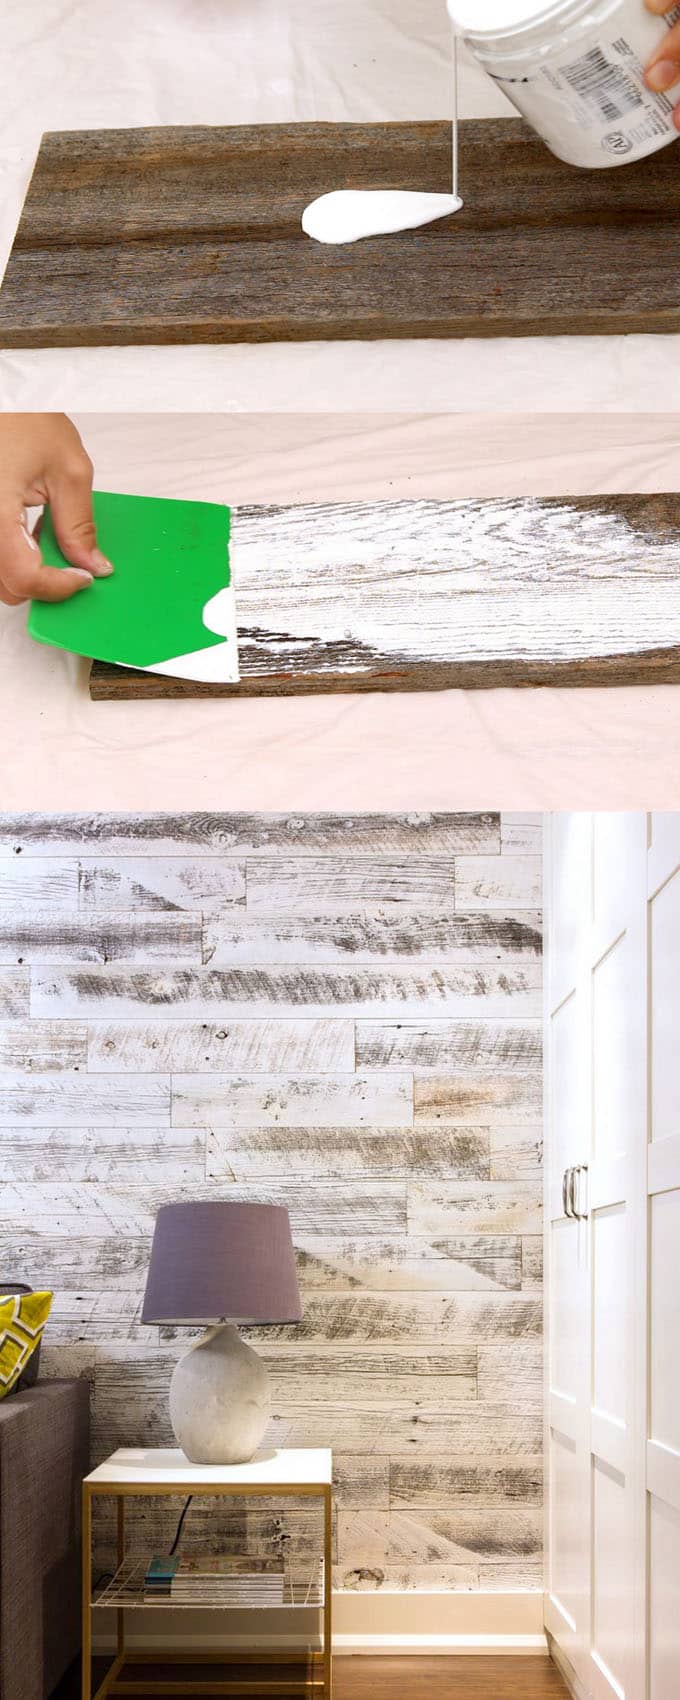
8 . Pouring paint technique
This is a one step method to distress wood and create a beautiful whitewashed barn wood look. It is great for wood with lots of textures on the surface.
I described it in detail in the Ultimate Guide on How to Whitewash Wood
Now you have see all 8 distressing techniques, there are a few basic tips that you can apply to all the techniques:
- If the surface you are painting on has been finished with sealer, wax, or lacquer, it would be helpful to sand it a little so the new paint will adhere better.
- Don’t fear about messing up: you can always paint things over or sand spots to make it look better. And you can mix up these techniques!
- Practice on some scrap wood or on less visible spots, for example the interior face of a cabinet door, before working on a big piece. Or, jump right in! 🙂
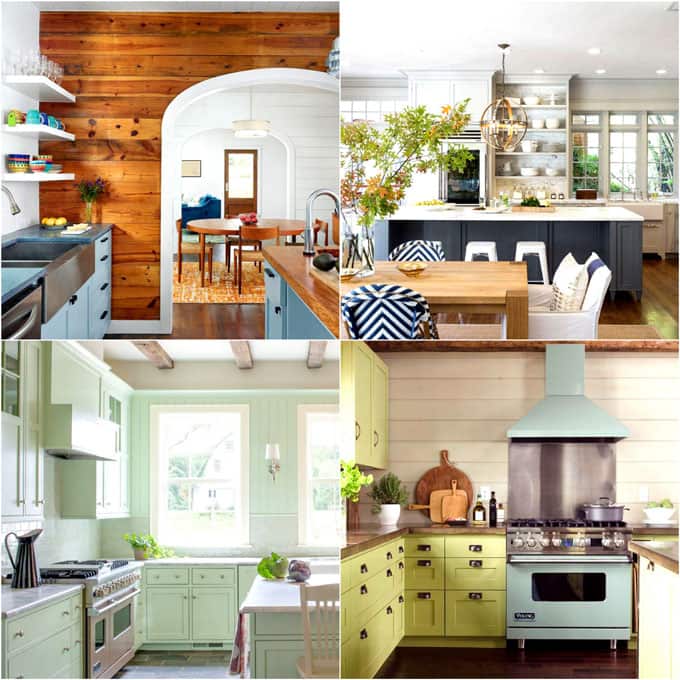
Since we are talking about painting, you may also love some color inspirations here: 25 beautiful kitchen cabinet paint color palettes!
Happy painting! See you next week!


Can you do this for outdoor furniture? If so what kind of weatherproof coating do you recommend? I want to do this to a solid wood potting station. Thank you!
hi Nora! yes you can do this for outdoor furniture. just use outdoor paint that’s fade & water resistant. i don’t think a sealer is that crucial if you use outdoor paint, but you can use a sealer like this 🙂 – https://amzn.to/43bPTg7
Thank you Soo very much for your time to describe all those techniques.. I have learned a lot
thank you Anne! happy painting! 🙂
For my final coat of paint, I’m using a flat white. If I use the candlewax method, will the wax leaves those spots shinier than the paint spots or does the candle wax not affect sheen too much?
hi ryan! the candle wax doesn’t show at all. if you notice them, you can always scrape a little with something like a credit card. 🙂
Great article with very helpful tips. And the photos are amazing, the colors, the vintage style is stunning. Thanks Amanda!
Moaoultumesc foarte interesant!!!
Great tutorials; clear and easy to follow. Thanx.
Will these same techniques work with stains?
hi james, the candle method should work. the only thing is that stains are thin and may seep under the resist materials.
thank you for sharing these ideas! you’re the best!
Thank you for sharing these techniques! I seem to have been making things more comp for icated than necessary and erred by letting mine dry completely. I was treating the pieces too gently while trying to distress them. Lol oxymoron, really.
Refinishing pieces and giving them new life for modern homes is my fun time that I am trying to make enough with which to replace my income. There are soooo many truly gifted and creative people out there.
Hey There. I found your blog on Google. That is a very smartly written article. I’ll be sure to bookmark it and come back to learn extra of your helpful information. Thank you for the post. I’ll definitely come back.
Thank you so much for sharing these tips!
But I have a question about tip with candles .
Could i use chalky paint after candle? Or
It must be acrylics ?
hi fazi, yes chalky paint and many other types of paints will work. 🙂
Here is a little trick I discovered for distressing wood, to give it a real antiqued effect.
After you have lightly sanded the wood, but before you apply a new coat or finish, take a small piece of chain link, like for a padlock and chain, and hit the wood with it a few times in various spots to make some dents. THEN take a barbecue lighter and scorch the dent marks.
Let it cool and apply your new finish. The char marks will show through and look like cigar burns. You cn also use a propane torch with a spreader nozzle
thank you so much larry for sharing these great tips! 🙂
Amazing,I am going to try this technique to my cafe .can please sent me the name of that blue shade color. Thank you
I love the whitewashed look! You are super talented!
Kayla | kaylablogs.com
Hi Ananda, great tips on how to get the paint distressed look the easy way. And I’m going to use them on a pallet shelf project I’ve started today.
thank you rob!! have fun with your project! =)
Loved these techniques. Very interesting the way some were carried out. I will definitely try a couple of these.
hi barbara! have fun and feel free to share your discoveries! 🙂
Wo ist der Link um eine andere Sprache anzuklicken?
Ich spreche kein Englisch
google translate is on the sidebar! =)
Thanks…this is a keeper…everything is one place with great instructions…love the photos. Thanks!
thank you jeanne! happy painting! 🙂
Great techniques with easy to follow instructions. Thanks so very much for sharing.
looks like fun with great results.
What a creative! This looks so wonderful. I love it.
These would make great back drops for my food photography! Pinning for later!
Love the distressed look. Now I just have to try it myself 🙂 I have been meaning to make some photography backgrounds so maybe one day this summer.
This is cool! I have been wanting to distress some old furniture exactly like this. I love the turquoise looking wood pieces you made!
These are all great techniques. I just painted a sign for a thrift store redo and used a brush to lightly go over tacky craft glue. When it was dragged across, it gave the effects of knots from wood and it was completely unexpected!
This is a great, comprehensive list. Thanks!