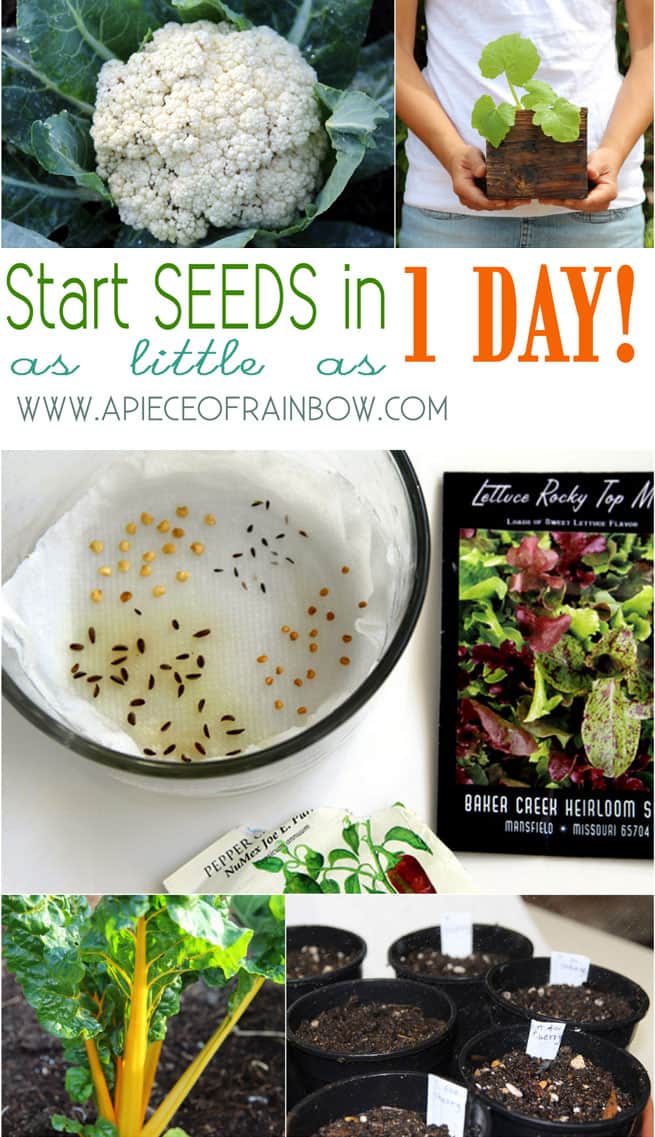
How To Germinate Seeds 3X Faster ( & What NOT to Do)
This is our FAVORITE method to germinate seeds quickly. As passionate gardeners, we have been using it to start seeds for over 10 years! It works great for all herbs, flowers, and vegetables seeds.
For most types of seeds, this is our go-to gardening secret! 🙂 Germinating seeds in 1/3 time with 3X more success, yes, you have to try this!
In this article, we will look at when and how to use this seed germination method. Comparison of two methods: germinating seeds on paper towel vs. germinating seeds in soil, plus some helpful tips we have learned along the way, and readers questions at the end!
Definitely check out the tips, because there is one thing that you should NOT copy what the nurseries do!
*Some resources in article are affiliate links. Full disclosure here.
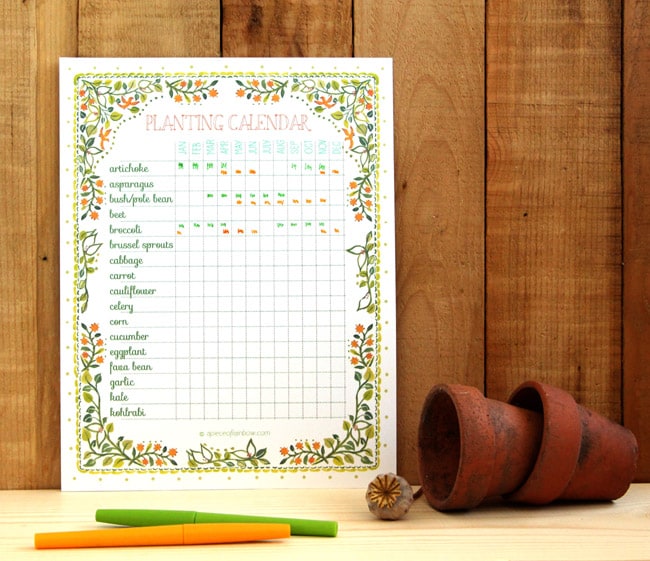
And feel free to download this pretty (and free ) printable planting calendar when you start the seeds! =)
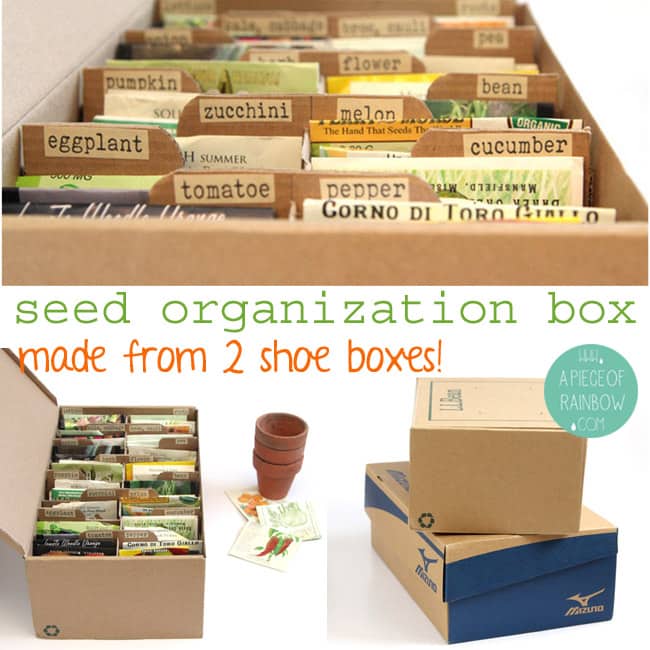
Or make this seed storage box from cardboard boxes! ( Some of the helpful resources are affiliate links. Full disclosure here. )
Our favorite method to germinate seeds super fast with much more success.
We discovered this method to start seeds from an older book- Planning The Organic Vegetable Garden. It made such a huge difference , we just LOVE it and have been using it every year for the last 10+ years! This method is called pre sprouting, or pre germinate in the book.

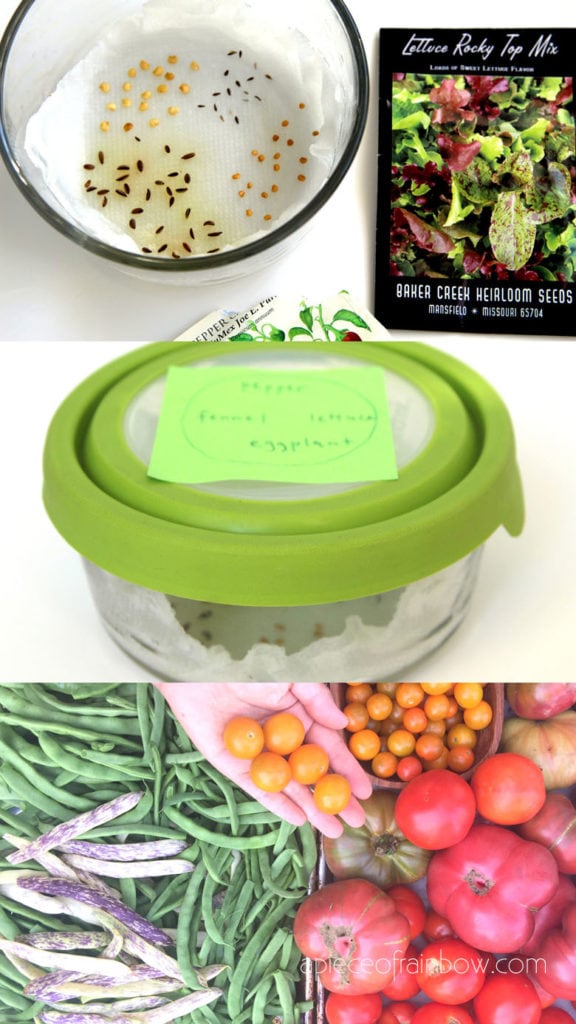
Step one: germinate seeds on paper towel
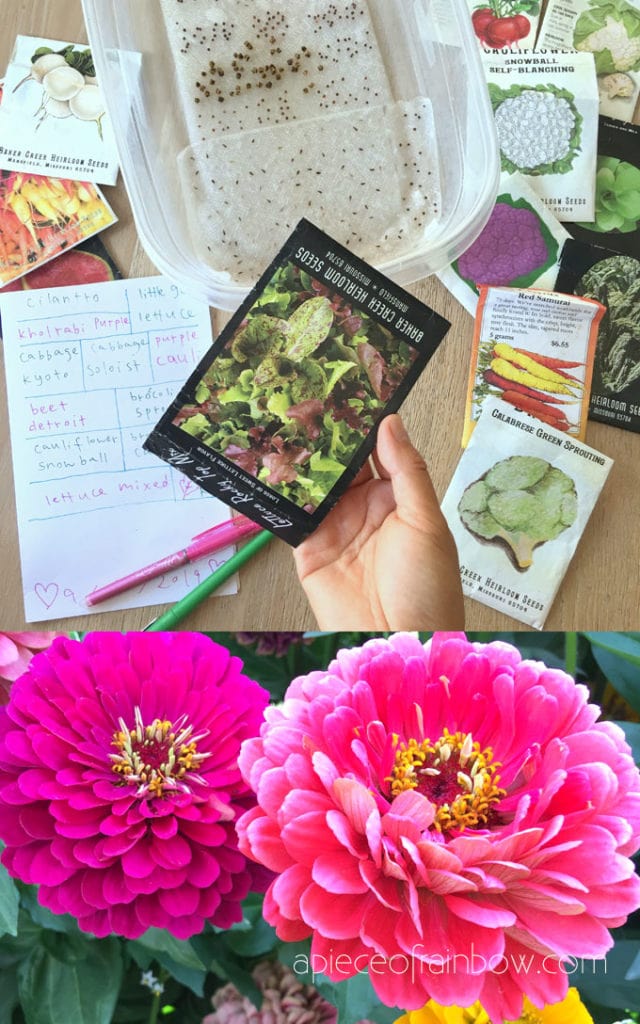
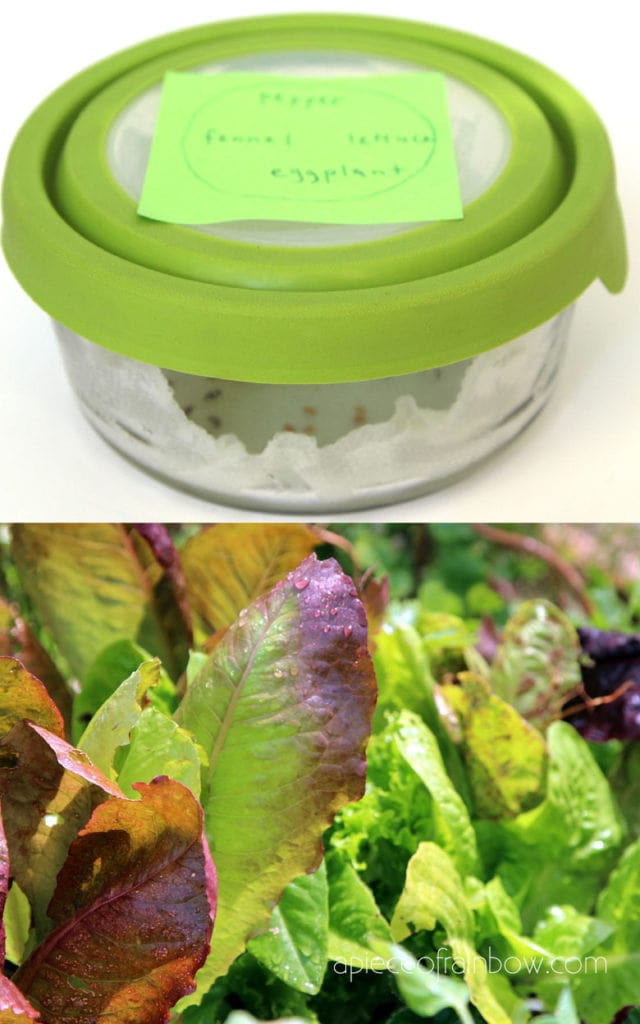
All you need is a plastic or glass container with a tight lid. Clear ones will make it easier to see through, but not required as the seeds don’t need light to send out roots.
Put a piece of paper towel or white paper on the bottom of the container, add water till the paper towel is thoroughly moist, but no puddles of water.
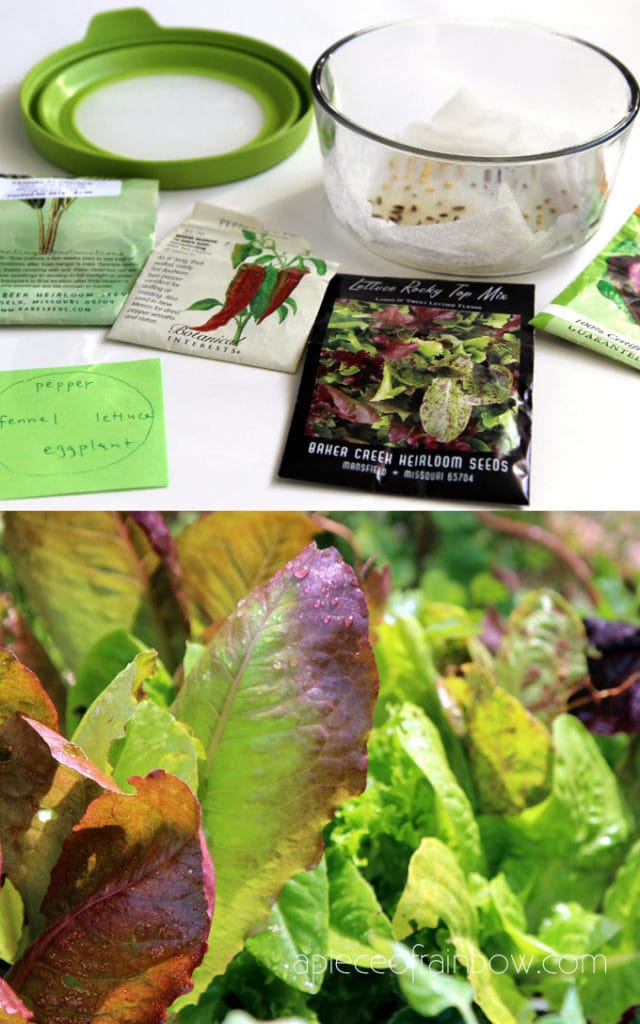
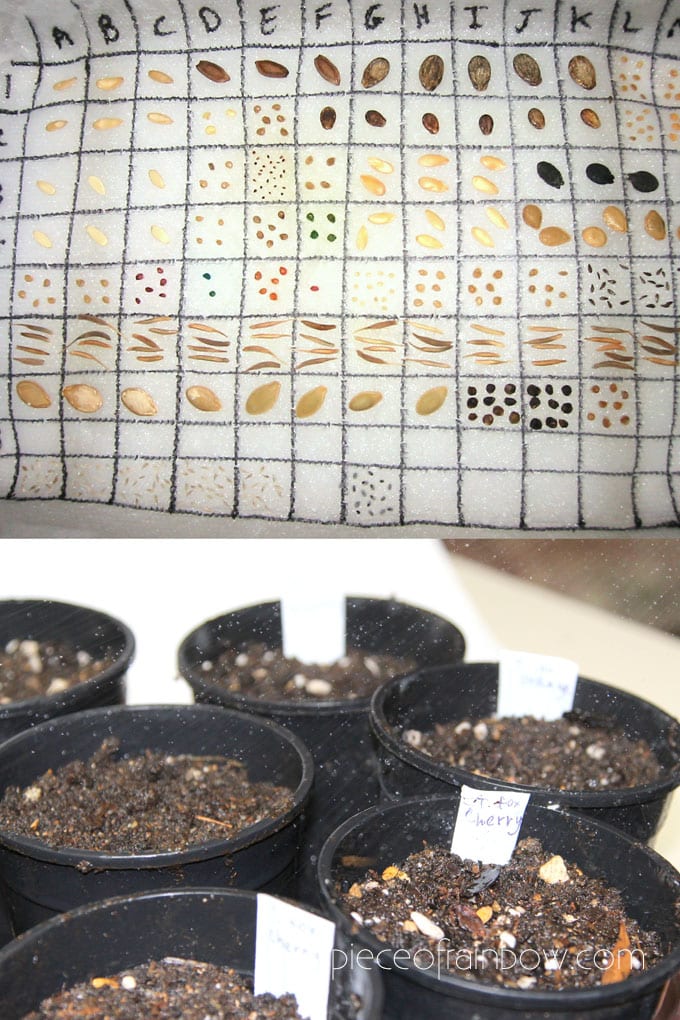
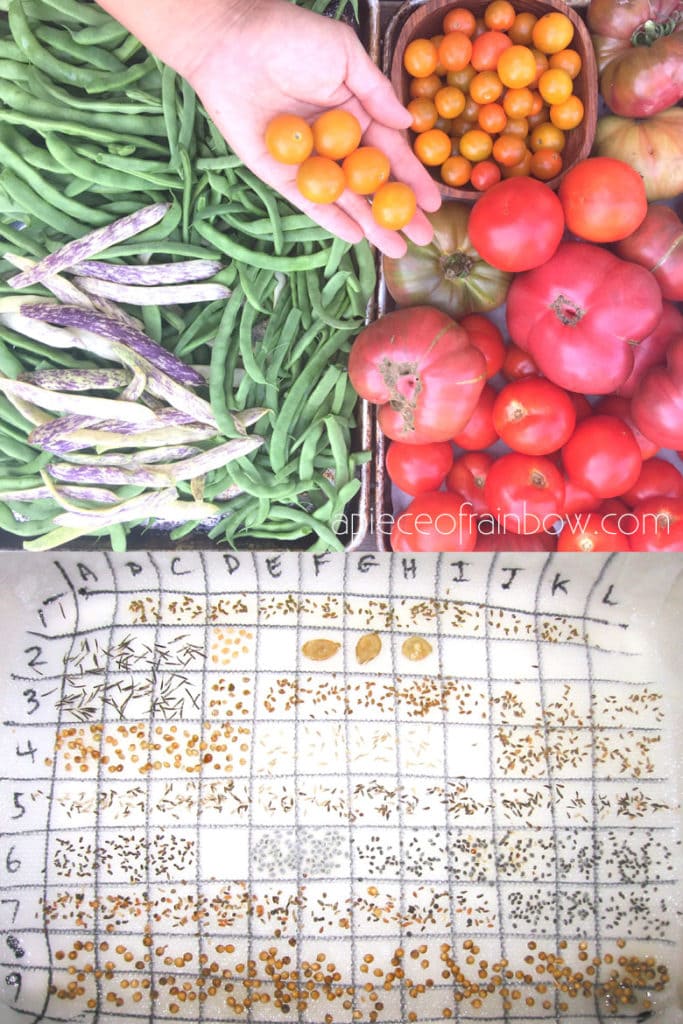
Sprinkle seeds in groups on the damp paper towel, close the lid, and make a note to yourself what type of seeds are where, especially when you have seeds that look identical, for example- broccoli, kale and cauliflower.
Place the container with seeds out of direct sun.
This is very important, because a closed container can get super hot, and all the germinating seeds would die from the heat.
Start checking on them the next day. If the seeds are really fresh, some will germinate in as little as 1 day! The fastest germinating seeds include everything in the cabbage family – bok choi, broccoli, kale, cauliflower etc, and lettuce.
The slowest seeds to germinate are pepper, eggplant, fennel, celery, which may take 5+ days. The rest such as tomato, beets, chard, squash, onions, will take about 3 days.

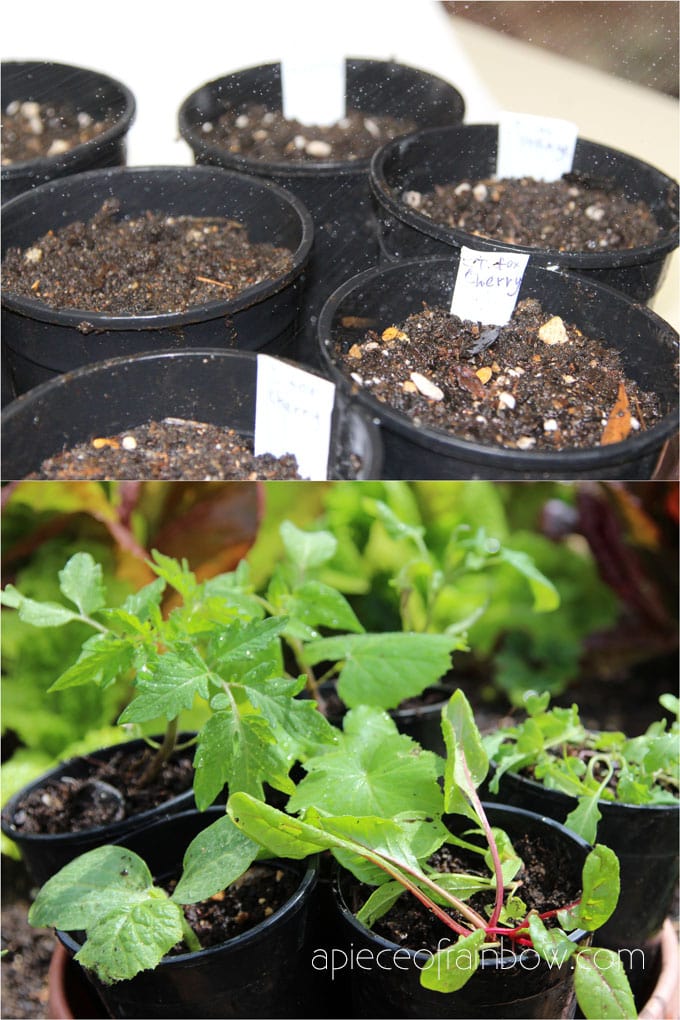
Step 2: Plant germinated seeds in pots
It is important to have pots and soil ready to go.
As soon as you see roots coming out, plant them right away. If the roots get too long, it will be hard to separate the roots from the paper towel. If that happens, just plant the paper towel!
It may seem hard to pick up a tiny seed, but it really is quite easy. you can use a tooth pick, or just your fingers, which is what I do.
Plant them at a depth of 1-2 seeds size ( shallow depth for small seeds, deeper for bigger seeds) , and gently mist them daily for the first week.
We also like to put the pots in saucers and fill the bottom with water till the soil in each pot is saturated, then empty the saucer. It will take a couple of days for the little green leaves to pop out. Now they will need full sun to grow strong and healthy! Below is an extreme example of how much we love this method! =)
If you try these DIY / decor / garden / craft projects, tag us on Instagram at @apieceofrainbow, we would love to see what you create!
Comparison of germinating seed on paper towel method with germinating seeds in soil.
Here’s how to plant seeds in soil, which is what most people do:
In a pot filled with soil, sprinkle some seed, add a thin layer of soil, water thoroughly. And wait.
Sounds familiar? Once you try the paper towel method to start seeds, you will rarely go back to the soil method. Here’s why.
Pros of germinating seed on paper towel:
- Great success rate: Have you ever scatter a whole packet of 300 seeds, just to have 3 plants survive? The reason is soil tend to dry out, while the paper towel maintains consistent moisture level. When we germinate seeds on paper towel, we sow 12 seeds if we want 10 broccoli plants, because almost all of them will germinate and grow. When we get fresh seeds from a good seed company, the germination rate is almost 100%!
- Test old or new seeds: If you have seeds that are a few years old, germinating seeds on paper towel is a great way to quickly test if they are still alive. We have been able to grow healthy plants from cabbage or tomato seeds that are over 5 years old! If you store seeds in a cool and dry place, some can have quite a long life. We also use this technique to find out if the new seeds we got are good quality.
- Faster germination: For example, cabbage seeds take 1-2 days to germinate on paper towel and another 2 days to leaf out, while it can take 2-3 times longer if sown directly in the soil.
Cons of germinating seed on paper towel:
There is one extra step of planting the germinated seed in soil. So if you want to plant a whole field of flowers or vegetables, this method will not be practical.
Now you see the pros and cons, it is very easy to see which method is better for the home gardener!
FAQ and helpful tips we have learned:
90% of the time we use this method to germinate seeds, but we sometimes direct sow seeds that grow super easily and super fast, or less attractive to pests, such as arugula, radishes, or carrots.
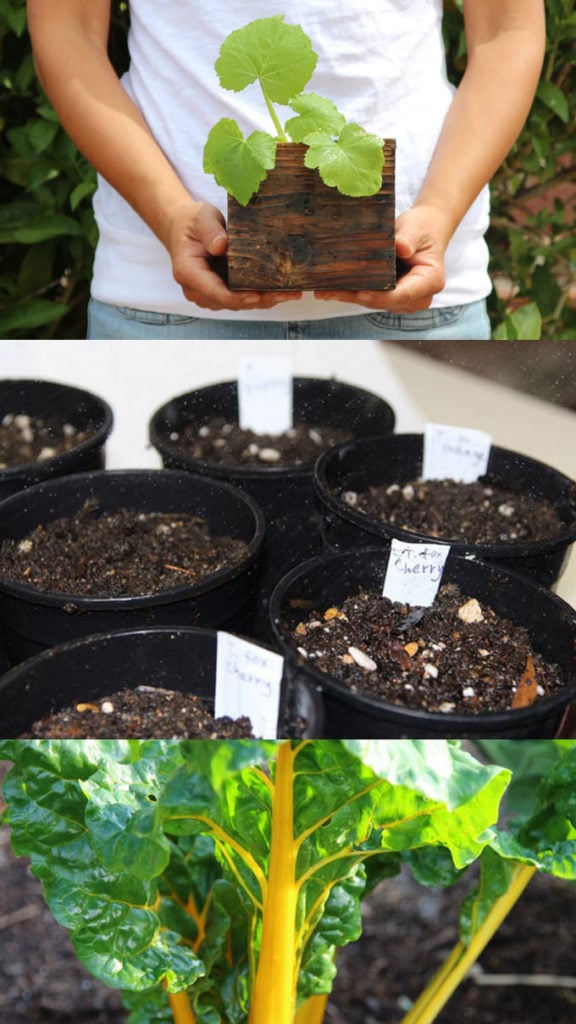
Although you see seedlings grown in six-packs at nurseries, I think it’s a fantasy because those plants were grown in perfect greenhouse conditions with daily fertilizers.
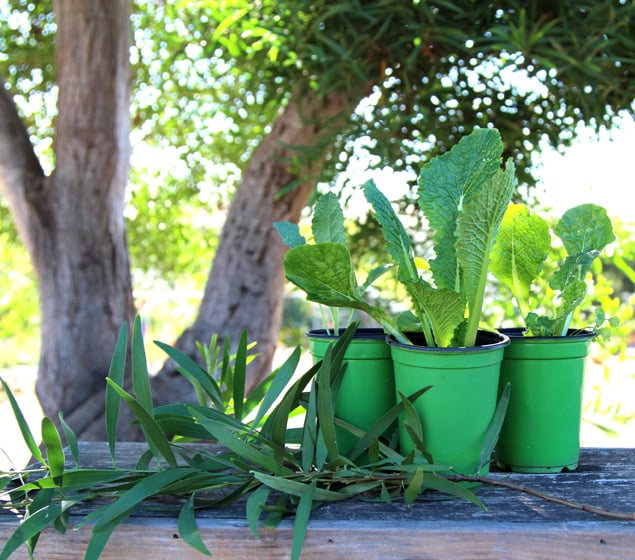
It’s very hard to grow seedlings to that big in a six-pack for home gardeners. We prefer to grow them in 4 inch pots like these, or a long deep planter like in the above image. This allows the seedling to grow quicker and bigger before being transplanted, so they don’t disappear with one bug bite!
Have pots and soil ready! Because the seeds could germinate in as little as one day! If your seeds grow into the paper towel, yes, you can plant the paper towel.
For the first 1-2 weeks after planting them in pots, mist the seedlings or gently water them, and keep the soil moist. They are fragile and can fall over easily!
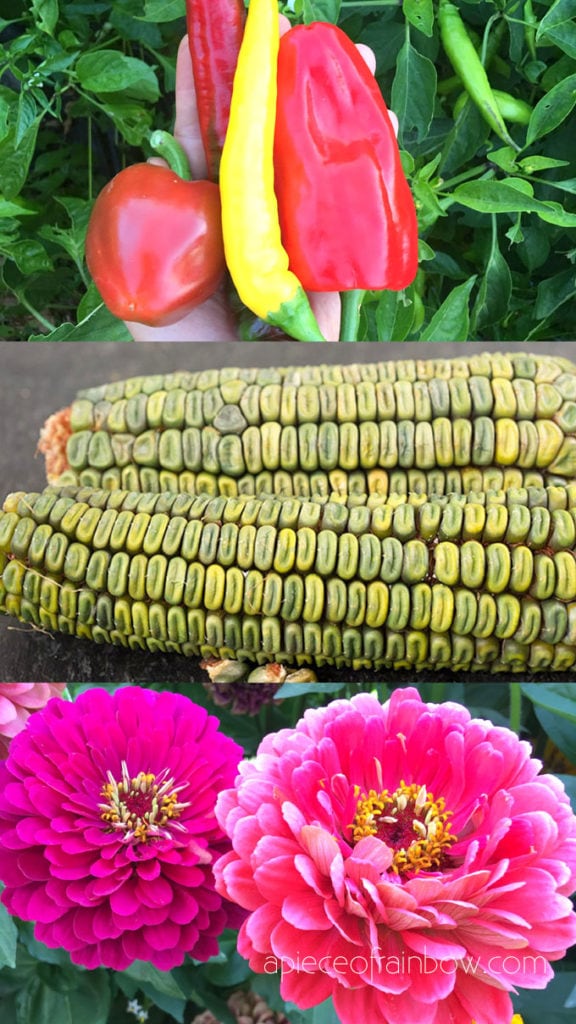
Our favorite seed companies are Baker Creek Seeds, and Everwilde Farms both are started and ran by some great passionate people! Just look at that gorgeous green corn from Baker Creek, irresistible!
If you try these DIY / decor / garden / craft projects, tag us on Instagram at @apieceofrainbow, we would love to see what you create!
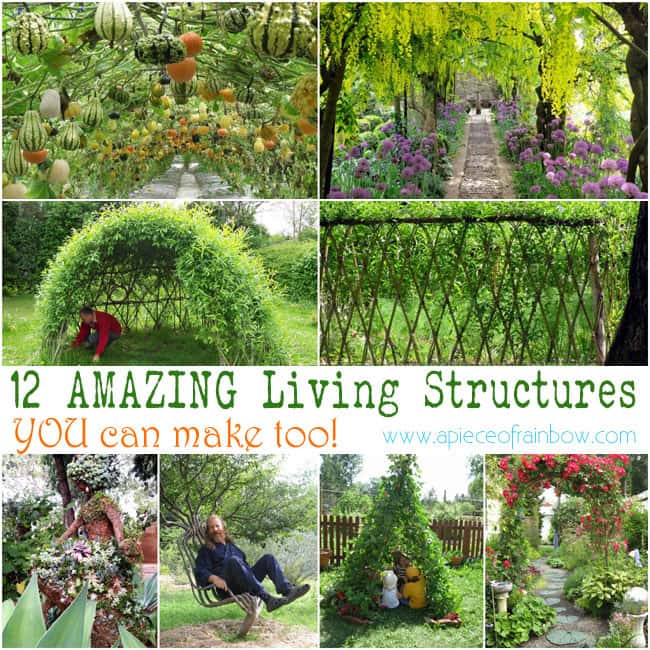
You may also love to see how to create living structures from all these plants here-
Wish you a beautiful and bountiful garden this spring!


Some seeds naturally take longer to germinate, like lemon seeds I’m trying to do.
With the container closed up tightly, don’t you run the risk of growing anaerobic bacteria, especially the seeds that take longer to germinate?
I’m intending to try your method to grow sprouts & shoots for eating directly, not for planting, if that makes a difference.
Thanks!
What a good idea! I don’t have a green thumb at all, but I really like these tips, it makes me want to retry this whole plant growing thing!
Hello and greetings from the UK! I love this method too, so quick and easy! I use coffee filters cut in half rather than kitchen paper as it’s very closely woven so the roots don’t get embedded in the filter. In the UK we have something called an airing cupboard. It’s a cupboard and shelving in which the house boiler is placed. Normally the bedsheets, towels etc are kept in there but because it’s nice and warm (and dark), it’s great for germinating seeds and you don’t need a heat mat! Good article btw. Cheers, Jasmin.
hi Jasmin! thank you for sharing these wonderful ideas! your airing cupboard sound perfect, wish we could have them here! 🙂
So I had a question, If the seeds grow too much in the paper towel what should I do (I think I also might have put too many in one paper towel although they have all germinated)
hi Alesssandro! you can gently tear the piece of paper towel into smaller pieces, and plant the paper towel with seeds on them. 🙂
is it bad to put the seeds in the fridge to make it germinate faster?
Is it bad to put the seeds in the fridge to make it germinate faster? Where would you recommend putting the seeds?
hi Eden! you can store dry seeds in fridge. when you are germinating them, most seeds like temperature above 55, some like it in the 70s. anywhere out of direct sun for the paper towel method, in full sun if planted in soil! 🙂
Thank you!
hi Ananda, we are trying to grow plants and have been given cotton wool pads to grow our seeds on, are there any benefits of cotton wool?
hi madi! cotton wool or cotton balls give the roots more room to grow than paper towel, which makes them fun to use for growing sprouts, or as science observations. 🙂 but if you eventually plant the seeds in soil, then paper towels are just as good! 🙂
You can use an emery / sandpaper or nick the seed ( hard coat ) to allow the water to enter faster. morning glory can take alot longer to sprout & I rub it on sandpaper & soak overnight to get it to sprout in a few days / Not weeks. Soaking seeds overnight or a few hours will also speed germination. Some seeds need to be in the freezer for a few weeks ( if you harvest /gather from plants )
thank you so much Su for sharing these helpful tips! 🙂
so many are a bit confused on what a seed actually is. Most veggies / flowers are Dicot & the 2 leaves are inside the seed until the root pushes it above ground, Monocots have one cotyledon ( 1 leaf) https://www.holganix.com/blog/monocots-vs-dicots-what-you-need-to-know
Hi Ananda, have you tried ridge guard/snake guard (hard shell seeds)using this method? Any tips for those seeds?
Thanks
Hi Sue! You meant Luffa, right? Yes I have, and it works great! Takes longer than zucchini, maybe a week or 2. 🙂
You can use an emery / sandpaper or nick the seed ( hard coat ) to allow the water to enter faster. morning glory can take alot longer to sprout & I rub it with sandpaper & soak overnight to get it to sprout in a few days / Not weeks. Soaking seeds overnight or a few hours will also speed germination.
Thanks for sharing your method!! What kind of marker are you writing with on the paper towel where the ink doesn’t run or separate?
just normal sharpie! sometimes i make a chart on a separate piece of paper so it stays dry 🙂
My late husband and I owned a rose nursery for 20 years. We found that the best plant markers were cut up, light coloured window blinds that people throw away after they’ve broken. Metal ones last the longest but the vinyl or plastic kinds are easier to quickly cut. The downside of those is that they break down faster from UV rays and seasonal temperature changes. I use 2 types of marking methods. There’s a Sharpie brand type of very permanent marker called Industrial Super Permanent Ink marker (item 13801) that “remains permanent under most chemical washes, extreme heat and steam up to 500°F”. They’re fairly widely available and not much more than a regular Sharpie. I’ve had the writing on plant markers last for several years! Roses from seed go through 3-5 years of testing from seedling to field conditions and it’s nice to be able to use the seedlings’ same marker. It’s vital to be able to read the marker for ID, especially when testing hundreds of plants at a time. The 2nd marker I use a lot is a pencil. On window blinds I can make note of germination, potting up, planting out, flowering dates, etc. in pencil easily. It stays put even wet for the season, and I can use an eraser when necessary. Pencils work well on wood markers as well. I find the recycled window blinds to be the best plant markers, full stop! They can be cut as tiny as seed tray markers or as large as outdoor field testing markers and everything in between. Their curved shape makes them easier to get them into any kind of soil without breaking. When I want to easily distinguish between types of plants, bulbs or the area of my property that plants must be grown, I use different coloured blinds as markers. If I don’t have any colourful blinds to use I just run a quick piece of sandpaper up and down some blinds, wipe off the dust, then spray paint them on both sides.
thank you SO much for sharing these great tips! i have never tried to grow roses from seeds. your roses must have been such amazing varieties! 🙂
I put a whole bunch of seeds on a paper towel into a ziploc bag. Can I open it daily to check for germination, close it and repeat daily?
it’s much easier in a container because the seeds can get stuck on the plastic and that would be tricky to get them out of the bag without disturbing any roots.
I used your quick germination method and am delighted it works so well. I’m so excited. Thank you for all your good information. I think you are very creative. I found your instructions for a seed container made from shoeboxes and acted on that idea right away. Sooo muchbetter than throwing them in a box like I had been.
thank you so much Joanne! 🙂 happy planting!!
How many seeds do you put in one container? Also this many sound stupid but you plant the part that grows out in a downward position correct.
hi Katy! i try to keep the seeds 2-3 inches apart, with roots side down! 🙂
Hi Ananda, thanks for the great post.
I have often sprouted mung beans and such for salads, sometimes leaving them so long that leaves appeared on the shoots but never so long for roots to emerge.
You say, “As soon as you see roots coming out, plant them right away.”
Now I’m confused. Shouldn’t that be ‘shoots’ and not ‘roots’?
The picture above ‘Step 2’ shows shoots emerging. I assume that is when to plant them?
Could you please clarify? I’m not an experienced gardener and have just bought some expensive seeds.
Thanks in advance
hi Owen! actually it is “roots” 🙂 some seeds such as cabbage or broccoli will have roots and shoots coming out around the same time, but seeds like cucumber, tomato, pepper etc will sprout roots first, and you want to plant them before the roots get to long and fragile! 🙂
Can’t wait to try it this spring when we start planting! Thanks for the inspiration!
Can sprouted seeds be planted directly outside, if the weather is already warm, daytime is +10+15′ C? we are too late this year, and everyone else has already done it outside, so i decided to do the quick germination, but i am not sure, if transplanting them directly to the garden beds will not kill them. Nights are still quite cold, but the beds could be covered with plastic or smth.
hi! yes you can, just make sure the soil is very moist before you plant, and water them a lot during the first week. good luck! 🙂
I love this! Such an amazing idea. I do have a question. Do I use the dirt from the ground to put in the pot or do I use bag dirt with fertilizer? I just want to do this right.
hi! potting soil sold in bags would help the seedlings grow better. 🙂
would have been nice if you also posted pictures of seeds in paper towel starting to germinate.
there are a few close ups of germinated seeds towards the end! 🙂
After putting germinated seeds into pots, do you keep them inside for a few weeks?
actually in the sun but well watered, because seedlings need bright sun to be healthy!
Do you put them in the sun inside or outside?
outside, unless it’s too cold 🙂
I didn’t read all the comments so maybe someone already does it this way.. Roots grow down, always. So put your seeds in the bottom of a deli container. Put a dry paper towel over. Soak with water, pat down. Then pour out the excess water. Put on the lid. Lift the container every day and see if anything germinated. If you are a few days late and the root tail is getting too long, at least it will not be tangled in the paper towel because that is above and the roots are trying to grow downward. Marilyn Kefirlady. kefirlady.com
thank you so much Marilyn for sharing this great idea! 🙂
Greetings from England! I use coffee filter paper instead of kitchen paper. It’s more finely woven so the roots don’t get tangled up and embedded in the paper. Good article btw.
thank you SO much Jasmin for sharing this great tip! i will have to try that! happy gardening! 🙂
Well I said I wasn’t going to try to plant seeds this year but now I think I will! I never have luck starting from seed but your article gave me hope. Thank you for the great instructions and hopefully I will be able to take pictures of plants I started this way to share with you!
thank you and happy planting Diane!! 🙂
so, we have to actually close the container with lid and make the germinating seed die from the heat? or what do you mean by it?
no, you have to keep the container away from sun so it won’t get too hot, and close the lid till seeds germinate
Hi there, quick question. Might be silly, but thought I would ask. When you are going to move them to the soil, is there a specific way you should put them in the soil? Sprout down/up? Or does it matter? Thanks
Amy
hi amy, i try to put the roots side down , but it really doesn’t matter. they all come up! 🙂
Good article on growing vegetables and flowers from seeds! We just had great success with this method! Keep it up.
when useing paper to germinate cilantro seeds the white item that appears is it a stem or root? When moveing it to container does this stem or root plant up or doem
the first white that appears from each seed is the root. plant it down will be a little easier on the plant, but not required. 🙂
Hi, i have tried your method for succulent seeds (echevaria) and it is day 7 and nothing yet. This is my firsttime planting. Should i discard if nothing grew after 3 weeks? I read online echevaria seeds germinate period is 3 weeks.
hi helen, i have not grown Echeveria seeds, but definitely give it 3 weeks. if the seeds are alive, they will sprout. good luck! =)
When misting the seeds and seedlings DO NOT use tap water! Tap water contains any amount of chlorine, fluorine or chloramines which depress or inhibit plant growth. Use rain water, preferably or mineral water instead.
thank you jeff for sharing your great tips! 🙂 i agree rain water is better than tap water, but if rain water is not readily available, tap water could work too.
Depends on if you have well water or pay by month for water. Tap water provided by cities or county is loaded with bad for the plants additives.
Catch rain water or I guess buy spring water for your plants.
Hi there! So I tried ur method & my seeds are just starting to sprout! (2 dats????) I’m wondering if I am able to plant them directly as is into either my flower beds or the containers I’ll be leaving them in all summer or should I start them in starter pots & transplant in a few weeks? I have calendula,zinnia,aster & nasturtium But would also like to do leafy herbs as well. *It is perfect conditions outside; warm,sunny,waaay past last frost*
Thanks so much!!!
hey! congrats! =) you can plant them directly, make sure to water gently & daily for a week. this trick is super useful too – http://www.apieceofrainbow.com/easy-trick-to-jump-start-your-veggie-garden/
starter pots give you more control though! =)
Hello there!
I was just wondering, if it’s a stupid or good idea to start growing marijuana strain in forests nearby my hometown now..Autumn is coming and the plants won’t be ready to harvest for 100% sure before winter comes… But will they survive the winter and start growing in spring? I probably won’t be around in springtime when i usually would put out the seedlings in the forest.. what do you think?
Thanks for your input!
hi jason, i have not grown marijuana, maybe some active communities online would be better to answer your question. good luck!
Im trying to get a jump start on veggies and flowers. Living in zone 5 many flowers can take some time to look nice. Can you do all seeds this way? Also, if the germination takes 14-21 days how much sooner will they sprout doing it with this method? For example Rosemary can take 14-21 days so what would be a better way to estimate when sprouting will occur?thanks
Chrisele
hi! the seeds will likely germinate in 7-10 days, just make sure they are in the right temperature, not too cold!
Hi Ananda,
I have just tried this method and it is fantastic! 2 packs of Calendula Ivory Princess @ $3 each, I already had the seed raising mix and I have 204 healthy little plants all potted up. It would have cost me at least $84.00 to buy these seedlings and I doubt that my local outlet store would have them in that colour anyway! I will be sprouting all my flower seedlings from now on. Thank you so much for sharing all the great tips with us, I personally find it really inspiring. Cheers!
This is such great information! Can you use this method with flower seeds as well?
yes! 🙂
Do you think this method will work with milkweed? I have asclepias tuberosa seeds and the packet doesn’t say a whole lot.
yes it should work, and if the seeds are no longer live, you will be able to tell in 1-2 wweks!
muchísimas gracias por compartir esto, sembré semillas de lechuga y ya pasaron 10 días y no paso nada. Entonces encontré tu pagina y puse algunas semillas del mismo paquete de semillas de lechuga en papel el día de ayer y hoy ya están geminando, 1 día exacto como pusiste en tu nota.
so glad to hear! remember to plant these in soil in 1-2 days! =)
OMGoodness. Thank you for this terrific article. I just moved to PA and I have a whole bunch of seeds that I have not planted. So this is an awesome help. I will be starting asap. Blessings to you and yours!!
Hey! Thank you very much for these tips! I have a quick question about planting germinated seeds. Would you plant them with the tap root down or up? The tap roots of my beans came out in just a day when I used your method, and now I’m wondering which way I should plant it. I don’t want to ruin my progress. 🙂 Thanks, Sam.
hi sam, roots down or side ways would make it much easier for seeds to come up, but they will make a u-turn and still come up if planted the other way. happy gardening! 🙂
my seedlings are tall and thin and always fall over and die.
Why? What am I doing wrong?
it is most likely that they are not getting enough direct sun. seedlings need at least 5 hours/day of direct sun after being planted in soil!
What about the temperature requirements for germination?
room temp around 65-75 is good for most seeds 🙂
I did this but didnt cover it. They all molded.
if the seeds are no longer alive, they would mold.
I have to try your method of planting seeds… Very interesting.. Hurry spring , I can not wait..
Hi. I read through some of your posts on growing veggies and plants. Brilliant.
however, I do have some query:
1. Growing plants by putting leaves in water method – Does this method work for every vegetable/ fruit/ flowering plant/ non-flowering plant, etc
2. Pre-sprouting Seed method – Do you usually buy new seeds? Can we do this from the fruits that we eat? If yes, does it need some preparation?
hi! here are the answers – 1. no, only certain plants can be rooted in water. 2. you can save seeds, just wash clean and dry them so they won’t mold. some hybrid varieties will not produce the same result when grown.
What do you use to keep insect pests off broccoli, cabbage, and cauliflower?
I use seven dust and it seems to work really good. Just remember when it rains it will wash the seven dust off so just reapply after it rains.
Will this work for Herbs? Such as basil, parsley, sage, rosemary, etc?
yes! the only one i haven’t tried is rosemary. we have so many growing in Cali! =)
I’m going to test some seeds today. Thanks for the information. I’m new to starting a flower garden.
Thank you -i have tried this and it works really well !
Thank you for this. I am going to start mine tomorrow morning.
I’m going to try this for my wild flowers.
What does it mean, depth of one to two seeds?
if a seed is 1mm in size, we would plant it 1mm to 2mm deep. if a seed is 5mm in size, we would plant it 5mm to 10mm deep. hope that helps! =)
Great tips! We just moved to our new home with loads of gardening space and that also made me challenge myself on to gardening! Just one question though I live in The Philippines where it’s basically summer half year and rainy on the other half. Now is summer and based on research I have done it’s best to plant during summer so am very keen to finally start.
Will this pre-sprouting technique work on all types of seeds, specifically herbs?
Thanks so much for this wonderful post and will be checking your site for more gardening tips from now on!
hi sonya! yes this works on all types of seeds! happy gardening! =)
Can’t wait to try this. I have some seeds from last year that I’d like to try. Thank you for the information.
Do they require being left in the dark?
no, daylight is fine!
I read the article 20 minutes ago and now I have started with pepper seeds just now. Wish me luck!
good luck!! peppers take a week to sprout! =)
Interesting and looks like it’ll work well for any place where it’s colder but as I live in Australia at 27 degrees from the equator( equivalent to southern florida) and the temperature is 30 degrees C. (& more) 7 or 8 months a year (80-85F?) and even winter is not too cold, would not suit gardeners here as described mostly as the overriding need is to keep seeds from being cooked or fungi etc. So also putting the seedlings out in the sun quick/ easy to transplant when so small doesn’t impress me and is both more TIME consuming & critical when transplanting from what I can see. My experience is that a holed plastic tray 5cm or 2 inches deep minimum, potting mix/sand/fertilizer pellets works well. Sprinkle seeds on top regularizing the seeds. Sprinkle THINLY with some coarse(friable) sand on top. Place in medium shadow and keep moist with atomizer (some steady light rain works wonders). When seeded ( similar to article times), in due course graduate to bright shadow and to part sun and full sun as required in due course. Transplant plants at something resembling your pleasure. Whisk sand away with a small brush when size or condition permit and re-use sand and your tray for the next batch. I usually get a good result from this. Cheers.
2 quick questions. 1 I have done everything that your article says I am just not sure where to put them after I have don all this I have seen some articles that says to put them in the fridge and some says to leave them out. can you please help? and 2 does this work for starting rose seeds?
Thank You
Shantel
Hi shantel, leave the seeds in room temperature, and it should work for most seeds ! =)
Oh my gosh! I grow all my veggies from seeds but never knew to do this. Our picture window in our Living room has a window ledge on it. Right now I have 3 pots on it. The sun comes through and below it is our radiators. In the winter, my sister says the plants think it’s a green house. Right now on there I have shallots, parsley and I have to replant my basil. Those were growing outside in pots until it got to cold for them so I brought them in. I am going to do this with my basil and maybe some flower seeds too! I am so excited to try this!
thank you gail! feel free to post a photo of your lovely window on my facebook! our home is filled with plants too! =)
Excelent Topics.
I live in south central Texas, summer temps can be 105 with 30s and 40 in winter. We get varied amounts of rain in spring but very little rain in summer.
I would like to know if there’s any hope in growing rhubarb here and if so what tips do you have for getting it started? Love your page! It’s colorful, instructive, easy to read/follow and gives me hope. Thank you………….ls
hi lorri, i did some research, and yes you can grow it through the winter for a spring harvest! =) here’s a a great article http://aggie-horticulture.tamu.edu/travis/wp-content/uploads/2013/06/Rhubarb_Tx_Style2013.pdf
Thank you, thank you, thank you. I bought some heritage seeds and want them to grow quickly. I am armed with more knowledge now. )
thank you carol!! wish you a bountiful garden!! =)
Looks fantastic! Could I incorporate this with the eggshell idea I’ve seen- where people use washed eggshells as their planter pots? I’m thinking one sprouted seedling per eggshell?
thank you cindy! =) eggshells can work as planters, but personally i prefer larger pots like 4″ to 6″. plants tend to stop growing in really small pots, unless being constantly fertilized like how the nurseries do!
Thank you so much for this post! This year will be my first real garden, and I hope to prove that my thumb is, in fact, green! I have a (dumb) question…when you say you plant the seeds 1-2 seeds deep, does that mean whatever size the seed is is how deep you generally plant it?
hi abby! yes, so for example, lettuce seeds need just a sprinkle of soil on top, vs bean seeds can be planted deeper =)
What about the really tiny seeds like Lobelia, ally sum, and impatiens? I have tried finding pelleted seeds for these and can’t find them. Only veggie seeds. Even if you sprinkle them on the wet towel they will be close To each other. Help!
hi vickie, for the super tiny seeds like celery root, lobelia, it will be easier to sprinkle them far part on the towel, and plant the towel. or sow them in a pot and mist daily till they come up!
Thank you for this! I feel like I’m behind so it might help me to not be so late in the planting game. This is my first time not buying plants so I’m hoping you can give me a few more pointers like once they start to sprout green out the soil do I then put them under a grow lamp? I’m worried because April can still be a bit cold here in VA sometimes. How long would you recommend them being under the grow lamp before transplanting outside? Thank you!
hi liz! if it’s a heat loving plant like tomotoe, it should stay inside when temp is below 45. the leafy ones and cabbage family can take a lot more cold. just watch for freezing spells. if it’s nice and sunny, take them outside for the day! =)
Can I plant the paper towel with the sprouted seeds? Will it work like the papers with carrot seeds on it that they sell?
yes angela, but it’s better to plant the seeds just when they send out roots, so the roots won’t get tangled with other seeds =)
If I pre-germinate my seeds, can I them place them in 4″ cowpots with organic potting soil? If so, I would be able to eliminate smaller containers with seed starting mix and a heating pad, correct? Just want to get it right, I have purchased a lot of seeds from Baker’s Creek ( so much to choose from) and don’t want to waste any of these precious seeds, also bought a grow light. So exited, I have wanted to start my gardens from seeds for years, but somehow never have. This is my year! I also have 2 neighbors joining me who also purchased seeds so we will have our own neighborhood co-op with so many delicious varieties!
hi linda! yes 4″ pots are great! however a heating pad can be great for seedlings like tomatoe, pepper, etc. they grow quicker when the soil is warm! baker creek seeds usually germinate 100%, and last a few years, so i would start with only 5-10 seeds each! good luck!!! =)
Can this method also be used for flower seeds? I’m trying seeds for the first time this year in my flower bed’s.
hi susan, yes, any kinds of seeds! =)
Thank you so much for this fabulous information about seed sprouting! We are searching for seeds today and are planning on using your method!
Found you on StumbleUpon! 😉
thank you ashley! wish you a great garden!! =)
Can I just transfer the sprouted seeds to our raised garden beds or do they need to go in little pots first?
yes, as long as you keep the soil really moist till the seedlings come up! =)
Love this! My daughter and I just started our seeds today. They are a older seeds so I’m hoping they are still alive. Fingers crossed!
wish you an amazing garden ashley!! =)
I will be doing a garden of only pots this year for the first time. Would you still transplant to larger pots or start out in a bigger pot size?
hi mindy! yes you can start in bigger pots, as long as you can still mist them and not let the seedlings dry out =)
Sorting my seeds today.
This idea is making me excited for spring to arrive. I love it. Gotta go … off to get my seeds and plastic containers…Thanks!
a beautiful garden to you sandi!! =)
Wow, great idea! We just bought our house last April and had a small garden with plants I bought already started at the farmers market. They did great but we want to use seeds this year! I’ll definitely be doing this! This may be a silly question but do you just place one seed in the starter pots before transplanting? I’ve tried to grow herbs before by just sprinkling a handful of seeds in the pot and it usually doesn’t flourish as I hoped. Thanks!
thank you lauren! for 4″ pots, i put 1 seed if it’s tomato, broccoli, or other plants that take a while to grow or does not like transplanting, such as squash. if it’s onions, lettuce, cilantro, i put 3 or more seeds per pot. =)
I’m not much of a gardening type but I have always dreamed of having an herb garden, I have a lot to learn!
Turquoise and Tortoiseshells
This is awesome! I just moved from New York City so gardening is definitely not my strong point. Hopefully now I can get to know more about planting!
I was just researching this to prepare for our first garden at our new home, this post is perfect. Thank you so much for sharing the great information!
I used to help my dad prepare all the seedlings ready for planting when I was younger! This takes me back a bit! Gorgeous images!
Katie <3
Ooh, I love your idea to jump-start germination! I do have to ask though, have you ever run into trouble with seeds molding instead of sprouting? I’ve had my share of failures, and I’m not really sure what the problem was… :/
xo,
lauriel
EyeForElegance.com
hi lauriel, yes that’s happened before. when seeds mold, it means they are no longer alive!
This is terrific!!!! I pinned it too so I will have it to use as a reference! I don’t know why but seeds always intimidate me LOL
thank you stacy! seeds are great because you can grow so many varieties!
This looks like so much fun! Definitely want to start my own garden now!
have fun selbe! xx
my only difference to this, is to drape clear polythene over the bed supported by small sticks nd held down by stones, it increases heat in the bed and maintains the humidity, works for me every year!!
thank you Andy for sharing this great idea! 🙂
I like various flowers, sensitive plant, elephant ears, oxylis. I love houseplants, but some can be bought in seed form, which I do not have good success with, help! Will your method grow my seeds to plants?
Such an awesome trick! I used to plant a garden every summer growing up!
oh wow this is so cool, I am not much of a gardener so this looks interesting to me
Oh my gosh, this is genius! Pinning this so I don’t forget this amazing trick! Thanks for sharing!
xxo,
Kelly
http://asideofsweet.com
wish you a great garden kelly!!
I taught 4th grade for many years and this was the method I used to pre-sprout. Great post!
kids always know the best ways to do things! =)
This is GENIUS! I can’t wait to try it out!
What a good idea! I don’t have a green thumb at all, but I really like these tips, it makes me want to retry this whole plant growing thing! (:
hope you will! it’s really rewarding! =)
No way!!! I’ve never thought to do this but I definitely am going to now. I love gardening but really dont like the sowing gamble. lol. Planting 300 and only getting 3. Thanks for sharing!
thank you erin! wish you a bountiful garden!! xx
Oh I love this I’m such a green thumb and absolutely love these tips Thankyou
Rosie
http://www.rosedogandco.blogspot.com.au
What a brilliant tip! I love how easy it is to get through your seeds this way- I definitely have a few packs where I’m not sure they’ll ever grow. 🙂
I absolutely love this method – it looks like a great way to be more successful than I have with seeds in the past. Not only that, but I do have some old seeds that I’d love to try this on!
i can just imagine how yummy your garden to table dishes are!! xo
Quick question, should I put the seeds on a dark place? I know you said pit of the sun, but is it ok for the seeds to be exposed to any type light? Thank you. Excellent article.
hi Cathy! it’s totally fine for the seeds to be in bright light. the reason we avoid direct sun is because the sunlight can cause the closed container to get super hot inside! 🙂
Great advice. In my case, it seems like it takes ages for them to grow.
This takes me back to school when we used to grow seeds on kitchen roll! This is such a helpful and insightful post 🙂
hellomissjordan.blogspot.co.uk xx
i love the name “kitchen roll”!! xx
I have ALWAYS wanted to have a small garden, but have not yet taken the plunge! Maybe this year will be the year!
Wonderful post! I have not tried planting from seeds yet but I will this come Spring. In the past I have grown roots from stems and that proved to be gratifying. Your advice will surely come in handy when I have a try at planting seeds 🙂
i am sure your garden will be so lovely cara!!
What an awesome idea! I had a tiny garden last year that I adored, but we’ve since moved to a place where I can have a garden about eight times the size of my former one. I’m SO excited to get started, and I’ll definitely use this method!
wow that’s awesome!! wish you a great garden natalie!!
I wish I had a green thumb and was able to do this!
Kyla Currier, you don’t need a green thumb to have a garden. I don’t have one, my husband did, but we divorced 25 years ago. I learned some essential things from him, that are necessary to having a nice garden. Through trial and error of leaving out the essentials, I have wasted quite a few growing seasons!
If you follow these few simple absolute musts, you will be suprised at how simple growing a garden is:
1.The Seeds: Germinate just like this article explains. Super simple and reliable. Follow package directions for sunliight. (Full sun, or partial,for less- 2. The Soil: And this is crucial. It must be turned over, either by digging, or tilling. First year is there hardest, subsequent years are a matter if turning over with shovel, but 1 St time garden, the rocks need to be picked out , and the clumps of dirt broken up. 3. Also crucial: FERTILIZER… Depends on your soul, but basically, if you can just put some manure on/in (usually your local cow/horse farm will gladly let you take some out of his stalls, take your shovel! free of charge. Dump it on, shovel it under, evenly. Ideally, this should be done in the fall, after your last hardest, so it can break down over the winter, and not risk burning, or over fertilizing. Although I have had to put in in in Spring, just before planting, and I just made sure to use about 1/4 the amount, and get the OLDEST Pooh in the field/barnyard. And my plants loved it. Just make sure to evenly distribute. 4. Water: Make sure to check your soil daily, to make sure it is moist, (if not, water with hose — never during mid day heat), continue to check daily, in the evening or late afternoon until you get accustomed to how your particular soil drains/maintains moisture., due to your climate and rainfall. Be creative, you don’t always have to stand there and hold the house. If soil gets dry, plants WILL wilt and quickly die, also, continued dry soil will effect produce production. Mist plants in the eve, or morn, they will love you! 5. Lastly, everyone’s favorite part of gardening…WEEDING. Pull weeds between rows after watering (roots pull out easily). Stay on top of it, avoid plant killers, it’s poison you will end up consuming. Weeding is necessary to allow sunlight to get to the entire plant. AND, the VEGGIES will get all the watering, instead of the weeds. Same with nutition from your soil. AND THATS IT!! I’m confident if you follow these few simple rules, you will have tastier, healthier food, for a healthier you. Keep in mind kids LOVE learning, and being helpful. Andy if you want to start extra small, you can try some tomato plants in 5 gallon buckets, on your porch. Like I said,cI DO NOT have a green thumb. I don’t even have any house plants, because they tend to die every winter. But girl, I can grow tomatoes, cukes, and squash and zukes as good as anyone, and miles better than the grocery store has to offer!!! It’s prob not too late if you get in in THIS week!! HURRY!!! You’ll be so glad you did, And it is so rewarding, and good for the soul to get DOWN TO EARTH!!! ☀️🌱😊
thank you so much Ronni for sharing so many great gardening tips! 🙂
thank you for providing this in depth description and response of what to look for when begginning techniques outlined in the article. you rock!!
Just found this and am using it ASAP. Really a great TBT 1st grade with the lima beans : )
This is really cool! I will have to add some planters to my balcony this season!
xoxo
Lee Anne
http://lifeinatx.com/
Ananda – this is AWESOME information!! Wish I’d known this years ago since I grow all my veggies from seed. THANK YOU!!
with your GREEN thumb yours will start in 1 hour i bet! =)
Wow! This is a really in depth blog post! I had no previous knowledge of seeds, so this is very helpful!
if you use a weak tea solution, (dilluted unsweetened tea) it provides a boost to starting seeds as well combined with this method.
Please can’t understand chart that says just to show how much we love ABC stands for what and 123 stands for what.. Thanks for you in advance for your reply
The chart you referred to is the one with seeds? I think that’s just a way of remembering which seeds are where. You can make your own grid then keep track of what you put in each part of the grid. EXAMPLE: A5 is where you put the tomato seed, c7 is where the cucumbers are.